
1. הקדמה
This manual provides detailed instructions for the installation, operation, and maintenance of your Akozon Digital Programmable Timer. Please read this manual carefully before use to ensure proper function and safety.

Figure 1: Akozon Digital Programmable Timer 12V
2. המוצר נגמרview ותכונות
The Akozon Digital Programmable Timer is a weekly programmable electronic timer designed for precise control of various electrical equipment. Its robust design and advanced features ensure reliable operation.
- בקרה אוטומטית: Automatically turns electrical equipment on and off according to preset schedules.
- דיוק גבוה: Equipped with a high-precision chip for accurate timing.
- תכנות שבועי: Supports advanced programming for up to one week in advance.
- תוכניות מרובות: Features 16 ON/OFF settings (programs) for daily or weekly scheduling.
- כוח גיבוי: Integrated high-performance rechargeable battery maintains time display and stores data for over 12 months during power outages.
- בנייה עמידה: Housing made of hard, durable plastic for extended lifespan.
- תצוגת LCD: Clear LCD for easy viewing of time and program status.
- התקנת מסילת DIN: Designed for convenient installation on a DIN rail.
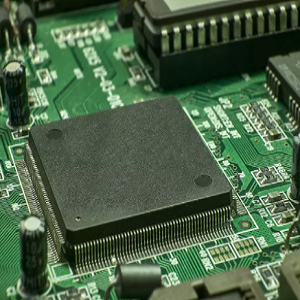
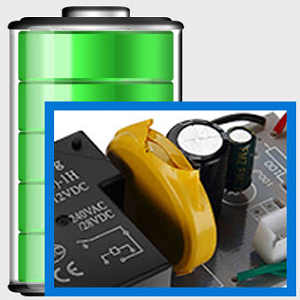
Figure 2: Internal components showing the high-precision chip and rechargeable backup battery.
3. מפרטים
| מספר דגם | Akozonqegcgmk04u-01 |
| קלט כרךtage | 12V DC/AC |
| קיבולת פלט | 25(16)A, 240VAC |
| צריכת חשמל | <1W |
| טווח תזמון | דקה אחת עד 1 שעות |
| תוכניות | 16 ON/OFF settings (daily/weekly) |
| שגיאת תזמון | <±2 seconds/day |
| זיכרון הפסקת חשמל | >12 months (with internal rechargeable battery) |
| טמפרטורת הפעלה | -20 מעלות צלזיוס עד 55 מעלות צלזיוס |
| שיטת התקנה | מסילת DIN |
| מידות (בערך) | 36 מ"מ (W) x 86 מ"מ (H) x 65 מ"מ (D) |
| משקל (בערך) | 120 גרם |
| לְהַצִיג | LCD |

איור 3: מידות מוצר מפורטות ומפרטים עיקריים.
4. מידע בטיחות
- נתק תמיד את החשמל לפני התקנה או תחזוקה.
- יש לבצע את ההתקנה על ידי חשמלאי מוסמך כדי למנוע התחשמלות או נזק למכשיר.
- ודא את נפח הקלטtage matches the timer's specifications (12V DC/AC). Connecting to incorrect voltage עלול לגרום נזק ליחידה.
- Do not expose the device to excessive moisture or extreme temperatures outside the specified operating range.
- Do not disassemble the timer; refer servicing to qualified personnel.
5. התקנה והתקנה
5.1 DIN Rail Installation
The timer is designed for easy installation on a standard 35mm DIN rail. Simply clip the timer onto the rail in your distribution box.

איור 4: דוגמהample of the timer installed on a DIN rail within a distribution box.
5.2 הוראות חיווט
Refer to the wiring diagram below for correct connection. Ensure all connections are secure and comply with local electrical codes.
- טרמינלים 1 ו-2: Power input (12V DC/AC).
- טרמינלים 3, 4, 5: Output contacts.
- 3: סגור בדרך כלל (NC)
- 4: נפוץ (COM)
- 5: פתוח בדרך כלל (לא)

Figure 5: Detailed wiring diagram showing connections for power input and output contacts.

איור 6: דוגמהamples of wiring methods, including direct load connection and connection via a contactor.
6. הוראות הפעלה
6.1 Initial Setup and Unlocking
- Upon first use, connect the timer to power (12V DC/AC).
- הקש על אִתחוּל button to clear all previous settings and initialize the timer.
- The timer display may be locked. To unlock, press the C/R button four times. The lock icon will disappear from the display. If no operation occurs for 15 seconds, the timer will automatically lock again.
6.2 הגדרת השעה והיום הנוכחיים
After unlocking, set the current time and day:
- הקש על P button (Program button) once.
- הקש על D+ button to set the current day of the week (MO, TU, WE, TH, FR, SA, SU).
- הקש על H+ לחצן כדי להגדיר את השעה הנוכחית.
- הקש על M+ לחצן כדי להגדיר את הדקה הנוכחית.
- הקש על P לחץ שוב על הכפתור כדי לצאת ממצב הגדרת זמן.

איור 7: תקריב view of the timer's control buttons.

Figure 8: Explanation of button functions and display elements, including day, hour, minute, and reset.
6.3 שליטה ידנית
הקש על ידני C/R button to cycle through manual control modes:
- עַל: Output is continuously ON.
- אוטומטי: Timer operates according to programmed schedules.
- OFF Output is continuously OFF.
לִבחוֹר AUTO for the timer to follow your programmed settings.
7. Programming ON/OFF Schedules
הטיימר תומך בעד 16 תוכניות הפעלה/כיבוי. בצעו את השלבים הבאים כדי להגדיר את לוחות הזמנים הרצויים:
- הקש על P כדי להיכנס למצב תכנות. הצג יציג "1 ON".
- לִלְחוֹץ D+ כדי לבחור את היום/ים עבור תוכנית זו. ניתן לבחור יום בודד, ימי חול, סופי שבוע או את כל הימים.
- לִלְחוֹץ H+ כדי להגדיר את שעת ההפעלה.
- לִלְחוֹץ M+ כדי להגדיר את דקת ההפעלה.
- לִלְחוֹץ P שוב. התצוגה תציג "1 OFF".
- לִלְחוֹץ D+ to select the day(s) for this OFF program (usually the same as ON, but can be different).
- לִלְחוֹץ H+ to set the OFF hour.
- לִלְחוֹץ M+ to set the OFF minute.
- Repeat steps 1-8 for additional ON/OFF programs (up to 16). Press P to advance to the next program number.
- כדי לצאת ממצב תכנות, לחץ על ידני C/R button. Ensure the timer is set to AUTO מצב לביצוע תוכניות.
Note: If you need to cancel a program, press the C/R כפתור בזמן viewing the specific ON or OFF program. This will clear the settings for that program.
8. יישומים
The Akozon Digital Programmable Timer is versatile and can be used in various applications, including:
- Controlling lamps and lighting systems (e.g., streetlights, garden lights, neon signs).
- Managing water heaters and preheaters.
- Automating agricultural facilities (e.g., irrigation systems).
- Controlling broadcasting equipment.
- Scheduling household appliances.
- Operating sprayers and bottling equipment.

איור 9: דוגמהamples of environments where the timer can be used, such as controlling outdoor lighting and industrial equipment.
9. תחזוקה
- Keep the timer clean and free from dust. Use a soft, dry cloth for cleaning.
- אין להשתמש בחומרי ניקוי שוחקים או ממסים.
- ודא אוורור נאות סביב המכשיר כדי למנוע התחממות יתר.
- The internal battery is designed for long-term backup. If the timer consistently loses time or program settings after a power outage, the internal battery may need professional inspection.
10. פתרון תקלות
| בְּעָיָה | סיבה אפשרית | פִּתָרוֹן |
|---|---|---|
| התצוגה ריקה. | No power supply or internal battery depleted. | Check power connections. Allow time for the internal battery to charge (connect to power for several hours). |
| הטיימר לא מגיב ללחיצות על הכפתורים. | Timer is locked. | הקש על C/R button four times to unlock. |
| תוכניות לא מבוצעות. | הטיימר אינו במצב אוטומטי. הגדרות התוכנית שגויות. | לִלְחוֹץ ידני C/R עד שיוצג "AUTO".view ולתקן את הגדרות התוכנית. |
| זמן או הגדרות אובדים לאחר כיבוי חשמלtage. | Internal backup battery is not charging or is depleted. | Ensure the timer is connected to power for sufficient time to charge the internal battery. If the issue persists, contact customer support. |
| Output is always ON or OFF, ignoring programs. | הטיימר נמצא במצב הפעלה או כיבוי ידני. | לִלְחוֹץ ידני C/R עד שיוצג "AUTO". |
11. אחריות ותמיכה
Akozon products are manufactured to high-quality standards. For warranty information or technical support, please refer to the contact details provided with your purchase or visit the official Akozon webאֲתַר.
אנא שמור את הוכחת הרכישה שלך עבור תביעות אחריות.