
1. המוצר נגמרview
The DIGOO External Sensor is designed to provide accurate outdoor temperature and humidity readings to compatible DIGOO weather stations. This sensor operates wirelessly, transmitting data to your main weather station unit, allowing you to monitor environmental conditions remotely. It is specifically designed for use with DIGOO weather station models TH11300, TH8380, TH1981, and TH8805.

איור 1: DIGOO External Sensor shown with examples of compatible weather station displays. The sensor is a sleek, black rectangular unit with the DIGOO logo.
2. התקנה
2.1 התקנת סוללה
The external sensor requires batteries for operation. Ensure you use fresh batteries of the correct type (typically AA or AAA, refer to the battery compartment for specifics).
- אתר את מכסה תא הסוללה בגב החיישן.
- החלק או שחרר את המכסה כדי לפתוח את התא.
- הכניסו את הסוללות תוך הקפדה על הקוטביות הנכונה (סימוני + ו-).
- Replace the battery compartment cover, ensuring it is securely closed to protect against moisture.
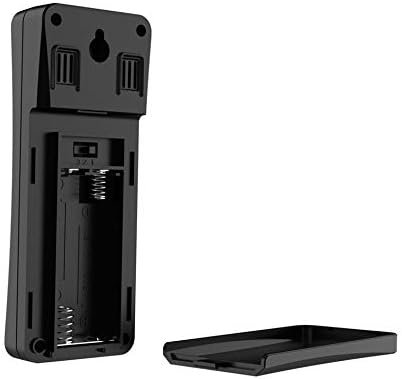
איור 2: אֲחוֹרִי view of the DIGOO External Sensor with the battery cover removed, showing the battery slots and a channel selection switch.
2.2 צימוד עם תחנת מזג אוויר
For the external sensor to transmit data to your weather station, it must be paired. This process typically involves setting both devices to the same communication channel.
- On the back of the external sensor, locate the channel selection switch (usually labeled 1, 2, or 3). Select a channel.
- On your DIGOO weather station, navigate to the sensor pairing or channel selection settings. Set the weather station to the אותו ערוץ as selected on the external sensor.
- Place the sensor and the weather station in close proximity (within a few meters) during the initial pairing process.
- Allow a few minutes for the devices to synchronize. The weather station display should show readings from the external sensor once connected.
2.3 המלצות מיקום
Optimal placement ensures accurate readings and reliable signal transmission.
- מיקום חיצוני: Place the sensor outdoors in a shaded area, away from direct sunlight, which can cause artificially high temperature readings.
- הגנה מפני אלמנטים: While designed for outdoor use, protect the sensor from direct rain and heavy snow to prolong its lifespan. A sheltered spot under an eave or porch is ideal.
- אוורור: Ensure good airflow around the sensor for accurate humidity readings. Avoid enclosed spaces.
- טווח אותות: Place the sensor within the specified wireless range of your weather station (typically up to 30-100 meters, depending on obstacles). Walls and electronic devices can interfere with the signal.
- הַרכָּבָה: Use the integrated hanging hole on the back of the sensor to mount it securely on a wall or post.
3. הוראות הפעלה
Once successfully paired and placed, the DIGOO External Sensor will automatically begin transmitting temperature and humidity data to your compatible DIGOO weather station. The sensor continuously monitors the outdoor environment and sends updates at regular intervals (e.g., every 30-60 seconds).
- The weather station will display the received data, often alongside indoor readings.
- No further user interaction is typically required for daily operation after initial setup.
- Refer to your specific DIGOO weather station manual for details on how to view and interpret the external sensor data on its display.
4. תחזוקה
4.1 החלפת סוללה
When the batteries are low, your weather station may indicate a low battery icon for the external sensor, or the sensor may stop transmitting data. Replace batteries as follows:
- פתחו את תא הסוללות כמתואר בסעיף 2.1.
- הסר את הסוללות הישנות.
- הכנס סוללות חדשות, תוך הקפדה על קוטביות נכונה.
- סגור היטב את תא הסוללות.
- The sensor should automatically re-establish connection with the weather station. If not, re-pair as per Section 2.2.
4.2 ניקוי
To maintain optimal performance, periodically clean the sensor.
- נגבו את החלק החיצוני של החיישן בעזרת מטלית רכהamp בַּד.
- אין להשתמש בחומרי ניקוי שוחקים או ממסים, מכיוון שאלה עלולים לפגוע ב-casing או רכיבים פנימיים.
- Ensure no water enters the battery compartment or sensor openings.
5. פתרון תקלות
-
Sensor not connecting or no data displayed:
- בדוק אם הסוללות מותקנות כראוי ושהן טעונות מספיקות. החלף במידת הצורך.
- Ensure the external sensor and weather station are set to the same channel (refer to Section 2.2).
- Move the sensor closer to the weather station to rule out range issues or signal interference.
- Restart both the sensor (by removing and reinserting batteries) and the weather station.
- Avoid placing the sensor near large metal objects or other electronic devices that might cause interference.
-
קריאות טמפרטורה/לחות לא מדויקות:
- Verify the sensor is placed in a shaded area, away from direct sunlight or heat sources (e.g., vents, walls that absorb heat).
- Ensure the sensor has adequate ventilation and is not in an enclosed space.
- Check for any obstructions blocking the sensor's vents.
- Compare readings with another reliable thermometer/hygrometer in the same location to confirm inaccuracy.
6. מפרטים
- מותג: DIGOO
- דֶגֶם: חיישן חיצוני
- תְאִימוּת: DIGOO Weather Stations TH11300, TH8380, TH1981, TH8805
- תדר אלחוטי: 433 מגה-הרץ
- מקור כוח: Batteries (type to be confirmed in battery compartment)
- ASIN: B07DF9XK7Q
- תאריך זמין ראשון: 30 בנובמבר 2019
7. אחריות ותמיכה
Specific warranty information for this DIGOO External Sensor is not available in the provided product details. For warranty claims, technical support, or further assistance, please refer to the documentation included with your original purchase or contact DIGOO customer service directly through their official webהאתר או הקמעונאי שבו המוצר נרכש.