
1. הקדמה
The EPEVER VS6048AU is a 60A common positive Pulse Width Modulation (PWM) solar charge controller designed for 12V, 24V, 36V, and 48V solar panel power systems. It incorporates advanced digital techniques to ensure efficient and reliable battery charging and load management. This controller is suitable for various applications, including solar home systems, traffic signals, solar street lights, and solar garden lamps.
תכונות עיקריות:
- 3-Stagטעינת PWM חכמה: Bulk, Boost/Equalize, Float.
- Supports three battery charging options: Sealed, Gel, and Flooded.
- Integrated LCD display for dynamic monitoring of operating data and working conditions.
- Dual USB output ports (Max. 5VDC/2.4A) for charging electronic devices.
- User-friendly button settings for comfortable and convenient operation.
- Multiple load control modes for versatile application.
- Energy statistics function.
- פונקציית פיצוי טמפרטורת הסוללה.
- Extensive electronic protections for system safety.

Image 1.1: The EPEVER VS6048AU Solar Charge Controller shown in various application settings, including home power supply, street lighting, monitoring, and green energy solutions.
2. מידע בטיחות
אנא קרא בעיון את כל ההוראות והאזהרות לפני ההתקנה וההפעלה. אי הקפדה על הוראות אלה עלולה לגרום להתחשמלות, שריפה או פציעה חמורה.
- Ensure all wiring is correctly polarized and securely connected to prevent damage to the controller and other components.
- יש לנתק תמיד את הפאנל הסולארי ואת הסוללה לפני התקנה או כוונון הבקר.
- Install the controller in a well-ventilated area, away from flammable gases, moisture, and direct sunlight.
- Use appropriate circuit breakers or fuses for the solar panel, battery, and load circuits.
- אין לפרק או לנסות לתקן את הבקר בעצמך. פנה לאנשי מקצוע מוסמכים לקבלת שירות.
- יש ללבוש ציוד מגן אישי מתאים, כולל הגנה על העיניים, בעת עבודה עם סוללות.
- הרחיקו ילדים מרכיבי מערכת האנרגיה הסולארית.
Electronic Protections: The VS6048AU controller includes comprehensive electronic protections:
- PV הגנת קוטביות הפוכה
- סוללה מעל כרךtagהגנה אלקטרונית
- הגנה מפני פריקת סוללה
- הגנת קוטביות הפוכה של הסוללה
- הגנה מפני התחממות יתר של הסוללה
- הגנת עומס יתר
- עומס הגנת קצר חשמלי
- הגנה מפני התחממות יתר של הבקר

Image 2.1: Visual representation of the electronic protections integrated into the controller and a basic solar power system connection diagram.
3. המוצר נגמרview
Familiarize yourself with the components and interface of your EPEVER VS6048AU solar charge controller.

תמונה 3.1: חזית view of the EPEVER VS6048AU controller with key components labeled.
- תצוגת LCD: Shows system status, parameters, and error codes.
- לחצן MENU: Used to navigate through different display interfaces and enter/exit setting modes.
- לחצן SET: Used to confirm selections, modify parameters, and clear data.
- USB Output Ports (5VDC/2.4A): לטעינת מכשירים אלקטרוניים חיצוניים.
- Temp. Sensor Port (RTS Port): Connects to the optional remote temperature sensor for accurate battery temperature compensation.
- טרמינלים פוטו-וולטאיים: חיבור למערך פאנלים סולאריים.
- הדקי סוללה: חברו לבנק הסוללות.
- מסופי עומס: התחבר לעומסי DC.
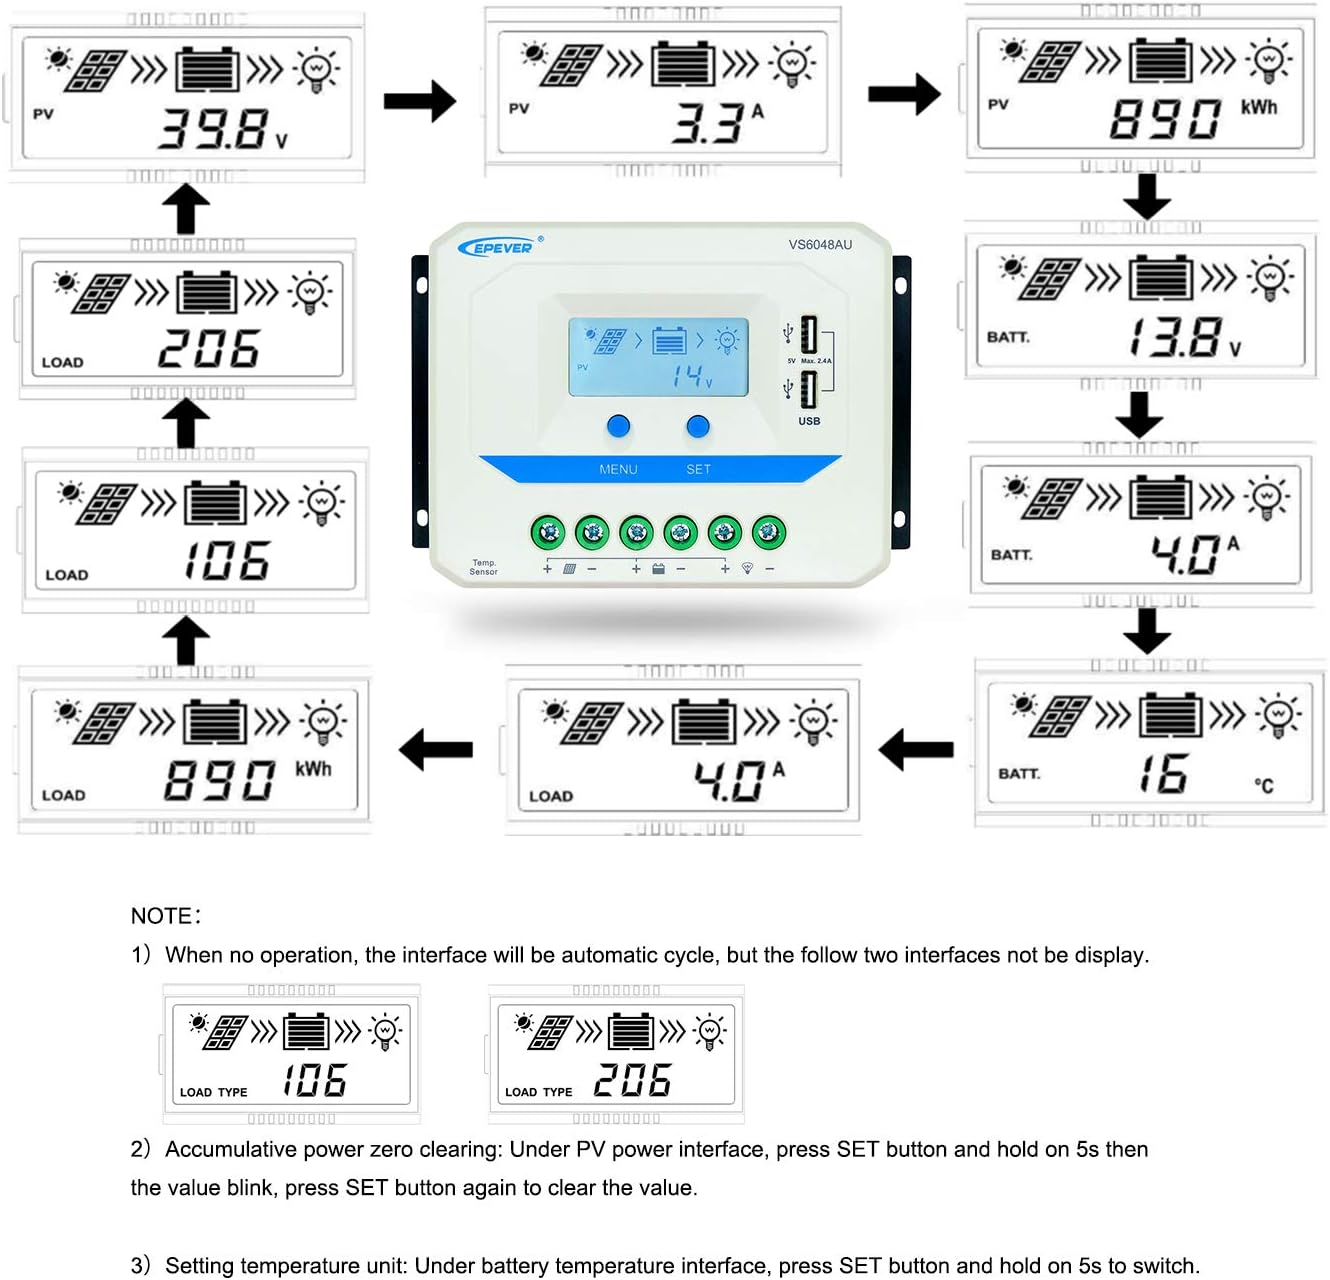
Image 3.2: Dimensions of the EPEVER VS6048AU Solar Charge Controller (approximately 21.4 cm x 12.87 cm x 7.22 cm).
LCD Display Status Description
The LCD display provides visual feedback on the system's operational status. Refer to the table below for icon meanings:

Image 3.3: Detailed description of the icons displayed on the VS6048AU LCD screen.
4. התקנה והתקנה
בצע את השלבים הבאים להתקנה נכונה של בקר הטעינה הסולארי שלך. ודא שכל מקורות החשמל מנותקים לפני ביצוע חיבורים כלשהם.
רצף חיווט:
- חבר את הסוללה: Connect the battery to the controller's battery terminals. Ensure correct polarity (positive to positive, negative to negative). The controller will detect the battery voltage.
- חבר את העומס: חבר את עומס הזרם הישר (DC) להדקי העומס של הבקר. ודא קוטביות נכונה.
- חבר את הפנל הסולארי: Connect the solar panel array to the controller's PV terminals. Ensure correct polarity.
חָשׁוּב: Always connect the battery first, then the solar panel, and finally the load. Disconnect in the reverse order: load, then solar panel, then battery.
מדריך וידאו להתקנה:
Video 4.1: An official EPEVER video demonstrating the connection process for the solar charge controller, including battery and load connections. This visual guide can assist with proper installation.
5. הוראות הפעלה
The EPEVER VS6048AU controller features an intuitive LCD display and button interface for monitoring and configuration.
ניווט צג LCD:
When no operation is performed, the LCD interface will automatically cycle through various display screens, showing real-time data such as PV voltage, זרם, עוצמת סוללהtagה, ומצב טעינה.
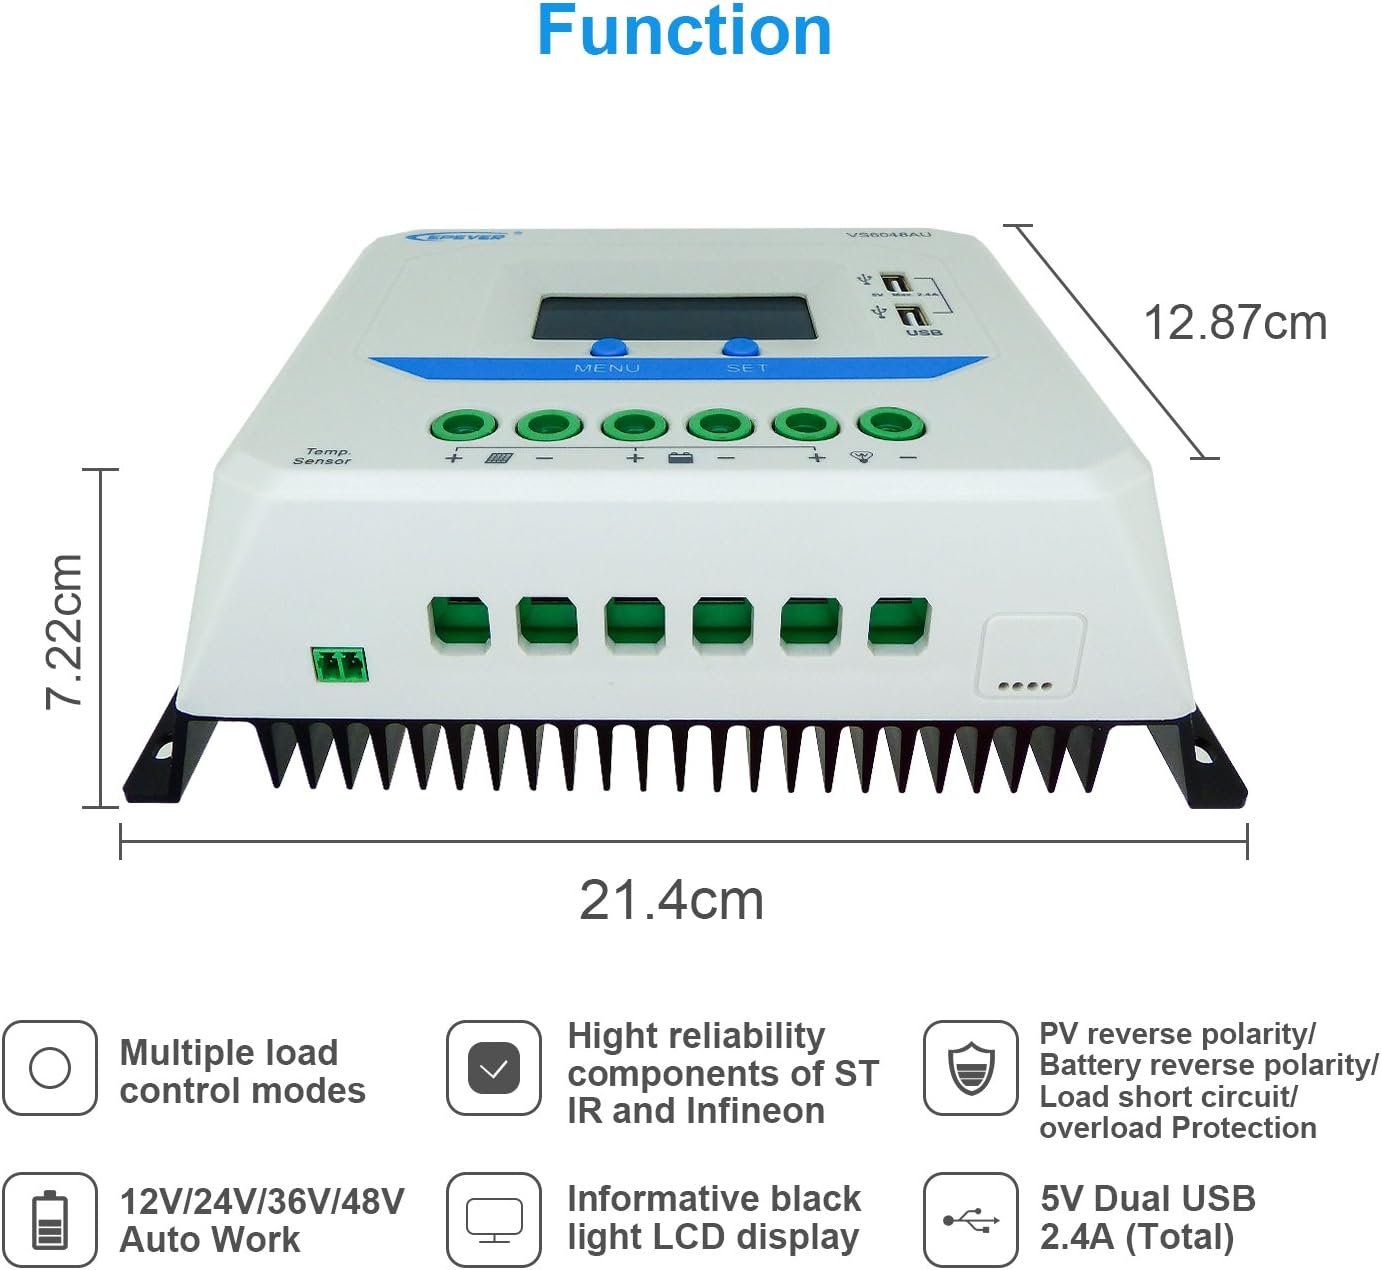
Image 5.1: Illustration of the automatic cycling interfaces on the VS6048AU LCD display.
- הקש על תַפרִיט button to manually cycle through the display interfaces.
- לחץ והחזק את תַפרִיט button to enter or exit the parameter setting mode.
- In parameter setting mode, use the מַעֲרֶכֶת button to adjust values or confirm selections.
מבצע מיוחד:
- Accumulative Power Clearing: Under the PV power interface, press and hold the מַעֲרֶכֶת button for 5 seconds until the value blinks, then press מַעֲרֶכֶת again to clear the accumulative power value.
- הגדרת יחידת טמפרטורה: Under the battery temperature interface, press and hold the מַעֲרֶכֶת button for 5 seconds to switch between Celsius (°C) and Fahrenheit (°F).
מצבי טעינה:
הבקר משתמש ב-3-stage intelligent PWM charging algorithm:
- טעינה בתפזורת: הסוללה נטענת בזרם מרבי עד לעוצמתהtage מגיע לבוסט כרךtage.
- Boost/Equalize Charging: The battery is charged at a constant voltage. An Equalize charge is typically performed once a month to balance battery cells.
- טעינה לצוף: כרך הסוללהtage is maintained at the Float voltage, and the charging current is reduced to a trickle to keep the battery fully charged.
The controller supports charging for Sealed, Gel, and Flooded battery types. Ensure the correct battery type is selected in the settings for optimal charging performance.
פלט USB:
The dual USB ports provide a maximum output of 5VDC/2.4A for charging compatible electronic devices.
6. תחזוקה
Regular maintenance ensures the longevity and optimal performance of your EPEVER VS6048AU solar charge controller.
- נִקָיוֹן: שמרו על ניקיון הבקר, ללא אבק ולכלוך. השתמשו במטלית יבשה לניקוי.
- חיבורים: בדקו מעת לעת את כל חיבורי החיווט לאיתור הידוק וקורוזיה. חיבורים רופפים עלולים לגרום להתחממות יתר ולנזק.
- אוורור: Ensure the installation area has adequate ventilation to prevent overheating of the controller.
- בְּדִיקָה: Inspect the controller and wiring for any signs of damage, such as frayed cables or cracked casing. Replace damaged components immediately.
- בריאות הסוללה: צג נפח סוללהtage and performance regularly. Ensure the battery type setting in the controller matches your battery.
7. פתרון תקלות
סעיף זה עוסק בבעיות נפוצות בהן ייתכן שתיתקלו בבקר הטעינה הסולארי שלכם.
| בְּעָיָה | סיבה אפשרית | פִּתָרוֹן |
|---|---|---|
| אין תצוגה על LCD | סוללה לא מחוברת או עוצמת קול נמוכהtagה; קוטביות הפוכה. | בדוק את חיבורי הסוללה ואת הקוטביות. ודא את עוצמת הסוללהtage הוא מעל 9V. |
| סוללה לא נטענת | PV panels not connected; PV reverse polarity; insufficient sunlight; PV open circuit voltagה נמוך מדי. | Check PV connections and polarity. Ensure adequate sunlight. Verify PV open circuit voltage נמצא במפרט. |
| טעינה לא עובדת | Load disconnected; load short circuit; load overload; battery low voltage נתק. | Check load connections. Remove short circuit. Reduce load. Recharge battery. |
| בקר התחממות יתר | Poor ventilation; excessive ambient temperature; prolonged high current operation. | Ensure proper ventilation. Relocate controller to a cooler environment. Reduce load if possible. |
| פלט ה-USB לא עובד | Device not compatible; controller fault. | Try another USB device. If issue persists, contact support. |
8. מפרטים
Detailed technical specifications for the EPEVER VS6048AU Solar Charge Controller.

Image 8.1: Comprehensive technical specifications table for the EPEVER VS-AU series, including the VS6048AU model.
| פָּרָמֶטֶר | Value (VS6048AU) |
|---|---|
| דֶגֶם | VS6048AU |
| מערכת נומינלית כרךtage | 12V/24V/36V/48V Auto Work |
| קלט סוללה כרךtagטווח | 9V ~ 64V |
| זרם טעינה/פריקה מדורג | 60A |
| מקסימום PV Open Circuit Voltage | 96V |
| סוג סוללה | Sealed (Default) / Gel / Flooded |
| Boost Charging Voltage | Sealed: 14.4V, Gel: 14.2V, Flooded: 14.6V |
| Equalize Charging Voltage | Sealed: 14.6V, Gel: No, Flooded: 14.8V |
| צף טעינה כרךtage | אטום/ג'ל/מוצף: 13.8V |
| כרך נמוךtage התחבר מחדש כרךtage | אטום/ג'ל/מוצף: 12.6V |
| כרך נמוךtage נתק כרךtage | אטום/ג'ל/מוצף: 11.1V |
| צריכה עצמית | ≤10mA (12V), ≤18mA (24V) |
| פיצוי טמפרטורה | -3mV/°C/2V (77°F) |
| הַאֲרָקָה | נפוץ חיובי |
| יציאת USB | 5VDC/2.4A (סה"כ) |
| מימד כולל | 214x128.7x72.2 מ"מ |
| טרמינלים | 3AWG (25 מ"מ) |
| משקל נטו | 1.02 ק"ג |
| קַרפִּיף | IP30 |
| טמפרטורת סביבת עבודה | -25°C ~ +55°C |
| טווח לחות | ≤95% (N.C.) |
9. אחריות ותמיכה
EPEVER products are designed for reliability and performance. For technical assistance or warranty inquiries, please refer to the following:
- תמיכה טכנית: EPEVER provides technical support through its local service centers. For assistance, please contact the authorized dealer or service center in your region.
- מידע על אחריות: Please refer to the warranty card included with your product or visit the official EPEVER webבאתר לקבלת תנאי האחריות המפורטים.
- Free Solar System Design: EPEVER's service centers may offer free solar system design assistance to help you optimize your setup.