Lindby Ragna
לינדבי ראגנה LED רצפה Lamp מדריך למשתמש
Model: Ragna (4251096519648)
מָבוֹא
Thank you for choosing the Lindby Ragna LED Floor Lampמדריך זה מספק מידע חיוני לשימוש בטוח ויעיל במכשיר החדש שלך.ampאנא קרא/י הוראות אלה בעיון לפני ההרכבה וההפעלה, ושמור/י אותן לעיון עתידי.
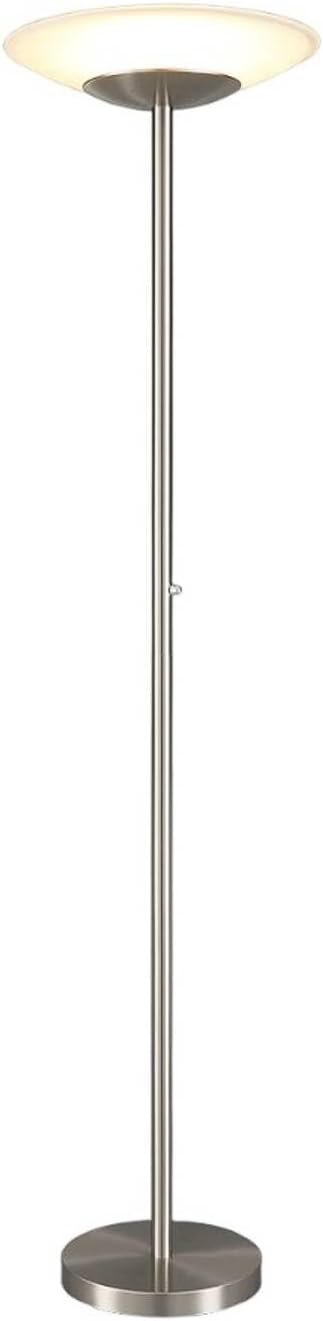
Figure 1: The Lindby Ragna LED Floor Lamp, הצגהasing its modern design with an aluminum body and glass uplighter shade.
הוראות בטיחות חשובות
כדי להפחית את הסיכון לשריפה, התחשמלות או פציעה, אנא שימו לב להוראות הבאות:
- ודא את אספקת החשמל כרךtage תואם ל-lampדרישות של לפני חיבור.
- אל תפעיל את ה- lamp עם כבל או תקע פגומים.
- הימנע מהצבת ה-lamp in unstable locations where it could tip over.
- אל תחשוף את ה-lamp to water or excessive moisture. This product has an IP20 rating, meaning it is protected against solid objects larger than 12.5mm but has no protection against water.
- אל תנסה לשנות או לתקן את ה-lamp בעצמך. צור קשר עם אנשי שירות מוסמכים לצורך תיקונים.
- יש להרחיק את חומרי האריזה מהישג ידם של ילדים כדי למנוע סכנת חנק.
- מקור אור ה-LED משולב ואינו ניתן להחלפה על ידי המשתמש.
תוכן החבילה
Verify that all components are present and undamaged upon opening the package. If any parts are missing or damaged, contact your retailer.
- קומה לamp Base and Pole Assembly
- Glass Uplighter Shade
- מקור אור LED משולב
- מתאם מתח עם כבל
- מדריך הוראות (מסמך זה)

Figure 2: Key components of the lamp, including the glass shade, LED module, and base plate, before assembly.
התקנה והרכבה
Follow these steps to assemble your Lindby Ragna LED Floor Lamp:
- פרק רכיבים: הוציאו בזהירות את כל החלקים מהאריזה. הניחו אותם על משטח רך ונקי כדי למנוע שריטות.
- להרכיב את הקוטב: ה- lamp pole may come in sections. Gently screw the pole sections together clockwise until secure. Ensure the power cord runs freely through the pole.
- חיבור לבסיס: Securely attach the assembled pole to the heavy base by screwing it clockwise. Ensure it is stable and upright.
- התקן את הצל: Carefully place the glass uplighter shade onto the top of the lamp pole. Ensure it sits correctly and is stable.
- חבר מתאם מתח: Insert the small connector from the lamp's cord into the power adapter. Then, plug the power adapter into a standard wall outlet.

Figure 3: The power adapter correctly connected to the lamp's base for power supply.
הוראות הפעלה
The Lindby Ragna LED Floor Lamp מיועד לתפעול פשוט.
- הפעלה/כיבוי: Locate the rotary dimmer switch on the lamp pole. Turn the switch clockwise to turn the lamp עַל.
- פונקצית עמעום: Continue turning the rotary switch clockwise to increase the light intensity. Turn it counter-clockwise to decrease the light intensity and eventually turn the lamp כבוי.

Figure 4: Detail of the integrated rotary dimmer switch, used for controlling the lamp's power and brightness.

Figure 5: The Lindby Ragna LED Floor Lamp providing ambient uplighting in a room.
תחזוקה וטיפול
Regular cleaning will help maintain the appearance and functionality of your lamp.
- ניקוי: נתק את ה-lamp from the power outlet before cleaning. Use a soft, dry cloth to wipe the metal surfaces. For the glass shade, a slightly damp ניתן להשתמש במטלית, ולאחר מכן במטלית יבשה כדי למנוע כתמי מים.
- אל תשתמש: Avoid abrasive cleaners, solvents, or polishing agents, as these can damage the finish.
- מקור אור LED: The LED light source is integrated and designed for long-term use. It does not require replacement.
פתרון בעיות
אם אתם נתקלים בבעיות עם ה-l שלכםamp, עיין בבעיות הנפוצות והפתרונות הבאות:
| בְּעָיָה | סיבה אפשרית | פִּתָרוֹן |
|---|---|---|
| Lamp לא נדלק. |
|
|
| האור מהבהב או לא יציב. |
|
|
| Lamp אינו יציב. |
|
|
אם הבעיה נמשכת לאחר ניסיון פתרונות אלה, אנא צור קשר עם תמיכת הלקוחות.
מפרט טכני
| מותג: | לינדבי |
| שם הדגם: | Ragna |
| התייחסות יצרן: | 4251096519648 |
| ASIN: | B0799H1LLC |
| סוג מקור אור: | LED משולב |
| מהtage: | 30 וואט |
| Material (Shade): | זְכוּכִית |
| Material (Frame): | אֲלוּמִינְיוּם |
| צֶבַע: | White (shade), Aluminum (frame) |
| סִגְנוֹן: | מוֹדֶרנִי |
| מקור כוח: | חשמלי עם כבלים |
| דירוג IP: | IP20 |
| מִשׁקָל: | 24.14 פאונד (כ-10.95 ק"ג) |
| מאפיינים מיוחדים: | Energy-Efficient, Dimmable (integrated) |

Figure 6: Energy efficiency label, indicating the lamp's energy class.
אחריות ותמיכה
For warranty information, please refer to the terms and conditions provided at the point of purchase or contact your retailer. Lindby products are designed for quality and durability.
If you require technical assistance or have questions not covered in this manual, please contact Lindby customer support or your authorized dealer. Please have your model number (Ragna) and manufacturer reference (4251096519648) available when contacting support.
לעיתים קרובות ניתן למצוא פרטי קשר באתר הרשמי של היצרן webבאתר או דרך פלטפורמת הרכישה שלך.