1. הקדמה
תודה על הרכישהasing the Riptunes Portable CD Player with AM/FM Radio, Model CDB204. This device is designed for portable audio playback, offering versatile options including CD playback, AM/FM radio reception, and auxiliary input for external audio sources. Please read this manual thoroughly before operating the unit to ensure proper use and to maximize your listening experience.

Image 1.1: Riptunes Portable CD Player (Model CDB204) with an external device connected.
2. מידע בטיחות
- אין לחשוף את המכשיר לגשם או לחות כדי למנוע שריפה או התחשמלות.
- אל תפתח את הארון. הפנה את השירות לצוות מוסמך בלבד.
- הימנעו מהצבת היחידה בקרבת מקורות חום כגון רדיאטורים, אוגרי חום, תנורים או מכשירים אחרים המייצרים חום.
- השתמש רק בתוספות/אביזרים שצוינו על ידי היצרן.
- נתק את היחידה מהחשמל במהלך סופות ברקים או כאשר אינו בשימוש לפרקי זמן ארוכים.
- יש להשליך סוללות בצורה נכונה, בהתאם לתקנות המקומיות. אין לחשוף סוללות לחום מוגזם.
3. תכולת החבילה
אנא ודאו שהפריטים הבאים כלולים בחבילה שלכם:
- Riptunes Portable CD Player (Model CDB204)
- מתאם מתח AC
- מדריך הוראות
4. המוצר נגמרview
Familiarize yourself with the controls and features of your Riptunes Portable CD Player.
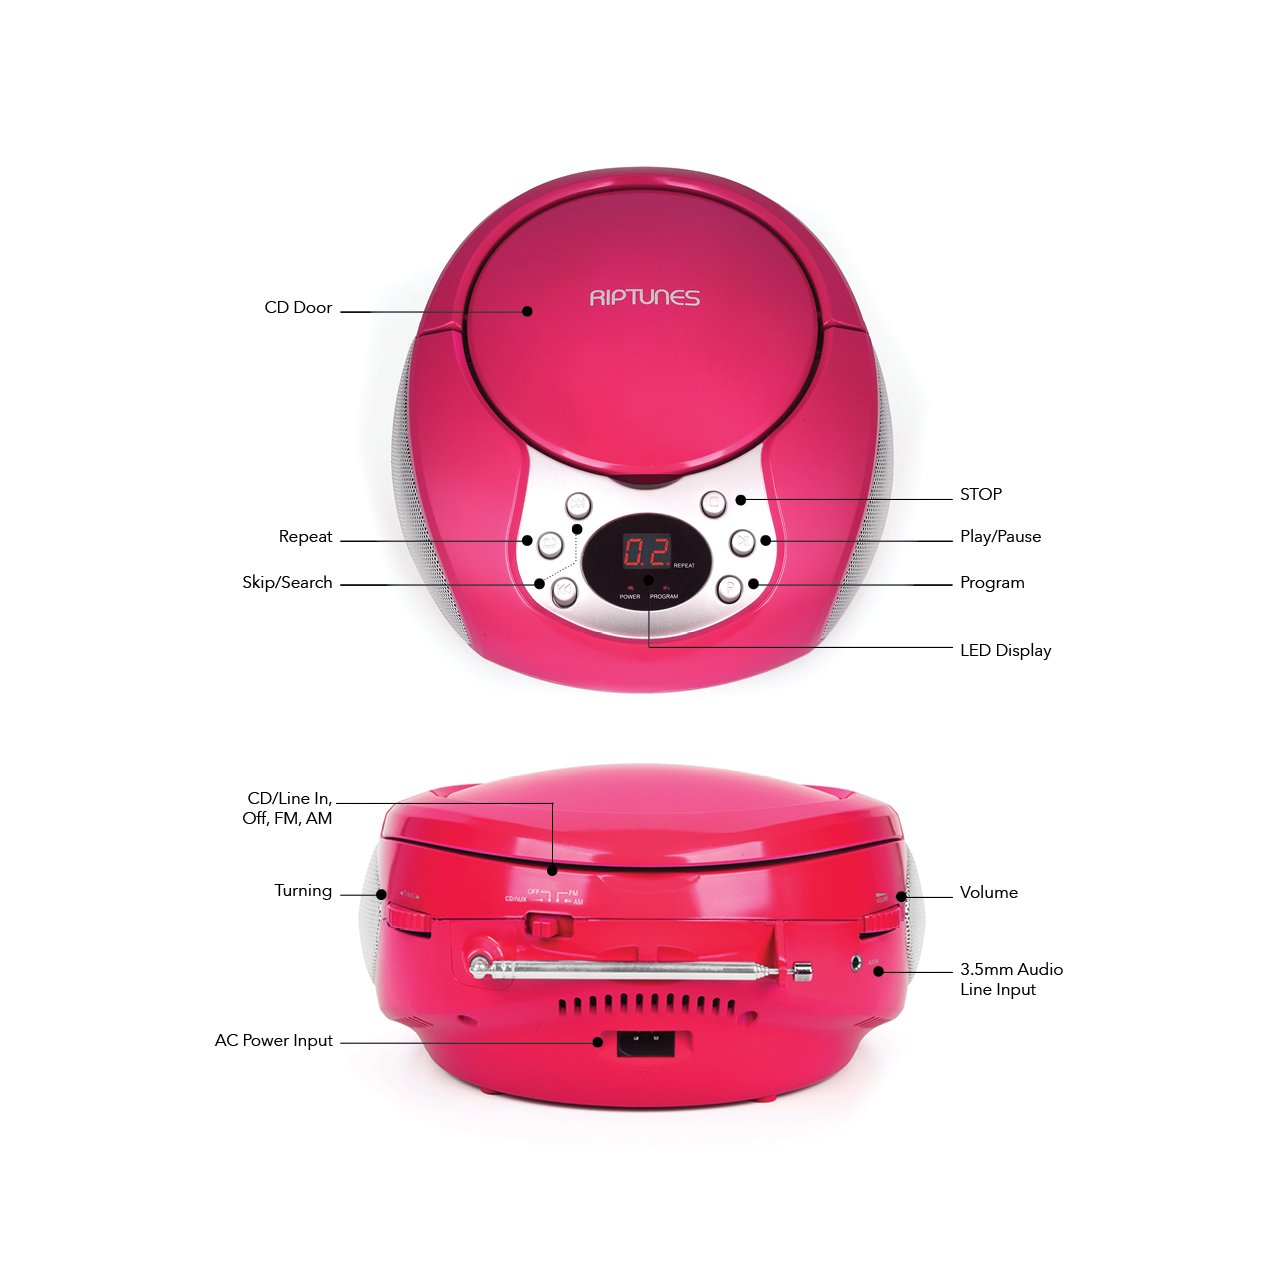
Image 4.1: Front and Side Panel Controls and Ports.
פקדי לוח קדמי:
- דלת תקליטורים: Open to insert or remove a CD.
- תצוגת לד: Shows track number, radio frequency, or mode.
- POWER/PROGRAM Button: Press to turn the unit on/off. In CD mode, press to program tracks.
- PLAY/PAUSE (►/−−) Button: Press to start or pause CD playback.
- כפתור עצור (■): Press to stop CD playback.
- SKIP/SEARCH (◀◀ / ►►) Buttons: Press to skip tracks on a CD. Hold to search within a track. In radio mode, press to tune.
- לחצן REPEAT: Press to repeat the current track or all tracks on a CD.
Side Panel Controls/Ports:
- FUNCTION Switch (CD/Line In-Off, FM, AM): Selects the operating mode (CD/Aux, FM Radio, AM Radio) and turns the unit off.
- חוגת עוצמת קול: מכוונן את רמת פלט השמע.
- TUNING Dial: Adjusts the radio frequency in AM/FM mode.
- שקע AUX IN: מחבר התקני שמע חיצוניים באמצעות כבל שמע 3.5 מ"מ.
- AC POWER INPUT Jack: מחבר את מתאם החשמל המצורף.
- אנטנת FM: Extend for optimal FM radio reception.
5. התקנה
5.1 הפעלת היחידה
The Riptunes Portable CD Player can be powered by either the included AC adapter or by batteries.
פעולת מתח AC:
- Ensure the FUNCTION switch is in the 'OFF' position.
- Insert the small end of the AC adapter into the AC POWER INPUT jack on the side of the unit.
- Plug the other end of the AC adapter into a standard AC wall outlet (120V ~ 60Hz).
תפעול סוללה:
For portable use, the unit requires 6 x 'C' size batteries (not included).
- Ensure the FUNCTION switch is in the 'OFF' position.
- אתר את תא הסוללה בתחתית היחידה.
- פתחו את מכסה תא הסוללות על ידי החלקתו החוצה.
- הכניסו 6 סוללות בגודל 'C', תוך הקפדה על הקוטביות הנכונה (+/-) כפי שמצוין בתוך התא.
- החזר היטב את מכסה תא הסוללות.

Image 5.1: Battery Compartment on the underside of the unit.
5.2 כוונון אנטנה
For optimal FM radio reception, fully extend the telescopic FM antenna located on the side of the unit. For AM reception, the unit has a built-in antenna, so no external adjustment is needed, but you may need to reposition the unit for better signal.

Image 5.2: Unit with FM antenna extended.
6. הוראות הפעלה
6.1 השמעת תקליטורים
- Slide the FUNCTION switch to the 'CD/Line In-Off' position.
- Press the 'OPEN' button on the CD door to open it.
- Place a CD into the compartment with the label side facing up.
- Close the CD door firmly. The LED display will show '00' or the total number of tracks.
- Press the PLAY/PAUSE (►/−−) button to start playback. The track number will appear on the display.
- Adjust the VOLUME dial to your desired listening level.
- To pause playback, press the PLAY/PAUSE (►/−−) button. Press again to resume.
- To stop playback, press the STOP (■) button.
- To skip to the next track, press the SKIP/SEARCH (►►) button.
- To go back to the beginning of the current track, press the SKIP/SEARCH (◀◀) button once. Press twice to go to the previous track.
- To search rapidly forward or backward within a track, hold down the respective SKIP/SEARCH button.
- פונקציית חזרה: Press the REPEAT button once to repeat the current track. Press again to repeat all tracks. Press a third time to cancel repeat mode.
- פונקציית התוכנית: While the CD is stopped, press the PROGRAM button. The display will flash. Use the SKIP/SEARCH buttons to select your desired track, then press PROGRAM again to confirm. Repeat for up to 20 tracks. Press PLAY/PAUSE to start programmed playback.
6.2 פעולת רדיו AM/FM
- Slide the FUNCTION switch to either 'FM' or 'AM' position.
- לקליטת FM, פרשו את האנטנה הטלסקופית במלואה.
- Rotate the TUNING dial on the side of the unit to select your desired radio station. The frequency will be displayed on the LED screen.
- Adjust the VOLUME dial to your desired listening level.
- For optimal AM reception, you may need to rotate the entire unit to find the best signal.
6.3 כניסת עזר (AUX IN)
- Slide the FUNCTION switch to the 'CD/Line In-Off' position.
- Connect one end of a 3.5mm audio cable (not included) to the AUX IN jack on the side of the unit.
- Connect the other end of the audio cable to the headphone jack or line-out jack of your external audio device (e.g., smartphone, MP3 player).
- Turn on your external audio device and start playback.
- Adjust the VOLUME dial on the Riptunes unit and the volume on your external device to achieve the desired sound level.
7. תחזוקה
- ניקוי: נגבו את היחידה במטלית רכה ויבשה. אין להשתמש בחומרי ניקוי שוחקים או ממסים.
- טיפול בתקליטור: טפלו בתקליטורים בקצוות שלהם. שמרו עליהם נקיים וללא שריטות. השתמשו במטלית רכה וללא סיבים כדי לנגב את התקליטורים מהמרכז החוצה.
- אִחסוּן: כאשר המכשיר אינו בשימוש למשך תקופות ממושכות, יש להוציא את הסוללות ולאחסן אותו במקום קריר ויבש, הרחק מאור שמש ישיר וטמפרטורות קיצוניות.
8. פתרון תקלות
| בְּעָיָה | סיבה אפשרית | פִּתָרוֹן |
|---|---|---|
| אין כוח | AC adapter not connected; Batteries depleted or incorrectly inserted; FUNCTION switch in 'OFF' position. | Ensure AC adapter is securely plugged in; Replace batteries or check polarity; Slide FUNCTION switch to 'CD/Line In-Off', 'FM', or 'AM'. |
| תקליטור לא מתנגן | CD inserted incorrectly; CD is dirty or scratched; CD door not closed; FUNCTION switch not in 'CD/Line In-Off' mode. | Insert CD with label side up; Clean or replace CD; Close CD door firmly; Set FUNCTION switch to 'CD/Line In-Off'. |
| קליטת רדיו גרועה | FM antenna not extended; Unit position. | Fully extend FM antenna; Reposition the unit for better signal. |
| אין קול מכניסת AUX | Audio cable not connected properly; External device volume too low; FUNCTION switch not in 'CD/Line In-Off' mode. | Check audio cable connections; Increase volume on external device; Set FUNCTION switch to 'CD/Line In-Off'. |
9. מפרטים
- דֶגֶם: CDB204
- מקור כוח: מתח AC 120V ~ 60Hz או 6 סוללות בגודל 'C' (DC 9V)
- תאימות CD: CD, CD-R / RW
- תדרי רדיו: FM, AM
- קישוריות: 3.5 מ"מ AUX IN
- מידות (בערך): 12.48 x 11.46 x 7.09 אינץ' (31.7 x 29.1 x 18 ס"מ)
- משקל (בערך): 2.68 פאונד (1.22 ק"ג)
10. אחריות ותמיכה
Riptunes products are designed for reliability and performance. For warranty information, technical support, or customer service inquiries, please refer to the contact information provided with your purchase documentation or visit the official Riptunes webאתר. אנא שמור את הוכחת הרכישה שלך לצורך תביעות אחריות.