
1. הקדמה
The COMPUTHERM Q7RF wireless room thermostat is designed for precise control of heating and air conditioning systems. This programmable device allows you to set individual temperature schedules for each day of the week, optimizing comfort and energy efficiency in your home or office. Its wireless design offers flexible placement of the thermostat unit, while the receiver unit connects directly to your boiler or air conditioning system, compatible with both 24V and 230V control circuits.
2. תכולת החבילה
ודא שכל הרכיבים נמצאים בחבילה שלך:
- 4 x COMPUTHERM Q7RF Room Thermostat (Transmitter Unit)
- 4 x COMPUTHERM Q7RF Receiver Unit
- מדריך למשתמש (מסמך זה)
- ברגי הרכבה ותקעים בקיר
3. המוצר נגמרview
The COMPUTHERM Q7RF system consists of two main components: the thermostat unit (transmitter) and the receiver unit. The thermostat unit measures the room temperature and allows you to set desired temperatures and programs. The receiver unit connects to your heating or cooling system and switches it on or off based on signals from the thermostat unit.

איור 1: מעלview of the COMPUTHERM Q7RF 4-piece set, showing multiple thermostat and receiver units.
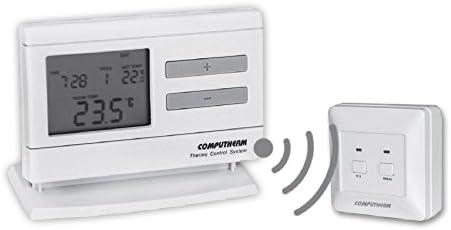
Figure 2: A single COMPUTHERM Q7RF thermostat unit communicating wirelessly with its receiver unit.
3.1 Thermostat Unit (Transmitter)
- תצוגת LCD: Shows current temperature, set temperature, time, day, and program status.
- לחצני שליטה: For setting temperature, time, and programming schedules.
- תא סוללות: עבור אספקת חשמל.
3.2 יחידת מקלט
- מסופי חיווט: For connection to the heating/cooling system.
- מחווני סטטוס: LEDs to show power and relay status.
- Manual Override Buttons: For temporary manual control.
4. מפרטים
| תכונה | מִפרָט |
|---|---|
| מותג | COMPUTHERM |
| דֶגֶם | Q7RF |
| מיתוג כרךtage | 24V AC/DC, ... 250V AC, 50Hz |
| צריכת חשמל | 6W |
| טווח מדידת טמפרטורה | 3 – 45°C (in 0.1°C increments) |
| טווח טמפרטורות מתכוונן | 5 – 40°C (in 0.5°C increments) |
| דיוק מדידת טמפרטורה | ±0.5 מעלות צלזיוס |
| סוג בקר | כפתור לחיצה |
| טכנולוגיית קישוריות | אלחוטי (תדר רדיו) |
| תכונות מיוחדות | Programmable, Compatible with various system voltages |
5. התקנה והתקנה
5.1 Thermostat Unit Placement and Battery Installation
- בחר מיקום: Place the thermostat unit in a central area of the room where it can accurately measure the ambient temperature, away from direct sunlight, drafts, or heat sources.
- התקן סוללות: Open the battery compartment on the back of the thermostat unit. Insert the required batteries (typically AA or AAA, refer to the unit's markings) ensuring correct polarity. Close the compartment.
- הפעלה: The display should light up, indicating the unit is powered.
5.2 Receiver Unit Wiring
WARNING: Electrical installation should only be performed by a qualified electrician. Disconnect power to the heating/cooling system before proceeding.
- התקן את המקלט: Secure the receiver unit near your boiler or air conditioning system using the provided screws and wall plugs.
- מסופי חיווט גישה: Open the cover of the receiver unit to expose the wiring terminals.
- התחבר למערכת: Connect the receiver unit to the two-wire room thermostat connection point of your boiler or AC system. Ensure connections are secure and follow the wiring diagram provided with your heating/cooling system and the receiver unit. The COMPUTHERM Q7RF is compatible with both 24V and 230V control circuits.
- החזר כוח: Once wiring is complete and verified, close the receiver unit cover and restore power to your heating/cooling system.
5.3 Pairing the Units (If not pre-paired)
Refer to the specific instructions provided with your Q7RF set for pairing procedures. Typically, this involves pressing a pairing button on the receiver unit and then initiating a pairing sequence on the thermostat unit within a short timeframe. A successful pairing will usually be indicated by an LED on the receiver or a message on the thermostat display.
6. הוראות הפעלה
6.1 הבנת צג ה-LCD
The LCD display provides all necessary information about the thermostat's current status and settings.

איור 3: מפורט view of the COMPUTHERM Q7RF LCD display, illustrating various indicators such as program number, manual modification symbol, weekdays, time, set temperature, actual room temperature, low battery symbol, boiler ON state, and timed control symbol.
- ימי חול: מציין את היום הנוכחי בשבוע.
- Exact Time / Time Left: Displays the current time or time remaining for a manual modification.
- מספר תוכנית: Shows the active program segment.
- הגדר טמפרטורה: The desired temperature set by the user.
- Actual Room Temperature: The current temperature measured by the thermostat.
- Symbol for Manual Modification: Indicates that the thermostat is currently operating under a temporary manual override.
- Temp. Modified until next manual intervention: Shows the duration of a temporary temperature change.
- Symbol for Low Battery Voltage: מופיע כאשר יש צורך להחליף סוללות.
- Symbol for Boiler ON State: Indicates when the heating/cooling system is active.
- Symbol for Timed Control: Indicates that a programmed schedule is active.
6.2 הגדרת השעה והיום הנוכחיים
- הקש על זְמַן לַחְצָן.
- השתמש ב- + or - כפתורים כדי לכוון את השעה, לאחר מכן לחץ על זְמַן שוב כדי לאשר.
- חזור על הפעולה עבור הדקות והיום בשבוע.
6.3 התאמת טמפרטורה ידנית
- במצב פעולה רגיל, לחצו על הלחצן + or - כפתורים לכוונון הטמפרטורה הרצויה.
- The new temperature will be maintained until the next programmed time slot or until manually overridden again.
6.4 Programming Daily/Weekly Schedules
The Q7RF allows for independent programming for each day of the week. You can typically set multiple time periods with different temperatures for each day.
- הקש על פרוג לחצן כדי להיכנס למצב תכנות.
- השתמש ב- יְוֹם button to select the day you wish to program (e.g., MON, TUE, etc.).
- השתמש ב- זְמַן ו +/- buttons to set the start time for the first program period.
- השתמש ב- הגדר TEMP ו +/- buttons to set the desired temperature for this period.
- לִלְחוֹץ פרוג again to move to the next program period for the same day, or use יְוֹם לעבור ליום הבא.
- Repeat until all desired periods and days are programmed.
- הקש על לָרוּץ or יְצִיאָה כפתור כדי לשמור ולצאת ממצב תכנות.
7. תחזוקה
7.1 החלפת סוללה
When the low battery symbol appears on the LCD display, replace the batteries immediately to ensure continuous operation. Use new, high-quality alkaline batteries of the specified type.
- Open the battery compartment cover on the back of the thermostat unit.
- הסר את הסוללות הישנות.
- Insert new batteries, observing correct polarity (+/-).
- סגור את מכסה תא הסוללות.
7.2 ניקוי
Clean the thermostat and receiver units with a soft, dry cloth. Do not use abrasive cleaners, solvents, or spray directly onto the units, as this may damage the electronics or finish.
8. פתרון תקלות
| בְּעָיָה | סיבה אפשרית | פִּתָרוֹן |
|---|---|---|
| תצוגת התרמוסטט ריקה | סוללות מתות | החלף סוללות בחדשות. |
| מערכת החימום/קירור לא מגיבה | 1. Receiver unit not powered 2. Units not paired 3. Wiring issue 4. מחוץ לטווח | 1. Check power supply to receiver. 2. Perform pairing procedure (Section 5.3). 3. Verify wiring connections (Section 5.2). 4. Move thermostat closer to receiver or check for obstructions. |
| קריאת טמפרטורה שגויה | Thermostat placed in unsuitable location (direct sun, draft) | העבר את התרמוסטט לאזור טמפרטורה מרכזי ויציב יותר. |
| Programmed schedule not active | Thermostat in manual override mode | Exit manual override mode (e.g., press RUN/AUTO button) to resume programmed operation. |
9. אחריות ותמיכה
COMPUTHERM products are manufactured to high-quality standards. For warranty information, please refer to the warranty card included with your product or contact your retailer. For technical support, please reach out to the COMPUTHERM customer service or your local distributor. Keep your purchase receipt as proof of purchase.