1. הקדמה
This manual provides detailed instructions for the installation, operation, and maintenance of your ASRock AB350M-HDV MicroATX Motherboard. The ASRock AB350M-HDV is designed to support AMD Socket AM4 A-Series APUs (Bristol Ridge) and Ryzen Series CPUs (Summit Ridge), featuring a Digi Power design and 7 Power Phase design for stable performance. It supports DDR4 memory and offers various connectivity options including SATA3, USB 3.0, and an Ultra M.2 slot.
2. המוצר נגמרview
The ASRock AB350M-HDV motherboard is a MicroATX form factor board, ideal for compact PC builds. It features essential components for a modern computing system.

איור 2.1: זוויתי view of the ASRock AB350M-HDV Motherboard, showcasing its compact MicroATX design and various components.
תכונות עיקריות:
- Supports AMD Socket AM4 A-Series APUs (Bristol Ridge) and Ryzen Series CPUs (Summit Ridge).
- DDR4 memory support up to 3200+ (OC) for Ryzen CPUs and 2400 for A-series APUs.
- 1 PCIe 3.0 x16 slot and 1 PCIe 2.0 x1 slot for expansion cards.
- 4 SATA3 ports and 1 Ultra M.2 (PCIe Gen3 x4 & SATA3) slot for storage.
- 6 USB 3.0 ports (2 front, 4 rear) and 2 USB 2.0 ports for peripheral connectivity.
- Integrated Gigabit Ethernet for network connectivity.
- Video outputs: VGA, DVI, HDMI.

איור 2.2: מלמעלה למטה view of the ASRock AB350M-HDV Motherboard, highlighting the CPU socket, RAM slots, M.2 slot, and PCIe slots.
3. התקנה והתקנה
Follow these steps carefully to install your ASRock AB350M-HDV motherboard and its components.
3.1 התקנת מעבד
- אתר את שקע המעבד AM4 בלוח האם.
- הרם את ידית הטעינה בצד השקע.
- יישר את הסימן המשולש שעל המעבד עם הסימן המתאים שעל השקע. הכנס בזהירות את המעבד לתוך השקע מבלי להפעיל אותו בכוח.
- הורד את ידית הטעינה כדי לאבטח את המעבד במקומו.
- התקן את מקרר המעבד בהתאם להוראות היצרן.
3.2 התקנת זיכרון RAM (זיכרון RAM)
- Locate the DDR4 DIMM slots. This motherboard has 4 slots.
- פתחו את הקליפסים בשני קצוות חריץ ה-DIMM.
- יישר את החריץ במודול ה-RAM עם המפתח בחריץ ה-DIMM.
- הכנס את מודול ה-RAM בחוזקה לחריץ עד שהקליפסים יתייצבו במקומם בנקישה. ודא ששני הקלפסים סגורים.
3.3 התקנת התקן אחסון (SATA ו-M.2)
כונני SATA:
- Connect one end of a SATA data cable to a SATA3 port on the motherboard.
- חבר את הקצה השני של כבל הנתונים SATA לכונן הקשיח או לכונן ה-SSD שלך.
- חבר כבל חשמל SATA מיחידת ספק הכוח (PSU) שלך להתקן האחסון.
SSD M.2:
- Locate the Ultra M.2 slot on the motherboard.
- הסר את בורג ה-M.2 ואת המעמד מהחריץ.
- הכנס את כונן ה-SSD מסוג M.2 לחריץ בזווית של 30 מעלות.
- Push the M.2 SSD down and secure it with the screw and standoff.
3.4 חיבורי חשמל
- Connect the 24-pin ATX power connector from your PSU to the 24-pin power socket on the motherboard.
- Connect the 8-pin (or 4-pin) ATX 12V power connector from your PSU to the corresponding socket near the CPU.
3.5 חיבורי לוח קדמי
Connect the cables from your PC case (Power Button, Reset Button, HDD LED, Power LED, USB, Audio) to the corresponding headers on the motherboard. Refer to the motherboard layout diagram in your physical manual for exact header locations.
3.6 התקנת כרטיס המסך
- אתר את חריץ ה-PCIe 3.0 x16.
- הסר את כיסוי חריץ ההרחבה המתאים ממארז המחשב שלך.
- Align the graphics card with the PCIe slot and press it down firmly until it clicks into place.
- חברו את כרטיס המסך למארז בעזרת בורג.
- חבר את כל כבלי החשמל PCIe הנדרשים מספק הכוח שלך לכרטיס המסך.
4. הוראות הפעלה
4.1 אתחול ראשון והגדרת BIOS/UEFI
- לאחר הרכבת כל הרכיבים, חברו את הצג, המקלדת והעכבר.
- הפעל את המערכת שלך.
- במהלך ההפעלה, לחצו שוב ושוב על DEL or F2 מקש כדי להיכנס לכלי התקנת BIOS/UEFI.
- In the BIOS, you can configure boot order, system time, and other advanced settings. Save changes and exit to boot into your operating system installation media.
4.2 התקנת דרייבר
After installing your operating system, install the necessary drivers for the motherboard components. These typically include chipset drivers, audio drivers, LAN drivers, and any specific utility drivers. Drivers can be found on the ASRock official webאתר עבור דגם לוח האם הספציפי שלך.
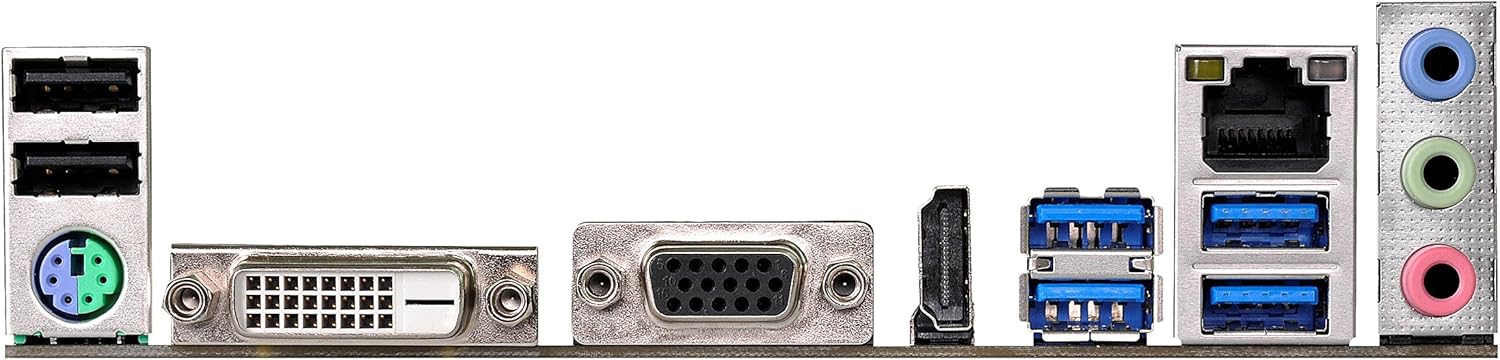
Figure 4.1: Rear I/O panel of the ASRock AB350M-HDV Motherboard, showing USB ports, video outputs (VGA, DVI, HDMI), LAN port, and audio jacks.
5. תחזוקה
תחזוקה נכונה מבטיחה את אורך החיים והביצועים האופטימליים של לוח האם שלך.
5.1 ניקוי
- נקה באופן קבוע אבק מלוח האם ומהרכיבים באמצעות אוויר דחוס.
- ודא שהמערכת כבויה ומנותקת מהחשמל לפני הניקוי.
- הימנעו משימוש בחומרי ניקוי נוזליים ישירות על רכיבים.
5.2 עדכוני BIOS/UEFI
בדוק את ה-ASRock מעת לעת website for BIOS/UEFI updates. Updates can improve compatibility, stability, and performance. Follow the instructions provided by ASRock carefully when performing a BIOS update to avoid system damage.
6. פתרון תקלות
סעיף זה מספק פתרונות לבעיות נפוצות שאתה עשוי להיתקל בהן.
6.1 אין חשמל / אין POST (בדיקה עצמית בעת הפעלה)
- בדוק את חיבורי החשמל: Ensure the 24-pin and 8-pin (or 4-pin) CPU power connectors are securely seated.
- Verify PSU: Test your power supply unit (PSU) to ensure it is functional and providing adequate power.
- החזרת הרכיבים למקומם: Remove and re-install the CPU, RAM, and graphics card to ensure they are properly seated.
- נקה CMOS: Refer to your physical manual for instructions on how to clear the CMOS (Complementary Metal-Oxide-Semiconductor) settings, which can resolve boot issues.
6.2 אין פלט תצוגה
- חיבור צג: Ensure your monitor is correctly connected to the graphics card or motherboard (if using an APU with integrated graphics).
- כרטיס מסך: If using a dedicated graphics card, ensure it is properly installed and has sufficient power. Test with another graphics card if possible.
- APU Compatibility: If using an AMD A-Series APU, ensure your monitor is connected to the motherboard's video outputs (VGA, DVI, HDMI). Ryzen CPUs without integrated graphics require a dedicated graphics card.
6.3 Operating System Not Booting
- סדר אתחול: Check the BIOS/UEFI settings to ensure the correct boot device (e.g., SSD/HDD with OS) is prioritized.
- מכשיר אחסון: Verify that your storage device is detected in the BIOS.
- התקנת מערכת הפעלה: If the OS is newly installed, ensure the installation process completed successfully.
7. מפרטים
| מותג | ASRock |
| שם הדגם | AB350M-HDV |
| שקע מעבד | שקע AM4 |
| סוג ערכת שבבים | AMD Promontory B350 |
| מעבדים תואמים | AMD A-Series APUs (Bristol Ridge), Ryzen Series CPUs (Summit Ridge) |
| טכנולוגיית זיכרון RAM | DDR4 |
| מהירות שעון זיכרון | 2133 MHz (Base), up to 3200+ (OC) for Ryzen CPU |
| חריצי זיכרון זמינים | 4 |
| ממשק כרטיס מסך | PCI Express (1x PCIe 3.0 x16, 1x PCIe 2.0 x1) |
| Total SATA Ports | 4 (SATA3) |
| M.2 חריץ | 1 (Ultra M.2, PCIe Gen3 x4 & SATA3) |
| סך כל יציאות USB | 8 (6x USB 3.0, 2x USB 2.0) |
| יציאות וידאו | VGA, DVI, HDMI |
| סוג מחבר מתח ראשי | 24 פינים ATX |
| גורם צורה | MicroATX |
| משקל פריט | 1.3 פאונד |
8. מידע על אחריות
The ASRock AB350M-HDV Motherboard comes with a 1 שנות אחריות. For specific terms and conditions, please refer to the warranty card included with your product or visit the official ASRock webאֲתַר.
9. תמיכה
For further assistance, technical support, or driver downloads, please visit the official ASRock webאֲתַר:
You can also find contact information for customer service and support resources on their webאֲתַר.