
1. מידע בטיחות חשוב
Read all instructions carefully before operating the pressure washer. Failure to follow these instructions may result in serious injury or property damage. Keep this manual for future reference.
- Always wear appropriate safety gear, including eye protection, when operating the pressure washer.
- ודאו שכבל החשמל והתקע במצב תקין. אין להשתמש אם הם ניזוקו.
- Connect the pressure washer only to a grounded outlet.
- לעולם אל תכוון את אקדח הריסוס לעבר אנשים, חיות מחמד או מכשירים חשמליים.
- Do not operate the pressure washer in an explosive atmosphere or near flammable liquids.
- יש לנתק תמיד את אספקת החשמל לפני ביצוע כל תחזוקה או ניקוי.
- הרחק ילדים וחיות מחמד מאזור ההפעלה.
2. תכולת החבילה
Verify that all components are present before assembly. If any parts are missing or damaged, contact customer support.

תמונה 2.1: Included Components. This image displays the pressure hose, spray gun, gun holder, nozzle cleaning tool, nozzle caps, water filter, mounting screws, quick connect adapter, fan nozzle lance, and lance holder.
- יחידת שטיפה בלחץ חשמלית
- High-Pressure Hose (3 Meters)
- Spray Gun with Trigger Lock
- Fan Nozzle Lance
- מסנן מים
- כלי לניקוי חרירים
- מתאם חיבור מהיר
- Gun Holder and Lance Holder
3. הוראות התקנה
3.1 הרכבת היחידה
- חבר את הידית: Secure the top handle to the main unit if it is not pre-attached.
- Install Holders: Mount the gun holder and lance holder onto the unit using the provided screws.
3.2 חיבור אספקת מים
The pressure washer requires a continuous water supply. Ensure your water source can provide sufficient flow.
- Connect Water Filter: Attach the water filter to the water inlet on the pressure washer unit.
- חיבור צינור גינה: Connect a standard garden hose (not included) to the water filter. Ensure the connection is tight to prevent leaks.
- Connect Quick Adapter: If using the quick connect adapter, attach it to your garden hose and then to the water inlet.
- הפעלת מים: פתחו לחלוטין את ברז המים כדי להבטיח זרימה קבועה למכונת שטיפה בלחץ.
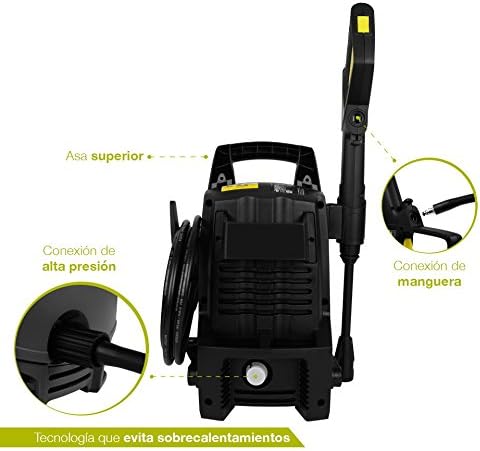
תמונה 3.1: Unit Connections. This image highlights the top handle, the high-pressure hose outlet, and the water inlet connection point.
3.3 Connecting High-Pressure Hose and Spray Gun
- חבר צינור לחץ גבוה ליחידה: Screw the high-pressure hose onto the high-pressure outlet of the pressure washer unit. Tighten securely by hand.
- חבר צינור בלחץ גבוה לאקדח ריסוס: Attach the other end of the high-pressure hose to the spray gun. Ensure a firm connection.
- חבר את הרומח: Connect the fan nozzle lance to the spray gun. Twist until it locks into place.

תמונה 3.2: Assembled Spray Gun and Hose. This image shows the spray gun, the fan nozzle lance attached, and the high-pressure hose connected, along with other accessories.
3.4 Purging Air from the System
Before connecting power, it is crucial to purge air from the pump and hose. This prevents damage and ensures proper pressure.
- ודא שאספקת המים פתוחה לחלוטין.
- Squeeze the trigger on the spray gun and hold it open for approximately 30-60 seconds. This allows water to flow through the system and expel any trapped air.
- Continue holding the trigger until a steady stream of water emerges from the nozzle, free of air bubbles.
- Release the trigger. The system is now primed.
3.5 חיבור חשמל
- ודא שהידיים שלך יבשות.
- חבר את כבל החשמל לשקע חשמל מוארק.
4. הוראות הפעלה
4.1 הפעלת מכונת השטיפה בלחץ
- Ensure the water supply is on and the unit is purged of air.
- סובבו את מתג ההפעלה/כיבוי של מכונת השטיפה בלחץ למצב "ON". המנוע יתניע.
- כוון את אקדח הריסוס אל המשטח המיועד לניקוי, תוך שמירה על מרחק בטוח.
- Squeeze the trigger to begin spraying. The motor will run continuously while the trigger is pressed.
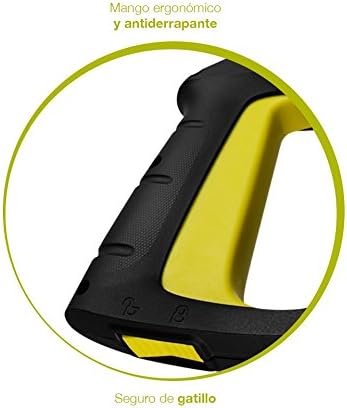
תמונה 4.1: Spray Gun Features. This image shows the ergonomic and non-slip handle of the spray gun, along with the trigger safety lock mechanism.
4.2 Using the Fan Nozzle Lance
The included fan nozzle lance provides a wide spray pattern suitable for general cleaning tasks. Adjust your distance from the surface to control the intensity of the spray.
4.3 Applying Detergent (If Applicable)
This model may include a detergent tank or siphoning tube. Follow the specific instructions for your detergent application method. Note that some users have reported the detergent dispenser may not provide optimal pressure or efficient use of soap.
4.4 Shutting Down the Pressure Washer
- שחרר את ההדק של אקדח הריסוס.
- סובב את מתג ההפעלה/כיבוי למצב "כבוי".
- כבה את אספקת המים בברז.
- לחץ על הדק אקדח הריסוס כדי לשחרר כל לחץ שנותר במערכת.
- נתק את כבל החשמל מהשקע.
- נתק את צינור הגינה ואת צינור הלחץ הגבוה.
5. תחזוקה
5.1 ניקוי הזרבובית
A clogged nozzle can cause the pump pressure to fluctuate or drop. Use the provided nozzle cleaning tool to clear any debris.
- Ensure the pressure washer is off and disconnected from power and water.
- הסר את הרומח מאקדח הריסוס.
- Insert the nozzle cleaning tool into the nozzle opening to dislodge any obstructions.
- Rinse the nozzle with water.
5.2 ניקוי מסנן המים
Regularly inspect and clean the water filter to prevent debris from entering the pump.
- Ensure the pressure washer is off and disconnected from power and water.
- Unscrew the water filter from the water inlet.
- Rinse the filter under running water to remove any accumulated particles.
- Reattach the clean filter securely.
5.3 אחסון
Store the pressure washer in a dry, frost-free area. Protect it from freezing temperatures, which can damage the pump.
- Drain all water from the pump, hoses, and spray gun before storage.
- גלגלו את צינור הלחץ הגבוה ואת כבל החשמל בצורה מסודרת.
- Store the spray gun and lance in their designated holders on the unit.
6. פתרון תקלות
| בְּעָיָה | סיבה אפשרית | פִּתָרוֹן |
|---|---|---|
| ללא לחץ או לחץ נמוך |
|
|
| המנוע לא מתחיל |
|
|
| נזילות מים מחיבורים |
|
|
7. מפרטים
| מותג | Aksi Herramientas |
| דֶגֶם | 1350W 1400 PSI Electric Pressure Washer |
| מקור כוח | כבל חשמלי |
| כוח מנוע | 1350 וואט |
| לחץ מקסימלי | 1400 PSI (פאונד לאינץ' רבוע) |
| אורך צינור בלחץ גבוה | 3 מטר |
| מידות המוצר (L x W x H) | 24 ס"מ x 20 ס"מ x 50 ס"מ |

תמונה 7.1: Product Dimensions. This image illustrates the overall height of the pressure washer, which is approximately 17 inches or 42 cm.
8. אחריות ותמיכה
For warranty information or technical support, please refer to the documentation included with your purchase or contact Aksi Herramientas customer service directly. Keep your purchase receipt as proof of purchase for warranty claims.
יַצרָן: Aksi Herramientas