
1. הקדמה
Thank you for choosing the OSD Audio PRE-1 High Definition Preamplifier. This unit is designed to enhance your audio experience by providing versatile source selection and precise audio control. The PRE-1 acts as a central hub for various audio components, including turntables, CD/DVD players, and tape decks, delivering a clean and powerful signal to your main ampחיים יותר.
This manual provides detailed instructions for the proper setup, operation, and maintenance of your PRE-1 preamplifier. Please read this manual thoroughly before operating the unit to ensure optimal performance and longevity.
2. מידע בטיחות חשוב
- מקור כוח: חבר את היחידה אך ורק לסוג מקור המתח המצוין על גבי תווית הסימון.
- אוורור: Ensure adequate ventilation. Do not block any ventilation openings. Install in accordance with the manufacturer’s instructions.
- מים ולחות: אין להשתמש במכשיר זה בקרבת מים ואל תחשוף אותו לטפטופים או להתזות.
- חוֹם: אין להתקין ליד מקורות חום כלשהם כגון רדיאטורים, אוגרי חום, תנורים או מכשירים אחרים (כולל ampמחצבים) המייצרים חום.
- ניקוי: נקה רק עם מטלית יבשה.
- שֵׁרוּת: אל תנסה לתת שירות למוצר זה בעצמך. הפנה את כל השירות לאנשי שירות מוסמכים.
- הַאֲרָקָה: יחידה זו חייבת להיות מוארקת כהלכה.
3. תכולת החבילה
אנא ודאו שהפריטים הבאים כלולים בחבילה שלכם:
- OSD Audio PRE-1 High Definition Preampחיים יותר
- כבל חשמל
- מדריך למשתמש (מסמך זה)
4. המוצר נגמרview
4.1. לוח קדמי
The front panel provides access to all primary controls and a microphone input for convenient use.

This image displays the front panel of the OSD Audio PRE-1 Preamplifier, including its physical dimensions for installation planning.

א מפורט view of the left side of the PRE-1's front panel, highlighting the Microphone Level, Bass, Midrange, and Treble adjustment knobs.

א מפורט view of the right side of the PRE-1's front panel, showing the Loudness, Balance, and Volume controls, along with input selection and function buttons.
- לחצן הפעלה: מפעיל או מכבה את היחידה.
- קלט מיקרופון: שקע 1/4 אינץ' לחיבור מיקרופון.
- רמת מיקרופון: כוונון עוצמת הקול של קלט המיקרופון.
- בקרת בס: מכוונן את פלט התדרים הנמוכים.
- Mid Control: Adjusts the mid-range frequency output.
- בקרת טרבל: מכוונן את פלט התדר הגבוה.
- קול: Engages or disengages a loudness contour for enhanced bass and treble at low volumes.
- לְאַזֵן: כוונון איזון הערוץ הימני/שמאלי.
- כֶּרֶך: Master volume control for all outputs.
- בחירת קלט: Rotary knob to choose between Phono, AUX1, AUX2, and CD/DVD inputs.
- Tape Button: Activates the Tape Monitor loop.
- כפתור מונו: Combines stereo signals into a monaural output.
- מסנן נמוך: Engages a low-frequency cut-off filter.
- לְהַשְׁתִיק: Silences all audio output.
4.2. לוח אחורי
The rear panel houses all the necessary input and output connections for your audio system.
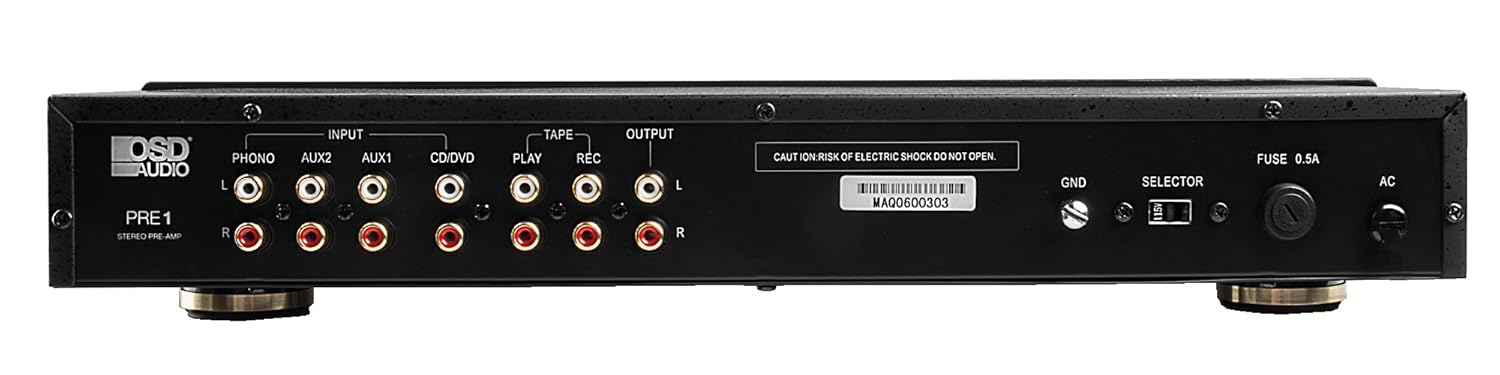
The rear panel of the PRE-1 Preamplifier, showing all input and output connections for various audio devices.
- Phono Input (L/R): RCA inputs for connecting a turntable. Includes a ground terminal.
- AUX1 Input (L/R): RCA inputs for general auxiliary devices.
- AUX2 Input (L/R): RCA inputs for a second auxiliary device.
- CD/DVD Input (L/R): RCA inputs for CD or DVD players.
- Tape Play (L/R): RCA inputs for the playback output of a tape deck or other recording device.
- Tape Rec (L/R): RCA outputs for connecting to the recording input of a tape deck or other recording device.
- Output (L/R): RCA outputs to connect to your main power ampחיים יותר.
- מסוף קרקע (GND): Connects to the ground wire of your turntable to reduce hum.
- מתג בחירה: For internal configuration (typically left in default position unless specified).
- נתיך: Replace only with the specified fuse type and rating.
- כניסת מתח AC: Connects to the supplied power cable.
5. הגדרה וחיבורים
Follow these steps to properly set up your OSD Audio PRE-1 Preampחיים יותר:
- מיקום: Place the PRE-1 on a stable, flat surface, ensuring adequate ventilation around the unit. Avoid placing it near heat sources or in direct sunlight.
- כיבוי: Ensure all audio components, including the PRE-1 and your main amplifier, are turned off before making any connections.
- חבר מקורות:
- פָּטֵיפוֹן: Connect the RCA cables from your turntable to the Phono Input (L/R) on the PRE-1. Connect the turntable's ground wire to the GND terminal on the PRE-1.
- נגן תקליטורים/DVD: Connect the RCA cables from your CD/DVD player to the CD/DVD Input (L/R).
- Other Devices (e.g., Streamer, Tuner): Connect RCA cables from these devices to the AUX1 Input (L/R) or AUX2 Input (L/R).
- Tape Deck: Connect the playback outputs of your tape deck to the Tape Play (L/R) inputs. Connect the recording inputs of your tape deck to the Tape Rec (L/R) תפוקות.
- התחבר ל Ampחיים יותר: חבר את Output (L/R) RCA jacks on the PRE-1 to the input jacks of your main power ampחיים יותר.
- חיבור חשמל: חבר את כבל החשמל המצורף ל- קלט מתח AC on the rear panel of the PRE-1, then plug it into a suitable wall outlet.
- הפעלה ראשונית: Turn on your main power amplifier first, then turn on the PRE-1. When powering off, turn off the PRE-1 first, then your main ampחיים יותר.
6. הוראות הפעלה
Once your PRE-1 is connected, follow these steps for basic operation:
- בחר קלט: השתמש ב- בחר קלט rotary knob on the front panel to choose the desired audio source (Phono, AUX1, AUX2, CD/DVD).
- התאם את עוצמת הקול: התחל עם ה כֶּרֶך knob at its minimum setting. Begin playing your selected audio source and slowly increase the volume to a comfortable listening level.
- בקרות טון: השתמש ב- בַּס, בֵּינוֹנִי, ו לְשַׁלֵשׁ knobs to adjust the tonal characteristics of your audio. Turn clockwise to increase, counter-clockwise to decrease.
- בקרת איזון: התאם את לְאַזֵן knob to fine-tune the left and right channel output for optimal stereo imaging.
- קול: הקש על קוֹלָנִיוּת button to activate a contour that boosts bass and treble frequencies, which can be beneficial at lower listening volumes. Press again to deactivate.
- מסנן נמוך: הקש על פילטר נמוך button to engage a filter that reduces very low frequencies. This can help eliminate rumble from turntables or other unwanted low-frequency noise. Press again to deactivate.
- מונו: הקש על מונו button to combine the left and right stereo channels into a single monaural signal. This is useful for playing mono recordings. Press again for stereo.
- לְהַשְׁתִיק: הקש על לְהַשְׁתִיק button to instantly silence the audio output. Press again to restore sound.
- שימוש במיקרופון: Plug a microphone into the כניסת מיקרופון. Adjust the microphone's volume using the רמת מיקרופון כַּפתוֹר.
- Tape Monitoring/Recording: If you have a tape deck connected, select the appropriate input for playback. To record, ensure your tape deck is set to record and the PRE-1 is passing the desired source through the Tape Rec outputs.
7. תחזוקה
Proper care and maintenance will ensure the longevity and optimal performance of your PRE-1 Preampחיים יותר.
- ניקוי: Use a soft, dry cloth to clean the exterior of the unit. Do not use liquid cleaners, aerosols, or harsh chemicals, as they may damage the finish or internal components.
- אוורור: Periodically check that the ventilation openings are free from dust and obstructions.
- חיבורים: Occasionally check all cable connections to ensure they are secure. Loose connections can lead to signal loss or interference.
- אִחסוּן: אם מאחסנים את המכשיר לתקופה ממושכת, יש לנתק אותו משקע החשמל ולאחסן אותו במקום קריר ויבש, הרחק מאור שמש ישיר וטמפרטורות קיצוניות.
8. פתרון תקלות
If you experience issues with your OSD Audio PRE-1, refer to the following common problems and solutions:
| בְּעָיָה | סיבה אפשרית | פִּתָרוֹן |
|---|---|---|
| אין כוח | Power cable not connected; Power outlet not active; Blown fuse | Ensure power cable is securely connected. Test the outlet with another device. Check and replace the fuse if necessary (refer to specifications for fuse type). |
| אין פלט קול | Incorrect input selected; Volume too low; Mute engaged; Loose audio cables; Main amplifier off or incorrect input selected | Select the correct input source. Increase the volume. Disengage Mute. Check all RCA cable connections. Ensure your main amplifier is on and set to the correct input. |
| צליל מעוות | Volume too high (clipping); Incorrect tone control settings; Faulty cables | Reduce the volume. Adjust Bass, Mid, and Treble controls to neutral or desired settings. Try replacing audio cables. |
| זמזום או רעש זמזום | Ground loop; Loose ground wire (Phono); Interference from other electronics | Ensure turntable ground wire is connected to the PRE-1's GND terminal. Try moving the PRE-1 or other audio components away from power cables or other electronic devices. Use a ground loop isolator if necessary. |
| המיקרופון לא עובד | Mic not connected; Mic Level too low; Faulty microphone | Ensure microphone is securely plugged into the Mic Input. Increase the Mic Level. Test with another microphone if available. |
9. מפרטים
Below are the technical specifications for the OSD Audio PRE-1 Preampחיים יותר:
| תכונה | מִפרָט |
|---|---|
| דֶגֶם | PRE-1 |
| מותג | אודיו OSD |
| מספר ערוצים | 2 |
| סוג הרכבה | מתקן משטח |
| UPC | 819603012446 |
| ASIN | B01MPYJLPX |
| יַצרָן | אודיו OSD |
10. אחריות ותמיכה
OSD Audio products are designed for reliability and performance. For specific warranty details and terms, please refer to the warranty card included with your product or visit the official OSD Audio website. If you require technical assistance or have questions not covered in this manual, please contact OSD Audio customer support.
OSD Audio Customer Support: Please visit the OSD Audio webאתר לקבלת פרטי קשר ומשאבי תמיכה.