
Sun Joe MJ401E-PRO
Sun Joe MJ401E-PRO 14-Inch 13-Amp Electric Lawn Mower Instruction Manual
Model: MJ401E-PRO | Brand: Sun Joe
1. הקדמה
This manual provides essential information for the safe and efficient operation, assembly, and maintenance of your Sun Joe MJ401E-PRO Electric Lawn Mower. Please read all instructions carefully before use and retain this manual for future reference.
תכונות עיקריות:
- עוצמתי 13-Amp מָנוֹעַ: Delivers efficient cutting performance for a 14-inch wide path.
- גובה חיתוך מתכוונן: Features a 3-position manual height control to tailor cutting height from 1.18 inches to 2.52 inches.
- Durable Steel Blade: Equipped with a 14-inch steel blade for precise cutting.
- Grass Collection System: Includes a 10.6-gallon hard top rear collection bag for convenient grass disposal.
- מגלשת פריקה צדדית: Comes with a side-discharge chute (MJ401E-DCA) for cutting taller grass without clogging.
- Collapsible Handle: Designed for compact storage.
2. המוצר נגמרview
Familiarize yourself with the components of your Sun Joe MJ401E-PRO Electric Lawn Mower.
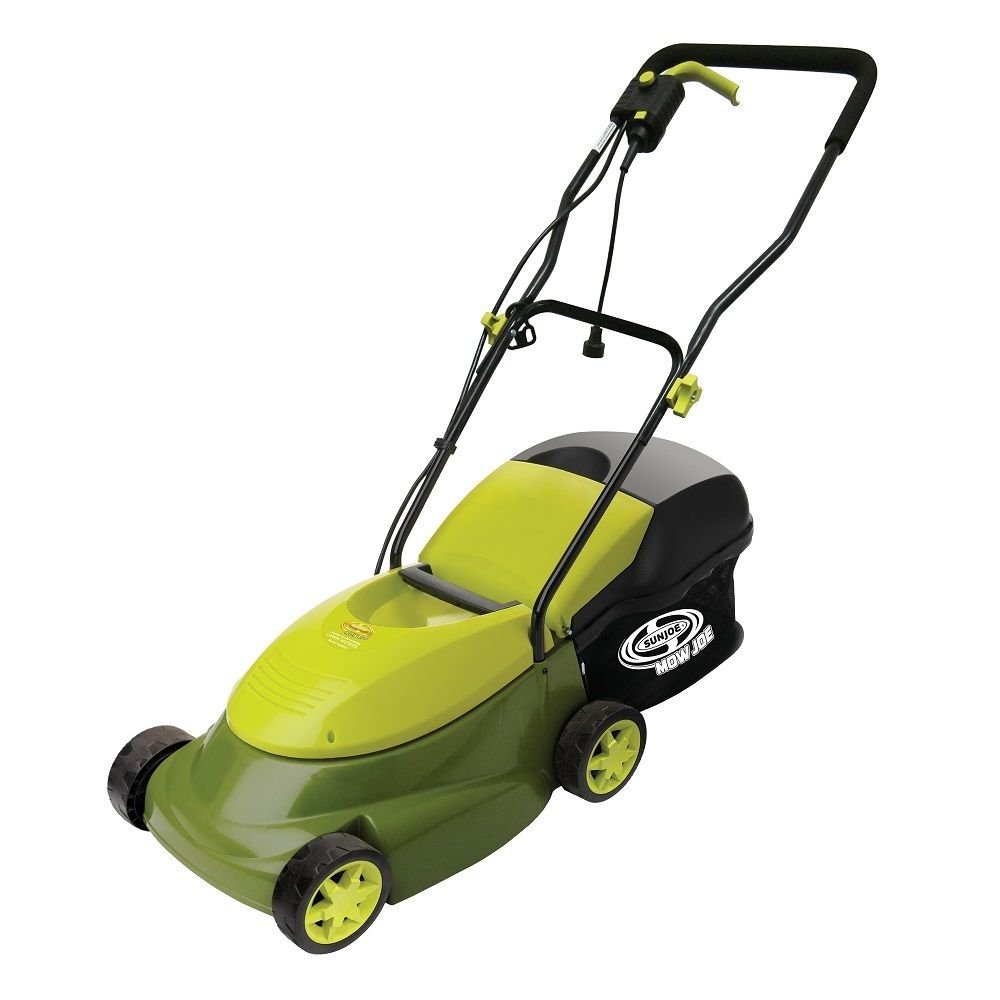
איור 2.1: בסך הכל view of the Sun Joe MJ401E-PRO Electric Lawn Mower.
רכיבים כלולים:
- Electric lawn mower unit
- שקית דשא
- מוט תמיכה לשקית דשא
- מצנח פריקת צד
- ידית עליונה
- מכלול ידית הידית והבורג העליון (2)
- ידית תחתונה
- ברגי ידית תחתונים (2)
- וו ריסון כבל מאריך
- קליפ כבל (2)
- מַפתֵחַ בְּרָגִים
- מדריך וכרטיס רישום
3. התקנה והרכבה
Follow these steps to assemble your electric lawn mower. For a visual guide, refer to the assembly video below.
Video 3.1: Quick assembly guide for the Sun Joe MJ401E-PRO Electric Lawn Mower.
שלבי הרכבה:
- חבר את הידית התחתונה: Align the holes on the lower handle with the corresponding holes on the machine body. Secure the handle on both sides using the provided screws.
- Install Extension Cord Restraint: Slide the extension cord restraint holder onto the upper handle.
- חבר את הידית העליונה: Align the holes on the upper handle with the lower handle assembly. Fit a washer to the outside of the handle, insert the bolt through the holes, and attach the knob. Twist until tight. Repeat for the other side.
- Assemble Grass Bag: Fit the grass bag support rod into the plastic cover of the grass bag.
- Attach Grass Bag: Lift the ejector flap at the rear of the mower and attach the assembled grass bag by fastening it onto the coupling hooks.
- Attach Side Discharge Chute (Optional): To attach the side discharge chute, slide the chute tabs onto the coupling hooks located on the side of the mower.
- כבלים מאובטחים: Use the provided cable clips (x2) to secure the power cable along the handle for safe operation.
4. הוראות הפעלה
Proper operation ensures effective lawn care and user safety.

Figure 4.1: Operating the lawn mower on a lawn.
הפעלת המכסחת:
- Ensure the mower is on a level surface and clear of debris.
- Connect the extension cord to the mower's power inlet and secure it with the restraint hook.
- Press and hold the safety switch button, then pull the instant start lever towards the handle. The motor will start.
- Release the safety switch button, but continue to hold the instant start lever to keep the mower running.
התאמת גובה חיתוך:
The mower features a 3-position manual height adjustment. To change the cutting height:
- Turn off the mower and disconnect it from the power source.
- Carefully tilt the mower on its side.
- Adjust all four wheels to the desired height setting (1.18, 1.85, or 2.52 inches) by repositioning them in the appropriate slots.
Grass Collection and Discharge:
The mower can be used with the grass collection bag or the side discharge chute.

Figure 4.2: Detaching the grass collection bag.
- For collecting clippings, ensure the grass bag is securely attached. Empty the bag when it is full to maintain optimal performance.
- For side discharge, remove the grass bag and attach the side discharge chute. This is ideal for taller grass where collecting clippings is not desired.
5. תחזוקה
תחזוקה שוטפת מבטיחה את אורך חייה ואת פעולתה הבטוחה של מכסחת הדשא שלכם.

Figure 5.1: Underside of the mower with the blade.
ניקיון כללי:
- Always disconnect the power cord before cleaning or performing any maintenance.
- נקו את החלק החיצוני של מכסחת הדשא בעזרת מודעהamp מטלית. אין להשתמש בחומרי ניקוי חזקים או ממסים.
- Remove grass clippings from the underside of the mower deck and around the blade after each use to prevent buildup and ensure efficient cutting.
טיפול להב:
- Inspect the blade regularly for sharpness and damage. A dull or damaged blade can affect cutting performance and may require sharpening or replacement.
- When handling the blade, always wear heavy-duty gloves to prevent injury.
6. פתרון תקלות
עיין בסעיף זה לקבלת פתרונות לבעיות נפוצות שאתה עשוי להיתקל בהן.
| בְּעָיָה | סיבה אפשרית | פִּתָרוֹן |
|---|---|---|
| מכסחת לא מתחילה | No power supply; Safety switch not engaged; Loose connections. | Check power outlet and extension cord; Ensure safety switch and lever are correctly engaged; Verify all connections are secure. |
| ביצועי חיתוך גרועים | Dull or damaged blade; Cutting height too low for grass type; Grass clippings clogging the deck. | Sharpen or replace blade; Adjust cutting height; Clean underside of mower deck. |
| רטט מוגזם | להב עקום או לא מאוזן; רכיבים רופפים. | בדוק את הלהב לאיתור נזקים והחלף במידת הצורך; בדוק את כל המחברים להידוק. |
7. מפרטים
Detailed technical specifications for the Sun Joe MJ401E-PRO Electric Lawn Mower.
| תכונה | מִפרָט |
|---|---|
| מותג | סאן ג'ו |
| מספר דגם | MJ401E-PRO |
| מקור כוח | חשמלי עם כבלים |
| מָנוֹעַ | 13-Amp |
| רוחב חיתוך | 14 אינץ' |
| מצבי גובה חיתוך | 3 (1.18 אינץ' עד 2.52 אינץ') |
| קיבולת שקית דשא | 10.6 ליטר |
| חומר להב | נירוסטה |
| משקל פריט | 30 פאונד |
| מידות המוצר | 48.4" D x 40.6" W x 40.6" H |
| ללא מהירות עומס | 3500 סל"ד |
| UPC | 787392915494, 810829024442 |
8. אחריות ותמיכה
Your Sun Joe MJ401E-PRO Electric Lawn Mower comes with a 2-year manufacturer's warranty.
For technical support, warranty claims, or to purchase replacement parts, please visit the official Sun Joe website or contact their customer service department. Refer to the product packaging or the Sun Joe webאתר לקבלת פרטי הקשר העדכניים ביותר.
Ask a question about this manual
Ask about setup, troubleshooting, compatibility, parts, safety, or missing instructions. Manuals+ will review the question and use this page’s manual context to help answer it.