
KitchenAid 5KMT223GOB
KitchenAid 5KMT223GOB 2-Slot Automatic Toaster
מדריך למשתמש
אמצעי הגנה חשובים
בעת שימוש במכשירים חשמליים, יש להקפיד תמיד על אמצעי זהירות בסיסיים, כולל הדברים הבאים:
- קרא את כל ההוראות לפני הפעלת הטוסטר.
- אל תיגע במשטחים חמים. השתמש בידיות או ידיות.
- כדי להגן מפני התחשמלות, אין לטבול את הכבל, התקעים או הטוסטר במים או בנוזל אחר.
- יש צורך בהשגחה צמודה כאשר כל מכשיר נמצא בשימוש על ידי ילדים או בקרבתו.
- נתק מהשקע כאשר אינו בשימוש ולפני ניקוי. מניחים להתקרר לפני ששמים או מורידים חלקים.
- אין להפעיל כל מכשיר עם כבל או תקע פגומים, או לאחר שהמכשיר פגום או ניזוק בכל דרך שהיא. החזר את המכשיר למתקן השירות המורשה הקרוב לבדיקה, תיקון או התאמה.
- השימוש באביזרים נלווים שלא מומלץ על ידי יצרן המכשיר עלול לגרום לפציעות.
- אין להשתמש בחוץ.
- אל תתנו לכבל להיות תלוי על קצה השולחן או השיש, או לגעת במשטחים חמים.
- אין להניח על או ליד מבער גז או חשמלי חם, או בתנור מחומם.
- תמיד חברו תחילה את התקע למכשיר, ולאחר מכן חברו את הכבל לשקע בקיר. כדי לנתק, כבו כל בקר למצב 'כבוי', ולאחר מכן הוציאו את התקע משקע הקיר.
- אל תשתמש במכשיר לשימוש אחר מהשימוש המיועד.
- אסור להכניס מזון גדול מדי, אריזות נייר כסף או כלים לטוסטר מכיוון שהם עלולים להיות כרוכים בסכנת שריפה או התחשמלות.
- שריפה עלולה להתרחש אם טוסטרים מכוסים או נוגעים בחומר דליק, לרבות וילונות, וילונות, קירות וכדומה, כאשר הם פועלים.
- אל תנסה לעקור מזון כאשר הטוסטר מחובר לחשמל.
- אל תפעל ללא השגחה.
חלקים ותכונות
Familiarize yourself with the components of your KitchenAid 2-Slot Automatic Toaster for optimal use.
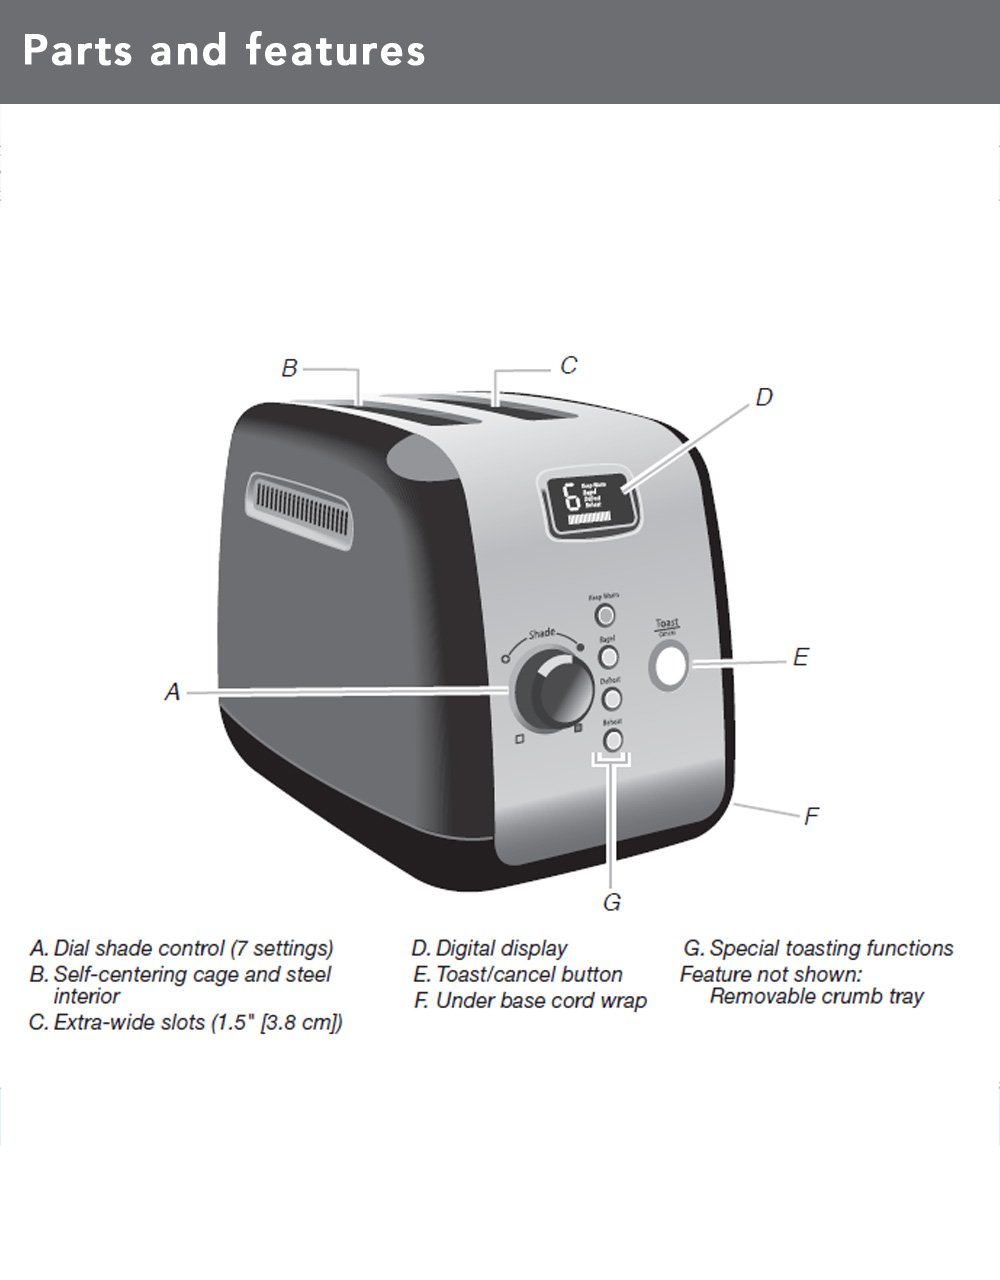
תְמוּנָה: Labeled diagram of the KitchenAid 2-Slot Automatic Toaster, highlighting its various parts.
- A. Dial Shade Control (7 settings): Adjusts the browning level of your toast.
- B. Self-Centering Cage and Steel Interior: Ensures even toasting for various bread thicknesses.
- C. Extra-Wide Slots (1.5" / 3.8 cm): Accommodates thick crumpets, breads, or pastries.
- ד. תצוגה דיגיטלית: Shows selected shade setting and a countdown timer for toasting progress.
- E. Toast/Cancel Button: Initiates or stops the toasting cycle at any point.
- F. Under Base Cord Wrap: Provides convenient cord storage.
- G. Special Toasting Functions: Includes Keep Warm, Bagel, Defrost, and Reheat buttons.
- Feature not shown: Removable Crumb Tray for easy cleaning.

תְמוּנָה: מעלview of the KitchenAid 2-Slot Automatic Toaster, detailing its key features such as extra-wide slots, shade control dial, Keep Warm feature, and Toast/Cancel button.
הגדרה
פריקה והצבה
- הוציאו בזהירות את הטוסטר ואת כל חומרי האריזה.
- Place the toaster on a dry, flat, stable surface, away from the edge of the counter.
- Ensure there is adequate clearance around the toaster for proper ventilation, especially from flammable materials like curtains.
- Unwind the power cord and plug it into a grounded 240-volt electrical outlet.
שימוש ראשון
Before toasting food for the first time, operate the toaster without bread for one cycle at the highest shade setting. This will burn off any manufacturing residues and eliminate any odors. A slight odor or smoke is normal during this initial use.
הוראות הפעלה
לחם קליה

תְמוּנָה: The KitchenAid 2-Slot Automatic Toaster actively toasting two slices of bread, demonstrating its function.
- Insert up to two slices of bread or other items into the toasting slots. The self-centering racks will automatically adjust to hold the bread.
- בחרו את רמת ההשחמה הרצויה באמצעות חוגת שליטה בצל. Settings range from 1 (lightest) to 7 (darkest). The digital display will show the selected shade.
- הקש על Toast/Cancel button. The motorized lift will automatically lower the bread into the toasting slots, and the toasting cycle will begin. The digital display will show a countdown timer.
- Once the toasting cycle is complete, the bread will automatically be raised.
- כדי לעצור את מחזור הקלייה בכל עת, לחצו על Toast/Cancel button again. The bread will automatically raise.
פונקציות מיוחדות
Your toaster includes several specialized functions for different toasting needs:
- לשמור על חום: Press this button after a toasting cycle to keep toasted foods warm for up to one minute without additional browning. The motorized lift will lower the toast and keep it warm.
- כַּעַך: This function toasts the cut-side of a bagel while gently warming the outer surfaces. Insert bagels with the cut side facing inwards. Select your shade and press the Bagel button, then the Toast/Cancel button.
- לְהַפְשִׁיר: Defrosts and toasts frozen food. Insert frozen bread, select your shade, and press the Defrost button, then the Toast/Cancel button. The toaster will automatically adjust the toasting time.
- לחמם מחדש: Quickly reheats previously toasted food without further browning. Insert the toasted item, and press the Reheat button, then the Toast/Cancel button.
טיפול וניקיון
Regular cleaning ensures the longevity and optimal performance of your toaster.
ניקוי מגש הפירורים
- ודאו שהטוסטר מנותק מהחשמל ושהוא קר לחלוטין.
- Locate the removable crumb tray at the bottom of the toaster.
- Pull out the crumb tray to remove accumulated crumbs.
- Empty the crumbs into a waste bin. The crumb tray can be washed in the top rack of a dishwasher or by hand with warm, soapy water. Rinse thoroughly and dry completely before reinserting.
- החלק את מגש הפירורים בחזרה למקומו עד שיישמע נקישה בטוחה.
ניקוי החלק החיצוני
- נתקו את הטוסטר מהחשמל ותנו לו להתקרר לחלוטין.
- נגב את החלק החיצוני של הטוסטר עם מודעהamp מטלית. אין להשתמש בחומרי ניקוי שוחקים או בכריות קרצוף, מכיוון שהם עלולים לשרוט את המשטח.
- Ensure no moisture enters the toasting slots or electrical components.
- יבש היטב עם מטלית רכה.
פתרון בעיות
If you experience issues with your toaster, refer to the following common problems and solutions:
| בְּעָיָה | סיבה אפשרית | פִּתָרוֹן |
|---|---|---|
| הטוסטר לא נדלק. | לא מחובר לחשמל; כבה את החשמלtagה; מפסק החשמל הופעל. | Ensure the toaster is securely plugged into a working outlet. Check your home's circuit breaker. |
| Bread does not lower or raise. | Motorized lift malfunction; Toast/Cancel button not pressed. | Ensure the toaster is plugged in and the Toast/Cancel button is pressed firmly. If the issue persists, contact customer service. |
| קלייה לא אחידה. | Bread not centered; crumb tray full; internal element issue. | The self-centering racks should position bread correctly. Empty and clean the crumb tray. If unevenness persists, contact customer service. |
| ריח עשן או שרוף. | Crumbs in toaster; food stuck; first use residue. | Immediately press the Cancel button and unplug the toaster. Allow to cool. Clean the crumb tray. Remove any stuck food carefully (only when unplugged and cool). Initial use may produce some smoke/odor. |
If the problem persists after attempting these solutions, please contact KitchenAid Customer Service.
מפרטים
- מותג: KitchenAid
- דֶגֶם: 5KMT223GOB
- כּוֹחַ: 1100 וואט
- כרך ידtage: 240 וולט
- מספר פרוסות: 2
- Slot Count: 2
- רוחב חריץ: 3.8 cm (Extra-wide)
- הגדרות גוון: 7
- מאפיינים מיוחדים: Cancel Function, Touchscreen (Digital Display), Motorized Lift, Keep Warm, Bagel, Defrost, Reheat functions.
- משקל פריט: 5.64 פאונד
- בְּנִיָה: All metal (stainless steel housing and steel interior)
אחריות ושירות
מידע על אחריות
This KitchenAid 5KMT223GOB 2-Slot Automatic Toaster comes with a 2 שנות אחריות מתאריך הרכישה. אנא שמור את הוכחת הרכישה שלך לצורך תביעות אחריות.
The warranty covers defects in materials and workmanship under normal household use. It does not cover damage resulting from misuse, abuse, accidents, alterations, or commercial use.
שֵׁירוּת לָקוֹחוֹת
For technical assistance, service, or warranty claims, please contact KitchenAid Customer Service. Refer to the contact information provided in your product packaging or visit the official KitchenAid webאתר עבור האזור שלך.
When contacting customer service, please have your product model number (5KMT223GOB) and serial number (if applicable) ready.
Ask a question about this manual
Ask about setup, troubleshooting, compatibility, parts, safety, or missing instructions. Manuals+ will review the question and use this page’s manual context to help answer it.