1. המוצר נגמרview
The Vonyx STM3030 is a compact and versatile 4-channel DJ mixer designed for various audio applications. Despite its size, it offers extensive connectivity, including two switchable phono/line inputs for turntables and three dedicated line inputs for external audio sources such as CD players, laptops, or smartphones. An integrated MP3 player allows direct music playback from USB drives or SD cards. For wireless convenience, the STM3030 features a Bluetooth receiver, enabling seamless audio streaming from compatible devices. Additionally, it includes a recording function, allowing users to capture their mixes directly to a USB drive or SD card. The mixer is equipped with an LED VU meter for visual signal monitoring and illuminated potentiometers for enhanced visibility in low-light environments. Microphone inputs are provided for vocal performances or announcements, and a headphone output facilitates pre-listening to tracks before they go live.
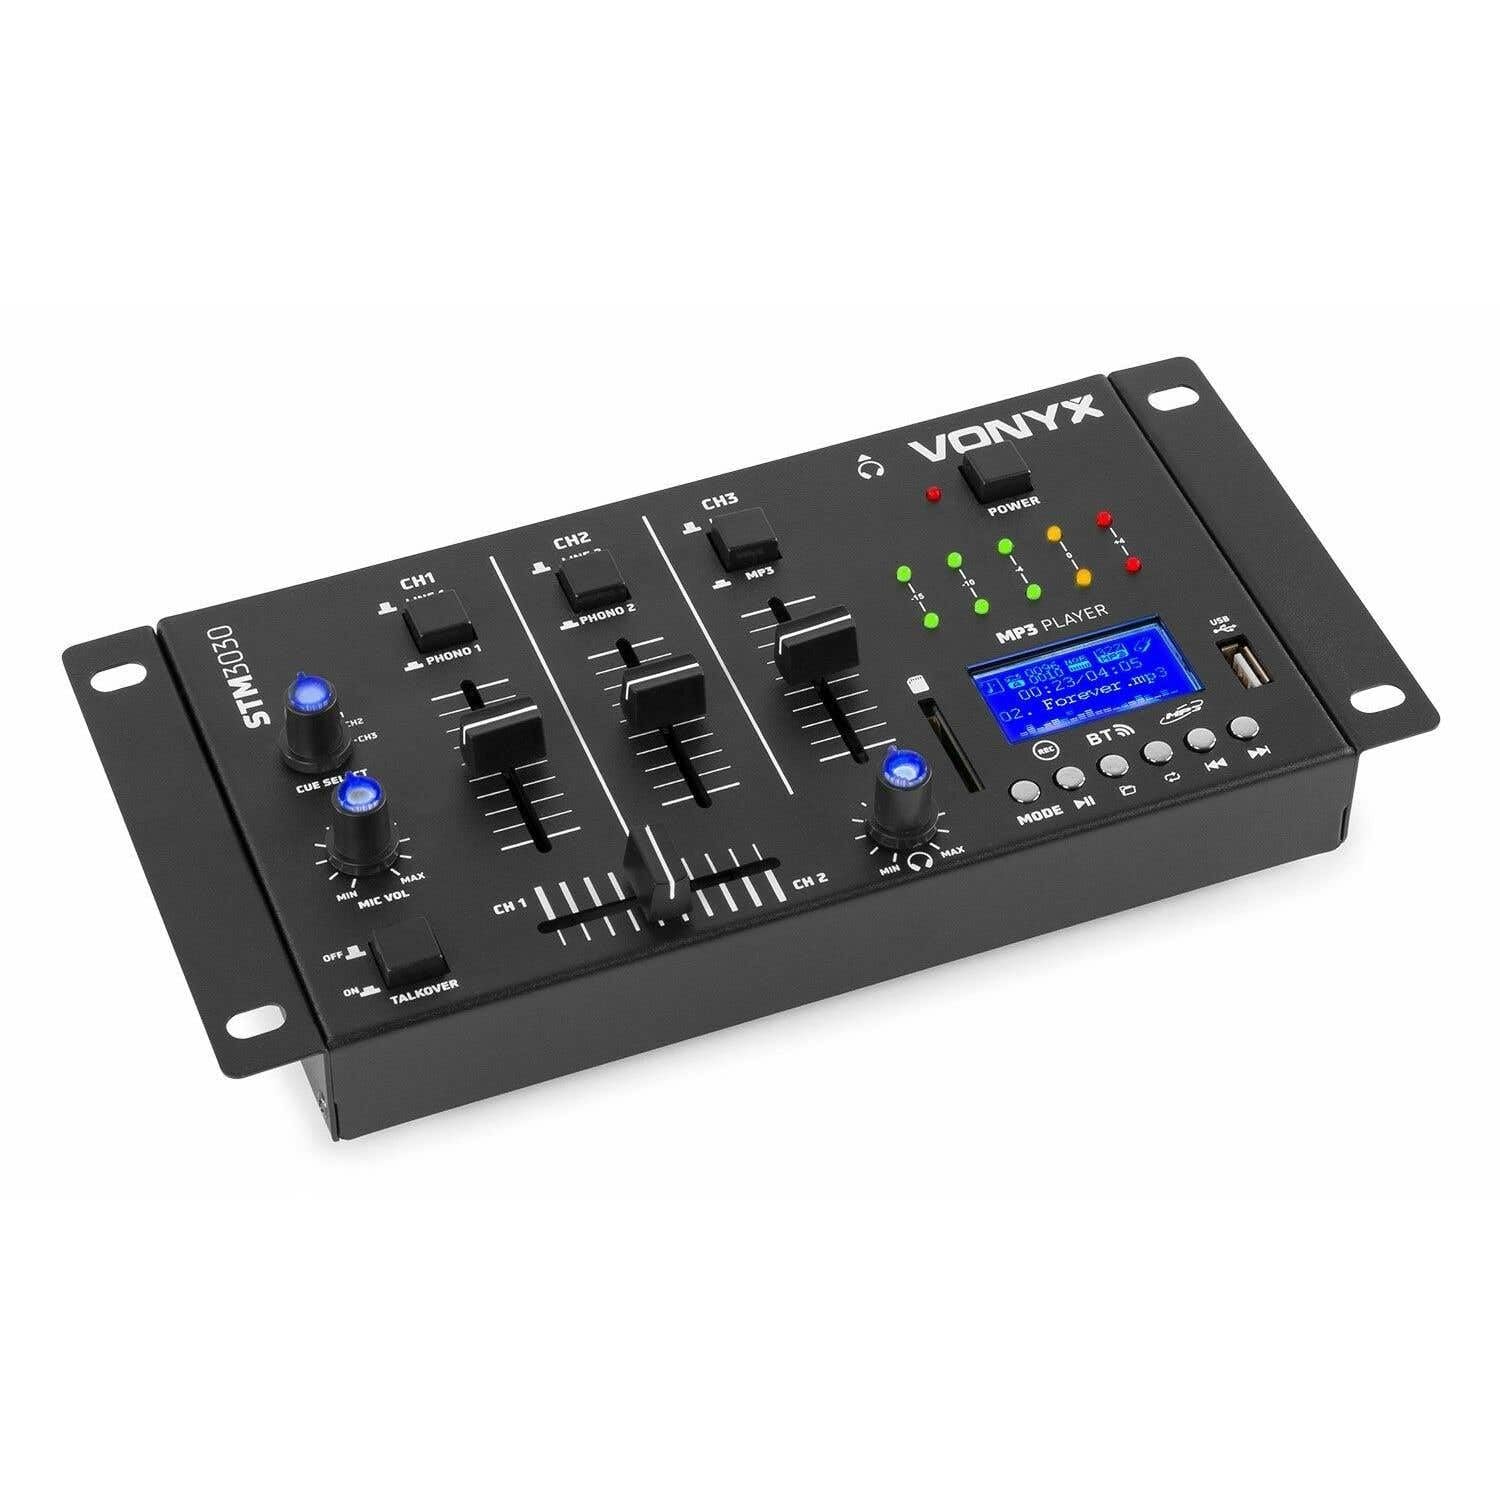
תמונה 1.1: חֲזִית view of the Vonyx STM3030 DJ Mixer, showcasinהעיצוב הקומפקטי ופריסת הבקרה שלו.
2. תכונות עיקריות
- מיקסר 4 ערוצים: Provides four input channels for connecting multiple audio sources.
- קישוריות רב-תכליתית: Includes Jack and RCA inputs for various devices.
- ממשק בלוטות': Enables wireless music streaming from smartphones, tablets, or computers.
- נגן MP3 משולב: Supports direct playback from USB drives and SD cards.
- USB Recording Function: Allows recording of live mixes to USB or SD storage.
- Cue Function: For pre-listening to tracks through headphones.
- LED VU Meter: Provides visual feedback on audio signal levels.
- Illuminated Controls: Potentiometers are illuminated for easy operation in dark environments.
- Crossfader: For smooth transitions between channels.
- פונקציית Talkover: Automatically reduces music volume when the microphone is used.
- עיצוב קומפקטי: Easy to integrate into any DJ setup.
3. הוראות בטיחות
Please read these safety instructions carefully before operating the device and retain them for future reference. Incorrect use may result in electric shock, fire, or other hazards.
- ספק כוח: השתמשו רק במתאם החשמל המצורף. ודאו שהעוצמהtage תואם את הדרישות המצוינות במכשיר.
- מים ולחות: Do not expose the device to rain, moisture, or liquids. Never place objects filled with liquids on the device.
- אוורור: Ensure proper ventilation. Do not block any ventilation openings. Install the device according to the manufacturer's instructions.
- מקורות חום: אין להתקין ליד מקורות חום כלשהם כגון רדיאטורים, אוגרי חום, תנורים או מכשירים אחרים (כולל ampמחצבים) המייצרים חום.
- הגנה על כבל חשמל: הגן על כבל החשמל מפני הליכה או צביטה, במיוחד בתקעים, בשקעי נוחות ובנקודה שבה הם יוצאים מהמכשיר.
- ניקוי: Unplug the device from the power outlet before cleaning. Use only a dry, soft cloth.
- שֵׁרוּת: אל תנסו לטפל במוצר זה בעצמכם. יש לפנות לכל טיפול בתיקונים ולטיפול באנשי שירות מוסמכים. טיפול נדרש כאשר המכשיר ניזוק בכל דרך שהיא, כגון כבל חשמל או תקע פגומים, נוזלים נשפכו או חפצים נפלו לתוכו, המכשיר נחשף לגשם או לחות, אינו פועל כרגיל או נפל.
- בָּרָק: נתק את המכשיר מהחשמל במהלך סופות ברקים או כאשר אינו בשימוש לפרקי זמן ארוכים.
4. בקרות וחיבורים
4.1 בקרות בלוח הקדמי

תמונה 4.1: חלק עליון בזווית view of the Vonyx STM3030, highlighting the front panel controls.
- CH1 / CH2 / CH3: Input channels.
- LINE 1 / PHONO 1 (CH1): Selector switch for Channel 1 input source.
- LINE 2 / PHONO 2 (CH2): Selector switch for Channel 2 input source.
- LINE 3 / MP3 (CH3): Selector switch for Channel 3 input source.
- Faders בערוץ: Adjust the volume level for each channel.
- Crossfader: Blends audio between Channel 1 and Channel 2.
- CUE SELECT: Rotary knob to select which channel(s) to monitor through headphones.
- MIC VOL (MIN/MAX): כוונון עוצמת הקול של קלט המיקרופון.
- TALKOVER (OFF/ON): Activates the talkover function, which automatically lowers music volume when the microphone is in use.
- נורת חשמל: Indicates when the mixer is powered on.
- LED VU Meter: Displays the output level of the master mix.
- MP3 PLAYER Display: Shows track information, mode, and status.
- יציאת USB: לחיבור כונני הבזק מסוג USB.
- חריץ לכרטיס SD: להכנסת כרטיסי זיכרון SD.
- MP3 Player Controls (MODE, Play/Pause, Skip, REC, BT):
- מצב: Switches between USB, SD, and Bluetooth modes.
- הפעל/השהה: מתחיל או מושהה את ההפעלה.
- Skip (Previous/Next): מנווט בין רצועות.
- REC: Initiates or stops recording to USB/SD.
- BT: מפעיל את מצב צימוד Bluetooth.

תמונה 4.2: Close-up of the integrated MP3 player, showing the display, controls, USB port, and SD card slot.
4.2 חיבורי לוח אחורי

תמונה 4.3: Rear panel of the Vonyx STM3030, detailing all input and output connections.
- AC 12V 500mA: Power input jack for the included AC adapter.
- יציאת אוזניות (שקע 6.3 מ"מ): לחיבור אוזניות לצורך ניטור.
- OUTPUT (RCA L/R): Main stereo RCA output to connect to an ampליפר או רמקולים מופעלים.
- LINE 3 (RCA L/R): Stereo RCA input for Channel 3.
- LINE 2 / PHONO 2 (RCA L/R): Stereo RCA input for Channel 2, switchable between Line and Phono.
- LINE 1 / PHONO 1 (RCA L/R): Stereo RCA input for Channel 1, switchable between Line and Phono.
- MIC 1 / MIC 2 (6.3mm Jack): שקעי כניסת מיקרופון.
5. מדריך התקנה
- לפרוק ולמקם: Carefully remove the mixer from its packaging. Place it on a stable, flat surface with adequate ventilation.
- חבר חשמל: Connect the provided AC power adapter to the 'AC 12V 500mA' input on the rear panel of the mixer. Plug the adapter into a suitable wall outlet. The POWER LED on the front panel should illuminate.
- Connect Main Output: Connect the 'OUTPUT' RCA jacks on the rear panel to the input of your ampרמקולים או רמקולים מוגברים באמצעות כבלי RCA.
- חבר מקורות שמע:
- Turntables: Connect turntables to the 'PHONO 1' and 'PHONO 2' RCA inputs. Ensure the corresponding channel selector switches (CH1, CH2) are set to 'PHONO'.
- CD Players/Laptops/Other Line Devices: Connect these devices to the 'LINE 1', 'LINE 2', or 'LINE 3' RCA inputs. Set the corresponding channel selector switches to 'LINE'.
- חיבור מיקרופונים: If using microphones, plug them into the 'MIC 1' or 'MIC 2' 6.3mm jack inputs on the rear panel.
- חבר אוזניות: Plug your headphones into the 6.3mm headphone output jack on the rear panel for monitoring.
6. הוראות הפעלה
6.1 פעולה בסיסית
- הפעלה: Ensure all connections are secure. Turn on your amplifier/speakers first, then the STM3030 mixer.
- בחר קלט: For each channel, use the LINE/PHONO/MP3 selector switch to choose the desired audio source.
- Adjust Channel Volume: Use the individual channel faders (CH1, CH2, CH3) to adjust the volume of each input.
- פלט צג: Observe the LED VU meter to ensure your master output level is not clipping (reaching the red indicators).
6.2 Using the MP3 Player (USB/SD)
- הכנס מדיה: הכנס כונן הבזק מסוג USB ליציאת ה-USB או כרטיס SD לחריץ כרטיס ה-SD.
- Select MP3 Mode: Ensure the CH3 selector switch is set to 'MP3'. Press the 'MODE' button on the MP3 player until 'USB' or 'SD' is displayed.
- השמעה: Use the Play/Pause button to start or pause playback. Use the Skip buttons to navigate between tracks.
6.3 קישוריות בלוטות'
- הפעל בלוטות': Ensure the CH3 selector switch is set to 'MP3'. Press the 'MODE' button on the MP3 player until 'BT' is displayed. The display will show 'BT' and typically flash, indicating it's in pairing mode.
- צמד מכשיר: On your smartphone, tablet, or laptop, go to Bluetooth settings and search for available devices. Select 'Vonyx STM3030' (or similar name) to pair.
- הזרמת אודיו: Once paired, you can stream audio wirelessly from your device through Channel 3 of the mixer.
6.4 פונקציית הקלטה
- Prepare Storage: Insert a USB flash drive or SD card into the MP3 player section. Ensure it has sufficient free space and is formatted correctly (FAT32 is generally recommended).
- התחל להקליט: Press the 'REC' button on the MP3 player. The display will indicate that recording has started.
- רמות צג: Adjust your channel faders and monitor the VU meter to ensure optimal recording levels without distortion.
- הפסקת ההקלטה: לחץ שוב על כפתור 'REC' כדי להפסיק את ההקלטה. ההקלטה file יישמר בכונן ה-USB או בכרטיס ה-SD שלך.
6.5 Microphone Usage and Talkover
- חיבור מיקרופון: Plug your microphone(s) into the MIC 1 or MIC 2 jacks on the rear panel.
- Adjust Mic Volume: Use the 'MIC VOL' knob on the front panel to adjust the microphone's volume.
- Activate Talkover: If you wish for the music volume to automatically decrease when you speak into the microphone, set the 'TALKOVER' switch to 'ON'. Set it to 'OFF' to disable this function.
6.6 Headphone Monitoring (Cue)
- חבר אוזניות: Plug your headphones into the headphone output jack.
- בחר ערוצים: Use the 'CUE SELECT' rotary knob to choose which channel(s) you want to pre-listen to in your headphones without affecting the main output.
7. פתרון תקלות
- אין פלט קול:
- Check if the mixer is powered on and the POWER LED is lit.
- Ensure all audio cables are securely connected to the correct inputs and outputs.
- Verify that channel faders and the master output level are raised.
- Confirm the correct input source (LINE/PHONO/MP3) is selected for each channel.
- Check the volume and input selection on your connected ampליפר או רמקולים מופעלים.
- סאונד מעוות:
- Reduce the input level of the audio source.
- Lower the channel faders or master output level to prevent clipping (indicated by red LEDs on the VU meter).
- Ensure the correct input type (LINE/PHONO) is selected for turntables; incorrect selection can cause distortion.
- Bluetooth לא מתחבר:
- Ensure the mixer's MP3 player is in 'BT' mode and flashing, indicating pairing mode.
- Make sure your Bluetooth device is within range (typically up to 10 meters) and has Bluetooth enabled.
- נסה לנתק את ההתאמה ולצימוד מחדש את המכשיר.
- USB/SD Recording Not Working:
- Check if the USB drive or SD card is properly inserted.
- Ensure the storage device is formatted to FAT32.
- Verify that there is sufficient free space on the USB drive or SD card.
8. מפרטים
| מותג | ווניקס |
| דֶגֶם | STM3030 |
| מספר ערוצים | 4 |
| טכנולוגיית קישוריות | בלוטות', USB |
| מקור כוח | Mains powered (AC 12V / 500mA adapter included) |
| תגובת תדר | 20 הרץ - 20 קילוהרץ |
| כניסות שמע | 2x Phono (RCA), 3x Line (RCA), 2x Microphone (6.3mm Jack), USB, SD, Bluetooth |
| יציאות שמע | 1x Master (RCA), 1x Headphone (6.3mm Jack) |
| Supported Data Types | MP3, WAV |
| מידות (L x W x H) | 125 x 267 x 55 מ"מ |
| משקל פריט | 0.9 kg (Product weight), 1.3 kg (Shipping weight) |
9. תחזוקה
To ensure the longevity and optimal performance of your Vonyx STM3030 DJ Mixer, follow these maintenance guidelines:
- ניקוי: Regularly wipe the mixer with a dry, soft, lint-free cloth. Do not use abrasive cleaners, solvents, or strong detergents, as these can damage the finish and internal components.
- הגנה מפני אבק: Keep the mixer free from dust. When not in use for extended periods, consider covering it with a dust cover.
- סְבִיבָה: Avoid operating the mixer in excessively hot, cold, humid, or dusty environments. Keep it away from direct sunlight and sources of vibration.
- ניהול כבלים: Ensure cables are not tangled or pinched, which can lead to damage over time.
10. אחריות ותמיכה
The Vonyx STM3030 DJ Mixer comes with a אחריות ל-24 חודשים מתאריך הרכישה. אחריות זו מכסה פגמי ייצור ופגמים בחומר בשימוש רגיל.
For warranty claims, technical support, or service inquiries, please contact your retailer or the manufacturer directly. Please retain your proof of purchase for warranty validation.