
1. הקדמה
This manual provides essential information for the safe and efficient operation of your InFocus IN112a SVGA DLP Projector. Please read it thoroughly before using the projector and retain it for future reference. The InFocus IN112a is designed to deliver clear and bright projections for various applications, featuring SVGA resolution, HDMI connectivity, and 3D support.
2. מידע בטיחות
יש להקפיד על אמצעי הזהירות הבאים כדי למנוע נזק למקרן ולהבטיח את בטיחות המשתמש:
- Do not look directly into the projector lens כאשר ה-lamp דולק. האור החזק עלול לגרום נזק לעיניים.
- יש לוודא אוורור נאות. אין לחסום פתחי אוורור.
- Only qualified service personnel should open the projector casinז. אין בפנים חלקים הניתנים לתחזוקה על ידי המשתמש.
- השתמשו רק בכבל החשמל המצורף למקרן.
- הרחק את המקרן ממים או מסביבות לחות.
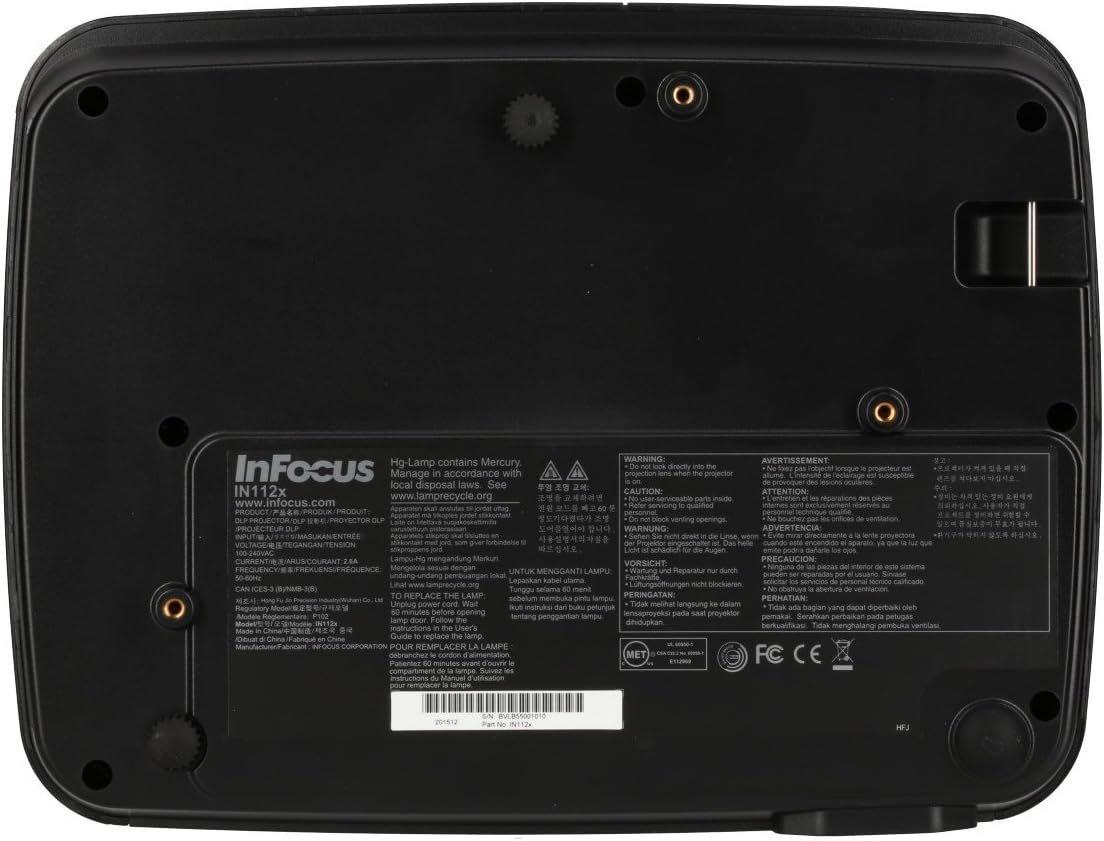
- המקרן lamp contains mercury. Dispose of lamps according to local regulations. Visit www.lampRecycle.org למידע נוסף.

תמונה: תחתית view of the InFocus IN112a projector, displaying various warning labels, regulatory compliance marks (like CE, FCC), and information regarding the mercury content in the lamp והוראות מיחזור.
3. המוצר נגמרview
3.1. Projector Dimensions

תמונה: חזית view of the InFocus IN112a projector, illustrating its physical dimensions. The projector measures approximately 292 mm in width, 220 mm in depth, and 108 mm in height.
3.2. פקדי הפאנל העליון
תמונה: למעלה view of the InFocus IN112a projector, highlighting the control panel. This panel includes buttons for power, menu access, source selection, and directional navigation for menu adjustments.
The top panel features buttons for power on/off, menu access, input source selection, and navigation arrows for adjusting settings within the on-screen display (OSD) menu. The focus and zoom rings are located near the lens.
3.3. חיבורי לוח אחורי

תמונה: אחורי view of the InFocus IN112a projector, displaying its comprehensive array of connectivity ports. These include HDMI 1.4, two VGA inputs (Computer 1, Computer 2), a VGA monitor output, S-Video, Composite video, two 3.5mm stereo audio inputs, one 3.5mm stereo audio output, an RS232C control port, and a USB-B port.
The rear panel provides a variety of connection options:
- HDMI 1.4: עבור קלט וידאו ואודיו דיגיטליים.
- VGA (Computer 1, Computer 2): Two inputs for analog computer signals.
- VGA Monitor Out: לחיבור צג חיצוני.
- סרטון מורכב: עבור קלט וידאו ברזולוציה סטנדרטית.
- S-Video: For enhanced standard definition video input.
- Audio In (3.5mm x 2): עבור קלט שמע סטריאו.
- יציאת שמע (3.5 מ"מ): For stereo audio output to external speakers.
- RS232C: For projector control via a computer or control system.
- USB-B: עבור שירות או עדכוני קושחה.
4. התקנה
4.1. מיקום
Position the projector on a stable, flat surface or mount it securely to a ceiling. Ensure there is adequate space around the projector for ventilation. The distance from the screen will determine the image size. Refer to the specifications section for throw ratio details.
4.2. חיבור חשמל
Connect the supplied power cord to the projector's power inlet and then to a grounded electrical outlet. The power LED will illuminate, indicating standby mode.
4.3. Connecting Video Sources
Connect your video source (e.g., computer, Blu-ray player, cable box) to the appropriate input port on the projector's rear panel using a compatible cable. For best quality, use the HDMI input.
- HDMI: Connect an HDMI cable from your source to the projector's HDMI port.
- VGA: Connect a VGA cable from your computer to either the Computer 1 or Computer 2 port.
- קומפוזיט/S-וידאו: Connect the respective cable for older video sources.
4.4. חיבור אודיו
If using VGA, Composite, or S-Video inputs, connect an audio cable from your source's audio output to one of the projector's 3.5mm Audio In ports. HDMI carries both video and audio, so a separate audio connection is not typically needed for HDMI sources.
4.5. Adjusting Focus and Zoom
After powering on the projector and displaying an image, rotate the טבעת פוקוס around the lens until the image is sharp and clear. Use the טבעת זום to adjust the image size to fit your screen.
5. תפעול
5.1. הפעלה / כיבוי
- כדי להפעיל: Press the Power button on the projector's top panel or the remote control. The power indicator will turn green.
- כדי לכבות: Press the Power button twice. The projector will enter a cooling cycle, and the power indicator will turn red (standby) once complete.
5.2. בחירת מקור קלט
Press the "Source" button on the projector or remote control repeatedly to cycle through available input sources (HDMI, VGA1, VGA2, S-Video, Video). The projector will automatically detect an active signal if "Auto Source" is enabled in the menu.
5.3. ניווט בתפריט
Press the "Menu" button to access the On-Screen Display (OSD) menu. Use the directional arrows to navigate through menu options and the "Enter" button to select. Press "Menu" again to exit.
5.4. 3D Content Playback
The IN112a supports 3D content from Blu-ray players, cable boxes, dish services (over HDMI), and PC-based 3D content at 120Hz. To view 3D content, you will need 144 Hz DLP Link 3D glasses (sold separately).
- Ensure your 3D source is connected via HDMI.
- Play 3D content from your source.
- Turn on your 144 Hz DLP Link 3D glasses. The projector should automatically detect the 3D signal.
6. תחזוקה
6.1. Cleaning the Projector Lens
Gently wipe the lens with a soft, lint-free cloth specifically designed for optical surfaces. Do not use abrasive cleaners or excessive force, as this can scratch the lens.
6.2. לamp תַחֲלִיף
המקרן lamp בעל אורך חיים של עד 10,000 שעות. כאשר ה-lamp החיים מתקרבים לסופם, הודעת אזהרה עשויה להופיע, או שה-lamp indicator LED may illuminate. Refer to the full service manual for detailed lamp הוראות החלפה. אזהרה: ה-lamp מכיל כספית. השלך את l משומשampבהתאם לתקנות הסביבה המקומיות.
6.3. ניקוי מסנני אוויר
Regularly clean the air filters to ensure proper ventilation and prevent overheating. Dust and debris can accumulate, reducing cooling efficiency. Gently remove the filter cover and clean the filter with a soft brush or vacuum cleaner. Replace the filter cover securely.
7. פתרון תקלות
| בְּעָיָה | סיבה אפשרית | פִּתָרוֹן |
|---|---|---|
| לא הוצגה תמונה |
|
|
| התמונה מטושטשת |
|
|
| אין אודיו |
|
|
| המקרן מתחמם יתר על המידה ונכבה |
|
|
8. מפרטים
| תכונה | פְּרָט |
|---|---|
| מספר דגם | IN112X |
| טכנולוגיית תצוגה | DLP |
| רזולוציה מקורית | SVGA (800 x 600) |
| בְּהִירוּת | עד 3200 לומן |
| יחס ניגודיות | 15,000:1 |
| Lamp חַיִים | עד 10,000 שעות |
| קישוריות | HDMI 1.4, VGA x 2, Composite video, S-Video, 3.5 mm stereo in x 2, 3.5mm stereo out, VGA monitor out, RS232C, USB-B |
| תמיכת תלת מימד | Yes (requires 144 Hz DLP Link 3D glasses) |
| יחס זריקה | 1.9 - 2.09 |
| מידות המוצר | 14.25 x 12 x 7.75 אינץ' (כ-36.2 x 30.5 x 19.7 ס"מ) |
| משקל פריט | 5.4 פאונד (כ-2.45 ק"ג) |
| שימוש מומלץ | פנים/חוץ |
| תכונה מיוחדת | רמקולים מובנים |
9. אחריות ותמיכה
For warranty information and technical support, please refer to the documentation included with your purchase or visit the official InFocus webאתר. שמור את הוכחת הרכישה שלך לצורך תביעות אחריות.