
1. הקדמה
This manual provides detailed instructions for the installation, operation, and maintenance of your ASUS X99-DELUXE motherboard. The ASUS X99-DELUXE is an ATX motherboard designed for high-performance computing, supporting Intel LGA 2011-3 processors and DDR4 memory.

איור 1: מלמעלה למטה view of the ASUS X99-DELUXE Motherboard, showing the CPU socket, RAM slots, and heatsinks.
2. תכונות עיקריות
- ASUS OC Socket: Designed to enhance 8-core CPU and DDR4 performance beyond standard X99 expectations.
- תמיכה בזיכרון DDR4: Features a special memory overclocking design, supporting DDR4 memory speeds up to 3200MHz (O.C.).
- Dual M.2 X4 Support: Provides two M.2 slots with PCIe 3.0 x4 interface, enabling data transfer speeds up to 32Gb/s for compatible NVMe SSDs.
- Fan Extension Card: Includes an extension card for advanced PC cooling management.
- אופטימיזציה 5-כיוונית: Utilizes Dual Intelligent Processors 5 for system optimization, including performance tuning, power saving, digital power control, and fan control.
- UEFI BIOS: Features a media-acclaimed Unified Extensible Firmware Interface (UEFI) BIOS for intuitive system configuration.
- SATA Express: Supports SATA Express for storage speeds up to 10Gb/s.
3. התקנה והתקנה
לפני תחילת ההתקנה, ודא שהמערכת כבויה ומנותקת ממקור החשמל. טפל בלוח האם בקצוותיו כדי למנוע פריקה סטטית.
3.1. CPU Installation (LGA 2011-3 Socket)
- פתח בזהירות את מנגנון החזקת שקע המעבד.
- יישר את הסימן המשולש שעל המעבד עם הסימן המתאים שעל השקע.
- הכנס בעדינות את המעבד לשקע מבלי ללחוץ עליו בכוח.
- Close the retention mechanism to secure the CPU. Ensure no pins are bent during this process.

איור 2: זוויתי view of the ASUS X99-DELUXE Motherboard, highlighting the LGA 2011-3 CPU socket.
3.2. התקנת זיכרון (DDR4)
The motherboard supports DDR4 memory modules. Refer to the motherboard manual for specific memory configurations and supported speeds.
- פתחו את הקליפסים בשני קצוות חריץ ה-DIMM.
- יישר את החריץ במודול זיכרון DDR4 עם המפתח בחריץ ה-DIMM.
- הכנס את המודול בחוזקה לחריץ עד שהקליפסים יתייצבו במקומם.
3.3. התקנת התקן אחסון (M.2, SATA)
Install M.2 SSDs into the dedicated M.2 slots and SATA drives to the SATA ports. The motherboard supports SATA 3 (6Gb/s) and SATA Express.
3.4. חיבור ציוד היקפי
Connect your display, keyboard, mouse, and other peripherals to the rear I/O panel. The motherboard provides various USB ports, Ethernet ports, and audio jacks.
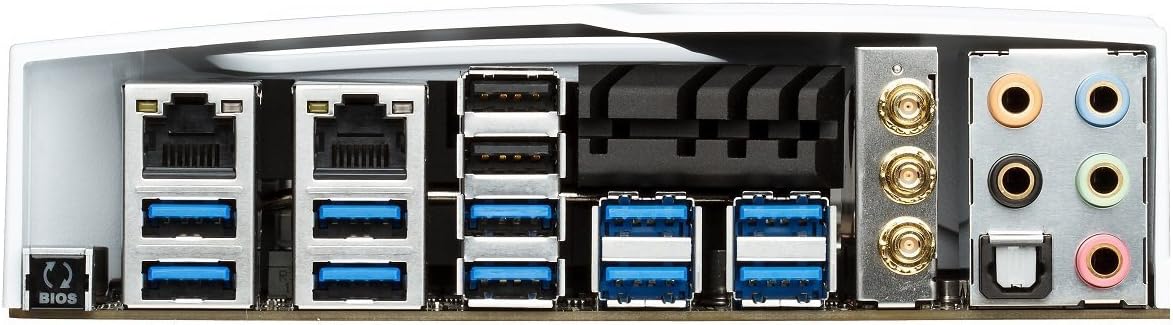
Figure 3: Rear I/O panel of the ASUS X99-DELUXE Motherboard, showing USB ports, Ethernet, and audio jacks.
4. הוראות הפעלה
4.1. UEFI BIOS Configuration
The UEFI BIOS allows you to configure system settings, boot options, and hardware parameters. To enter the BIOS, press the DEL key during system startup.
- מצב EZ: Provides a simplified interface for basic settings.
- מצב מתקדם: Offers comprehensive control over all motherboard features, including overclocking and fan control.
4.2. התקנת דרייבר
After installing your operating system (e.g., Windows XP, as listed in specifications, and newer OS versions), install the necessary drivers for the motherboard chipset, audio, network, and other integrated components. These are typically provided on a support DVD or available for download from the ASUS webאֲתַר.
4.3. 5-Way Optimization
The 5-Way Optimization feature, accessible through ASUS software, automatically tunes your system for optimal performance, power efficiency, digital power delivery, and fan acoustics based on your usage. It is recommended to manage overclocking and fan settings directly within the BIOS for more precise control.
5. תחזוקה
תחזוקה שוטפת מסייעת להבטיח את אורך החיים והפעולה היציבה של לוח האם שלך.
- הסרת אבק: יש לנקות מעת לעת אבק מלוח האם ומרכיבי הקירור באמצעות אוויר דחוס. יש לוודא שהמערכת כבויה ומנותקת מהחשמל לפני הניקוי.
- בדיקות חיבור: Verify that all cables and components are securely seated.
- עדכוני BIOS: בדוק את התמיכה של ASUS website for the latest BIOS updates to improve compatibility and performance. Follow update instructions carefully.
6. פתרון תקלות
If you encounter issues with your ASUS X99-DELUXE motherboard, consider the following troubleshooting steps:
- אין חשמל/אין אתחול:
- ודא שכל כבלי החשמל (ATX בעל 24 פינים, מעבד בעל 8 פינים) מחוברים היטב.
- Verify the power supply unit (PSU) is functioning correctly.
- בדוק את חיבור מתג ההפעלה בלוח הקדמי ללוח האם.
- אין תצוגה:
- Confirm the graphics card is properly seated in its PCIe slot and has adequate power.
- ודא שכבל הצג מחובר היטב לכרטיס המסך.
- בדוק עם כבל תצוגה או מסך אחר במידת האפשר.
- חוסר יציבות/קריסות מערכת:
- Check RAM modules for proper seating; try reseating them or testing one module at a time.
- Ensure CPU cooler is correctly installed and making good contact with the CPU. Monitor CPU temperatures.
- אפס את הגדרות ה-BIOS לברירת המחדל.
- Bent CPU Socket Pins:
Bent pins in the CPU socket can cause severe system malfunctions or prevent booting. This type of damage is typically not covered under warranty. Exercise extreme caution during CPU installation to avoid bending pins.
7. מפרטים
| קָטֵגוֹרִיָה | מִפרָט |
|---|---|
| מותג | ASUS |
| שם הדגם | X99-דלוקס |
| שקע מעבד | LGA 2011-3 |
| מעבדים תואמים | Intel Core i7 (LGA 2011-3) |
| סוג ערכת שבבים | אינטל X99 |
| טכנולוגיית זיכרון RAM | DDR4 |
| מהירות שעון זיכרון | Up to 3200 MHz (O.C.) |
| חריצי זיכרון זמינים | 8 |
| גודל מקסימלי של זיכרון RAM | 64 ג'יגה-בייט |
| ממשק כרטיס מסך | PCI Express |
| Total PCIe Ports | 5 |
| Total SATA Ports | 8 |
| נתמך בתקן אפיק מערכת | SATA 3 |
| יציאות USB 2.0 | 2 (internal headers, total ports may vary) |
| סך כל יציאות USB | Various (including USB 3.0 on rear I/O) |
| מספר יציאות אתרנט | 1 (Dual Gigabit LAN) |
| סוג מחבר מתח ראשי | 24 פינים ATX |
| מכשירים תואמים | מחשב אישי |
| פּלַטפוֹרמָה | Windows XP (and newer OS versions) |
| משקל פריט | 4.44 פאונד (כ-2.01 ק"ג) |
8. אחריות ותמיכה
למידע על אחריות ותמיכה טכנית, אנא עיינו באתר הרשמי של ASUS webאתר או צרו קשר עם שירות הלקוחות של ASUS. שמרו את הוכחת הרכישה שלכם לצורך תביעות אחריות.
תמיכה של ASUS Webאֲתַר: https://www.asus.com/support/
Note: Damage resulting from improper installation, misuse, or unauthorized modifications may void your product warranty.