
1. הקדמה
This manual provides detailed instructions for the installation, operation, maintenance, and troubleshooting of your ASUS P8Z77-V LX motherboard. The ASUS P8Z77-V LX is an ATX motherboard featuring the Intel Z77 chipset, designed to support Intel LGA1155 3rd/2nd Generation Intel Core i7 Processors.
תכונות מפתח כוללות:
- DIGI+ VRM: כרך דיגיטליtage regulation for enhanced system stability and power efficiency.
- מעבד אלקטרוני (EPU): System-level energy saving and real-time power management.
- ASUS USB 3.0 Boost: Improves USB 3.0 read/write performance with Normal, Turbo, and UASP modes.
- הגברת GPU: Provides flexible frequency and voltage adjustments for graphics performance upgrades.
- הגנה מפני נחשולי מתח: Safeguards components by providing voltage הגנה.
- Supports PCIe 3.0 for AMD Quad-GPU CrossFireX Technology.
- Intel Smart Response Technology for enhanced storage performance.
2. התקנה והתקנה
Proper installation is crucial for optimal performance and system stability. Ensure all components are compatible and installed correctly.
2.1 Unboxing and Component Overview
Upon unboxing, verify that all included accessories are present. Familiarize yourself with the motherboard layout before proceeding with installation.
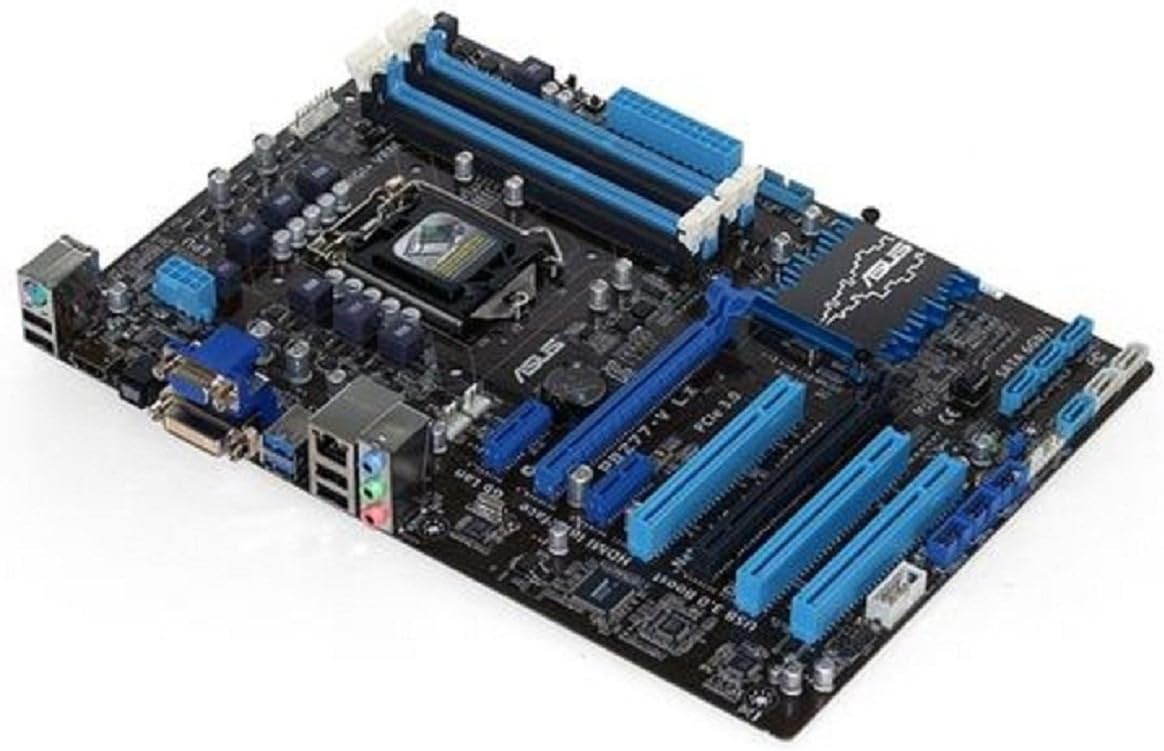
Image: The ASUS P8Z77-V LX motherboard, showcasing its LGA 1155 socket, four DDR3 RAM slots, PCIe slots, SATA ports, and rear I/O panel. The board features a black PCB with blue accents on the heatsinks and slots.
2.2 Processor (CPU) Installation
Carefully open the CPU socket lever. Align the triangular mark on the CPU with the corresponding mark on the socket. Gently place the CPU into the socket without forcing it. Close the lever to secure the CPU.
2.3 התקנת זיכרון (RAM)
Open the clips on the DDR3 DIMM slots. Align the notch on the memory module with the key in the DIMM slot. Press down firmly on both ends of the module until the clips snap into place.
2.4 התקנת כרטיס הרחבה
Insert graphics cards or other expansion cards into the appropriate PCIe slots. Ensure they are fully seated and secured with the case's retention mechanism.
2.5 חיבור התקן אחסון
Connect SATA 6Gb/s drives to the designated SATA ports on the motherboard using SATA data cables. Ensure power cables are also connected to your storage devices.
2.6 חיבור אספקת חשמל
Connect the 24-pin ATX power connector and the 8-pin (or 4-pin) CPU power connector from your power supply to the motherboard. Ensure all connections are firm.
2.7 אתחול ראשוני ותצורת BIOS
After assembling all components, connect your display, keyboard, and mouse. Power on the system and enter the BIOS/UEFI setup (usually by pressing DEL or F2 during boot) to configure basic settings, boot order, and verify component detection.
וידאו: אוברview of a motherboard and its accessories, demonstrating the components typically included and the general appearance of a motherboard for installation purposes.
סרטון: מוצר נגמרview הצגת וידאוasing various angles and features of a motherboard, providing a visual guide to its physical characteristics and connectivity options.
3. Operating the Motherboard Features
The ASUS P8Z77-V LX motherboard integrates several technologies to enhance performance and user experience.
3.1 DIGI+ VRM and EPU
These technologies work in conjunction to provide precise digital power control and intelligent energy conservation. Utilize the ASUS AI Suite utility in Windows to monitor and adjust these settings for optimal stability and power efficiency.
3.2 ASUS USB 3.0 Boost
This feature accelerates USB 3.0 transfer speeds. Install the ASUS USB 3.0 Boost utility from the provided driver disc or ASUS support website to enable and configure Normal, Turbo, or UASP modes for compatible USB 3.0 devices.
3.3 GPU Boost
The onboard GPU Boost switch or software utility allows for quick and easy graphics performance enhancement by adjusting GPU frequencies and voltages. Refer to the ASUS AI Suite documentation for detailed usage.
3.4 Intel Smart Response Technology
This SSD caching technology improves system responsiveness and boot times when combined with a solid-state drive (SSD) and a traditional hard disk drive (HDD). Configuration is typically done within the Intel Rapid Storage Technology utility or BIOS settings.
4. תחזוקה
תחזוקה שוטפת מסייעת להבטיח את אורך החיים והפעולה היציבה של לוח האם שלך.
- שמור על ניקיון: Periodically clean dust from the motherboard and case interior using compressed air. Ensure the system is powered off and unplugged before cleaning.
- עדכוני דרייבר: בדקו באופן קבוע את התמיכה של ASUS website for the latest drivers for your motherboard components (chipset, LAN, audio, etc.).
- עדכוני BIOS: Update the BIOS only when necessary, such as for new CPU support or critical bug fixes. Follow ASUS's recommended update procedures carefully to avoid system damage.
- ניהול כבלים: Ensure internal cables are neatly routed to promote good airflow and prevent interference.
5. פתרון תקלות
If you encounter issues with your system, refer to the following basic troubleshooting steps.
- אין חשמל/אין אתחול: Verify all power connections (24-pin ATX, 8-pin CPU) are securely seated. Check the power supply unit (PSU) functionality.
- אין תצוגה: Ensure the monitor is connected to the correct graphics output (onboard or discrete GPU). Reseat the graphics card and memory modules.
- שגיאות בקוד POST: If your motherboard has a POST code display or emits beep codes, consult the motherboard manual for the meaning of these codes to identify the faulty component.
- חוסר יציבות/קריסות מערכת: Check for overheating (CPU, GPU, chipset). Ensure RAM is correctly installed and compatible. Update drivers and BIOS. Test components individually if possible.
- בעיות היקפיות: If USB devices or other peripherals are not working, check device manager for driver issues. Try different ports.
6. מפרטים
| תכונה | מִפרָט |
|---|---|
| מותג | ASUS |
| שם הדגם | P8Z77-V LX |
| שקע מעבד | LGA 1155 |
| מעבדים תואמים | Intel Core i7 (3rd/2nd Gen) |
| סוג ערכת שבבים | אינטל Z77 |
| טכנולוגיית זיכרון RAM | DDR3 |
| זיכרון RAM מקסימלי נתמך | 32 GB DDR3 |
| מהירות זיכרון | 1600 מגה-הרץ |
| מספר יציאות USB 2.0 | 3 (כותרות פנימיות) |
| משקל פריט | 1.8 פאונד |
| מידות המוצר (LxWxH) | 13.78 x 11.69 x 2.26 אינץ' |
| כרך ידtage | 1.5 וולט |
| פּלַטפוֹרמָה | לא ספציפי למכונה |
7. אחריות ותמיכה
Your ASUS P8Z77-V LX motherboard is covered by a limited warranty. Please refer to the warranty card included with your product for specific terms and conditions, including the warranty period and coverage details.
For technical support, driver downloads, BIOS updates, and additional product information, please visit the official ASUS support webאֲתַר:
When contacting support, please have your motherboard model (P8Z77-V LX) and serial number readily available.