
1. הקדמה
This manual provides detailed instructions for the installation, operation, and maintenance of the Supermicro CSE-827HD-R1400B 1400W 2U Rackmount Server Chassis. This high-performance chassis is designed to house server components, offering robust power delivery and efficient cooling for demanding applications. Please read this manual thoroughly before proceeding with installation or operation.
2. מידע בטיחות
יש להקפיד תמיד על אמצעי הזהירות הבאים כדי למנוע פציעות ונזק לציוד:
- ודא שספק הכוח מנותק לפני ביצוע כל התקנה או תחזוקה.
- Wear anti-static wrist straps when handling internal components to prevent electrostatic discharge (ESD).
- Do not operate the chassis with the cover removed unless specifically instructed for troubleshooting.
- ודא הארקה תקינה לכל החיבורים החשמליים.
- This chassis is heavy. Use appropriate lifting techniques or assistance when moving or installing it in a rack.
- יש לשמור על אוורור נאות סביב המארז כדי למנוע התחממות יתר.
3. תכולת החבילה
ודא שכל הפריטים נמצאים בחבילה:
- Supermicro CSE-827HD-R1400B 2U Rackmount Server Chassis
- 1400W High-Efficiency (1+1) Redundant Power Supply (pre-installed)
- 4x 80mm PWM Cooling Fans (pre-installed)
- Rack mounting rails (if included with your specific purchase)
- Accessory kit (screws, cables, standoffs)
- מדריך התקנה מהיר (מסמך זה)
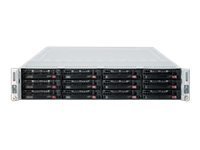
איור 3.1: Supermicro CSE-827HD-R1400B 2U Rackmount Server Chassis. This image shows the front view of the server chassis, highlighting its rackmount design and general appearance.
4. התקנה והתקנה
Follow these steps for proper installation of the server chassis and its components.
4.1. הרכבה על מתלה
- Attach the provided rack rails to the server chassis sides using the designated screws.
- Mount the other end of the rack rails to the server rack posts, ensuring they are securely fastened.
- Slide the chassis into the rack until it locks into place.
4.2. התקנת לוח אם
The chassis supports ATX motherboards.
- Remove the chassis top cover by unscrewing the retaining screws.
- Install the I/O shield into the chassis rear panel.
- Align the motherboard with the standoffs inside the chassis.
- אבטחו את לוח האם בעזרת הברגים המתאימים.
4.3. התקנת כונן קשיח
The chassis supports 3.5-inch hard drives.
- Locate the drive bays.
- Mount each 3.5-inch hard drive into a drive tray.
- Slide the drive tray with the installed hard drive into the designated bay until it clicks into place.
- Connect the SATA/SAS data and power cables to each hard drive.
4.4. חיבורי חשמל
- Connect the main 24-pin ATX power connector from the power supply to the motherboard.
- חבר את מחבר החשמל של המעבד בעל 8 פינים (או 4 פינים) ללוח האם.
- Ensure all peripheral power connectors (e.g., for GPUs, additional fans) are properly connected.
- Connect the AC power cords from the redundant power supplies to separate, grounded power outlets.
5. הוראות הפעלה
5.1. הפעלה / כיבוי
- הפעלה: After all connections are secure, press the power button on the front panel. The power LED should illuminate.
- כיבוי רגיל: Perform a graceful shutdown through the operating system.
- כיבוי כוח: Press and hold the power button for 5-7 seconds. Use only when necessary to prevent data loss.
5.2. מחווני LED
Refer to your motherboard manual for specific LED indicator meanings. Common indicators on the chassis front panel include:
- LED מתח: Indicates system power status (On/Off/Standby).
- HDD Activity LED: Flashes when hard drives are being accessed.
- Network Activity LED: Indicates network traffic (if integrated on the front panel).
6. תחזוקה
Regular maintenance ensures optimal performance and longevity of your server chassis.
- הסרת אבק: Periodically clean dust from the chassis interior, especially fan blades and heatsinks, using compressed air. Ensure the system is powered off and unplugged before cleaning.
- בדיקת מאוורר: Check cooling fans for proper operation and excessive noise. Replace any failing fans promptly.
- ניהול כבלים: Ensure internal cables are neatly routed to avoid obstructing airflow.
7. פתרון תקלות
סעיף זה עוסק בבעיות נפוצות שאתה עשוי להיתקל בהן.
| בְּעָיָה | סיבה אפשרית | פִּתָרוֹן |
|---|---|---|
| המערכת לא נדלקת. | Power cables disconnected, faulty power supply, faulty power button. | Check all power connections. Verify power supply status LEDs. Test power button functionality. |
| Excessive fan noise. | Dust accumulation, failing fan bearing. | Clean fans. Replace noisy or failing fans. |
| התחממות יתר של המערכת. | Poor airflow, fan failure, dust buildup. | Ensure proper ventilation. Check fan operation. Clean dust from components. |
| Hard drives not detected. | כבלי נתונים/חשמל רופפים, הגדרות BIOS שגויות, כונן תקול. | Verify all data and power cables are securely connected. Check BIOS/UEFI settings. Test drives in another system if possible. |
8. מפרטים
| תכונה | פְּרָט |
|---|---|
| מותג | סופר מיקרו |
| שם הדגם | CSE-827HD-R1400B |
| גורם צורה | מתלה 2U |
| תאימות לוח אם | ATX |
| ספק כוח | 1400W High-Efficiency (1+1) Redundant, 80 PLUS Gold Certified |
| מאווררי קירור | 4x 80mm PWM |
| גורם צורת דיסק קשיח | 3.5 אינץ' |
| צֶבַע | שָׁחוֹר |
| משקל פריט | 68 פאונד |
| מידות המוצר (D x W x H) | 28.5" D x 28.5" W x 28.5" H |
| UPC | 672042062768 |
| ASIN | B005KFBPBS |
9. אחריות ותמיכה
For warranty information, please refer to the documentation provided with your purchase or visit the official Supermicro website. For technical support, product inquiries, or to report issues, please contact Supermicro customer service through their official channels.
תמיכה מקוונת: www.supermicro.com/support
מידע ליצירת קשר: עיין ב- Supermicro webאתר לקבלת פרטי קשר אזוריים.