1. התקנה
1.1 Unpacking the Camcorder
הוציאו בזהירות את כל הרכיבים מהאריזה. ודאו שהפריטים הבאים נמצאים:
- JVC GR-25U VHS-C VideoMovie Camcorder (main unit)
- מתאם מתח AC/מטען
- Rechargeable Battery Pack (BN-V60U)
- RF Unit and A/V Cables
- Carrying Case (optional, may vary by package)
- מדריך הוראות (מסמך זה)
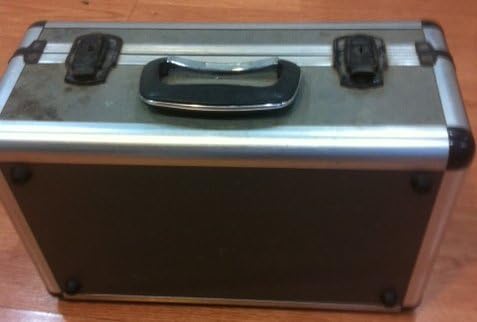
Image: A silver and black carrying case, designed to protect the camcorder and its accessories during transport and storage.

Image: Various camcorder accessories including the JVC RF unit, a rechargeable battery pack (BN-V60U), and several connecting cables for audio/video output.
1.2 טעינת הסוללה
Before initial use, fully charge the battery pack. Connect the AC power adapter to the battery charger port on the battery pack, then plug the adapter into a standard electrical outlet. The charging indicator light will illuminate. Charging typically takes several hours. Refer to the battery pack for specific charging times.

Image: The JVC AC power adapter, used for charging the camcorder's battery and powering the unit directly from a wall outlet.
1.3 הכנסת הסוללה
Once charged, slide the battery pack onto the designated battery compartment on the rear of the camcorder until it clicks securely into place. Ensure it is firmly attached to prevent accidental disconnection during use.
1.4 Inserting a VHS-C Cassette
- Open the cassette compartment cover, usually located on the top or side of the camcorder.
- Insert a VHS-C cassette with the tape window facing outwards and the arrow on the cassette pointing towards the camcorder.
- Gently push the cassette until it seats correctly.
- Close the cassette compartment cover firmly until it latches.
2. הפעלת מצלמת הווידאו
2.1 הפעלה/כיבוי
To power on the camcorder, slide the POWER switch to the 'ON' position. The viewfinder or LCD screen will activate. To power off, slide the switch to 'OFF'.
2.2 הקלטה בסיסית
- Ensure a charged battery or AC adapter is connected and a VHS-C cassette is inserted.
- Open the LCD screen or extend the viewמוֹצֵא.
- כוון את מצלמת הווידאו אל נושא הצילום.
- הקש על רְשׁוּמָה button (usually red) to begin recording. The recording indicator will appear in the display.
- הקש על רְשׁוּמָה לחץ שוב על עצירת ההקלטה.
2.3 השמעה
כדי לחזורview your recordings:
- Switch the camcorder to PLAY/VCR mode (if available, otherwise use the menu).
- השתמש ב- לְשַׂחֵק, גלגל אחורה, ו FAST FORWARD כפתורים לניווט בקלטת.
- לִלְחוֹץ לְהַפְסִיק כדי לסיים את ההשמעה.
2.4 חיבור לטלוויזיה
אתה יכול view your recordings on a television using the supplied RF unit or A/V cables.
- Using the RF Unit: Connect the RF unit to the camcorder's A/V output and then to your TV's antenna/cable input. Tune your TV to the appropriate channel (usually channel 3 or 4).
- Using A/V Cables: Connect the yellow (video) and white/red (audio) cables from the camcorder's A/V output directly to the corresponding input jacks on your television. Select the correct A/V input on your TV.
2.5 פונקציית זום
השתמש ב- W (רחב) ו T (טלה) buttons or lever, typically located near the top of the camcorder, to zoom out or zoom in, respectively. The GR-25U features a 6x optical zoom.
2.6 התאמת פוקוס
The camcorder may feature an autofocus system. For manual focus, switch to מוקד ידני mode and rotate the focus ring on the lens until the image appears sharp in the viewמאתר או על מסך ה-LCD.
3. תחזוקה
3.1 ניקוי מצלמת הווידאו
- נגבו את החלק החיצוני של מצלמת הווידאו בעזרת מטלית רכה ויבשה. במקרה של לכלוך עיקש, נגבו מעטampen את הבד עם מים.
- Use a soft brush or air blower to remove dust from the lens. For smudges, use a lens cleaning cloth and solution specifically designed for optical lenses.
- Never use strong solvents like benzene or thinner, as they can damage the camcorder's finish.
3.2 טיפול בסוללה
- כדי להאריך את חיי הסוללה, הימנעו מפריקת הסוללה לחלוטין לעתים קרובות.
- אחסן סוללות במקום קריר ויבש כאשר אינן בשימוש.
- If the camcorder will not be used for an extended period, remove the battery.
3.3 ניקוי ראש הקלטת
Over time, tape heads can accumulate dirt, leading to poor picture or sound quality. Use a commercially available VHS-C head cleaning cassette periodically to maintain optimal performance. Follow the instructions provided with the cleaning cassette.
3.4 אחסון
When storing the camcorder, ensure it is powered off and the battery is removed. Store it in its carrying case in a dry, dust-free environment away from extreme temperatures and direct sunlight.
4. פתרון תקלות
This section addresses common issues you might encounter with your JVC GR-25U camcorder.
- אין כוח:
Ensure the battery is charged and correctly inserted, or the AC adapter is properly connected to a working power outlet. Check the power switch position. - אין הקלטה:
Verify that a VHS-C cassette is inserted and that the write-protect tab on the cassette is not set to 'SAVE' (red tab visible). Ensure the camcorder is in recording mode. - איכות תמונה ירודה (הפעלה):
This could indicate dirty video heads. Try using a head cleaning cassette. Also, check the condition of the VHS-C tape itself. - Tape Jamming:
Do not force the tape. Power off the camcorder and try to gently remove the cassette. If it remains jammed, seek professional service. Avoid using damaged tapes. - אין צליל במהלך השמעה:
Check the volume settings on the camcorder and your television. Ensure audio cables are correctly connected if playing back through a TV. - Camcorder Does Not Respond:
Remove the battery and/or disconnect the AC adapter, wait a few minutes, then reconnect and try again. This can reset the internal system.
5. מפרטים
The following are key technical specifications for the JVC GR-25U VHS-C VideoMovie Camcorder:
| מותג | JVC |
| מספר דגם | GR-25U |
| רזולוציית לכידת וידאו | 480p |
| גודל מסך | 2.7 אינץ' |
| תכונה מיוחדת | קַל מִשְׁקָל |
| UPC | 012886409938 |
| מספר חלק של היצרן | GR-25U VHS-C |
| מקור כוח | DC 9V (AC Adapter), DC 6V (Battery) |
| מִשׁקָל | משוער. 800 גרם (1.8 פאונד) |
| סוג קסטה | VHS-C |
| עֲדָשָׁה | f/1.2, 6x Zoom |
| מינימום תאורה | 3 לוקס |
| טמפרטורת הפעלה | 0°C עד 40°C (32°F עד 104°F) |
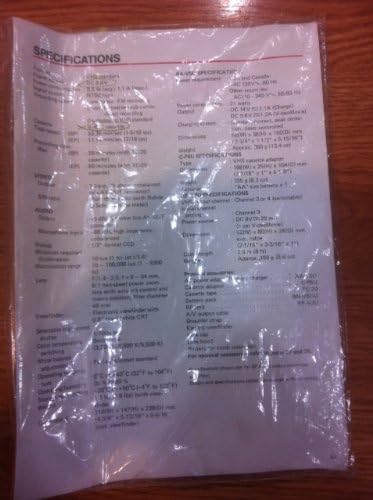
Image: A plastic-covered sheet detailing the technical specifications of the JVC GR-25U camcorder, including video, audio, and general characteristics.
6. אחריות ותמיכה
6.1 מידע אחריות
Warranty terms and conditions for the JVC GR-25U VHS-C VideoMovie Camcorder are typically provided at the time of purchase. Please refer to any warranty cards or documentation included with your original product packaging. For detailed information regarding warranty coverage, duration, and claims, please contact JVC customer service or visit their official webאֲתַר.
6.2 תמיכת לקוחות
Should you require further assistance, technical support, or service for your camcorder, please contact JVC customer support. Contact information can usually be found on the manufacturer's website or in the original product documentation. When contacting support, please have your camcorder's model number (GR-25U) and serial number ready.