
1. הקדמה
The ASUS P6X58D-E is an ATX form factor motherboard designed for Intel LGA 1366 processors, including the Intel Core i7 series and future 32nm 6-core processors. It features the Intel X58 chipset and supports DDR3 triple-channel memory. This motherboard incorporates advanced technologies such as USB 3.0 and SATA 6 Gb/s for high-speed data transfer, and ASUS exclusive innovations like Xtreme Phase power design and Stack Cool 3+ for enhanced performance and stability. This manual provides essential information for setting up, operating, and maintaining your motherboard.
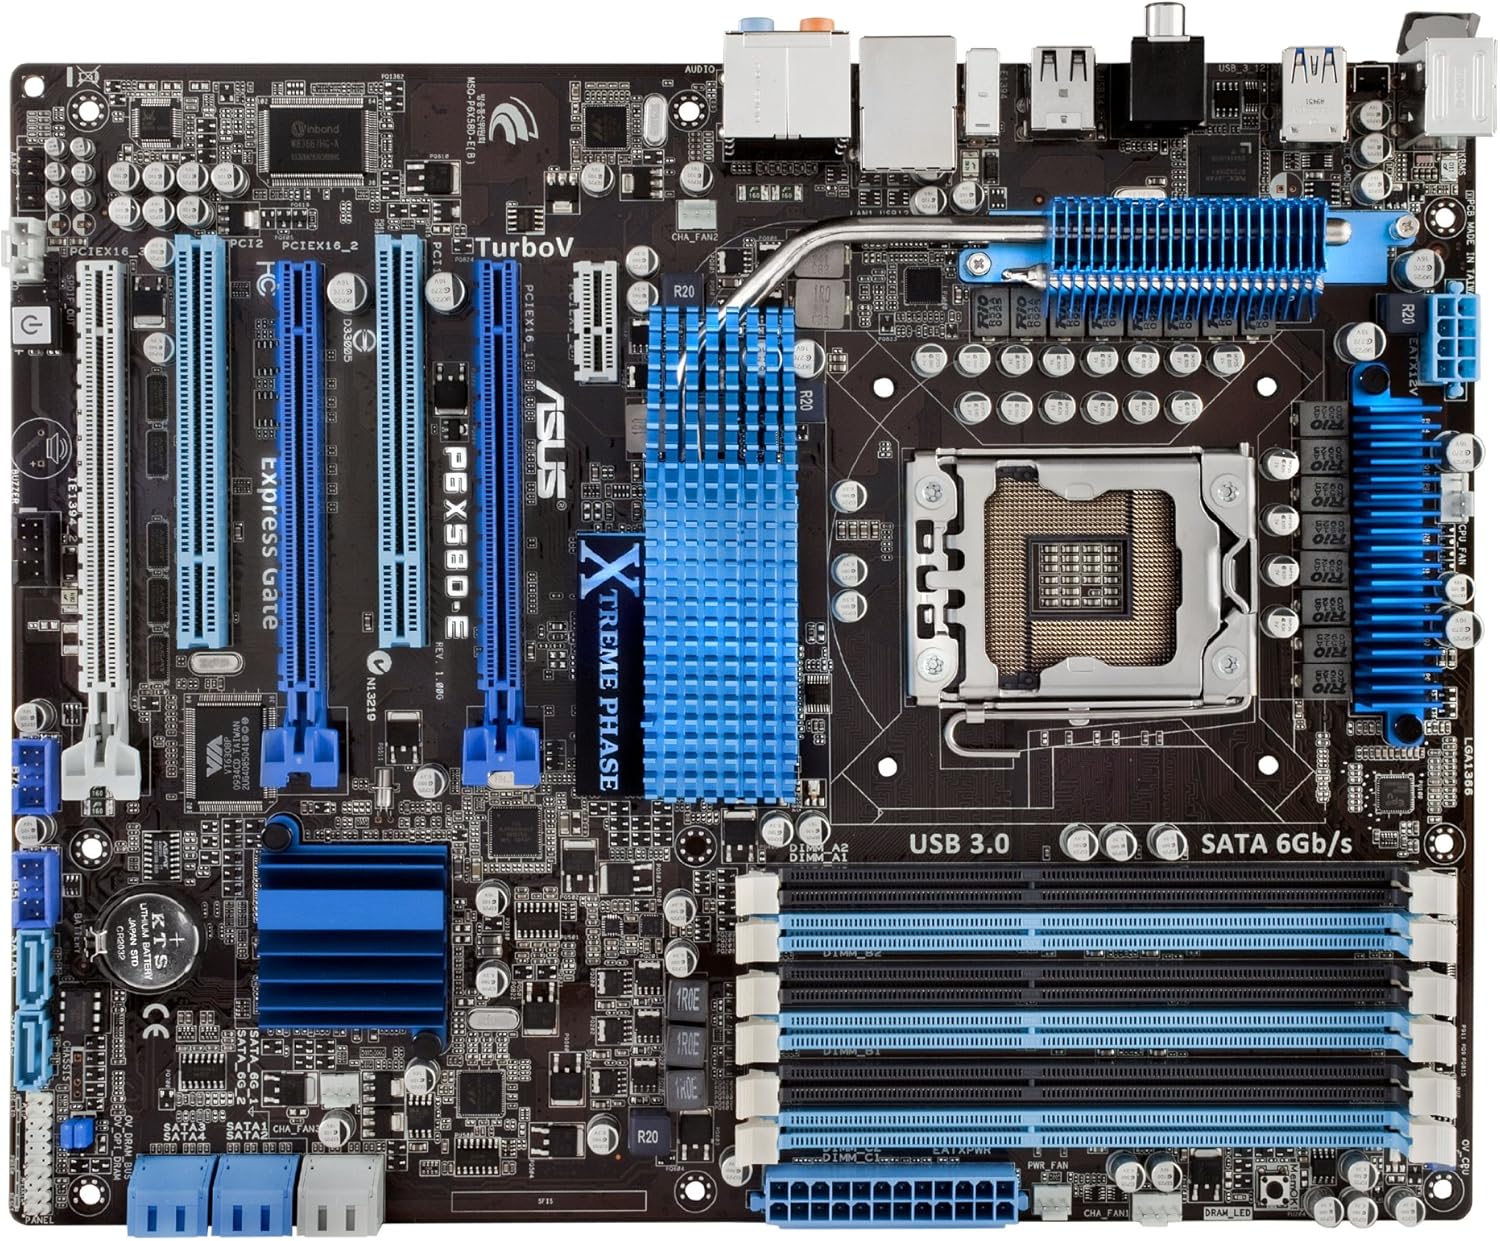
איור 1.1: מלמעלה למטה view of the ASUS P6X58D-E motherboard, highlighting key components like the CPU socket, RAM slots, and PCIe slots.
2. תכונות עיקריות
- שקע אינטל LGA 1366: Supports Intel Core i7 series processors and is ready for next-generation 32nm 6-core Intel LGA 1366 processors.
- Intel X58 Chipset: Provides robust performance and compatibility.
- Triple Channel DDR3 Memory: Six DIMM slots support up to 24GB of DDR3 2000 (O.C.)/1600/1333/1066 MHz non-ECC, un-buffered memory.
- TRUE USB 3.0 Support: Offers data transfer rates up to 4.8Gbps, 10 times faster than USB 2.0, and is backward compatible.
- TRUE SATA 6 Gb/s Support: Delivers data transfer rates up to 6.0Gb/s, doubling the bandwidth of previous SATA standards.
- תמיכה בריבוי GPU: Features three PCIe 2.0 x16 slots for NVIDIA 3-Way SLI or ATI Quad-GPU CrossFireX configurations.
- ASUS Xtreme Phase Power Design (16+2 Phase): Provides efficient power delivery to the CPU and memory controller, enhancing overclocking capability and component longevity.
- Stack Cool 3+: A fanless cooling solution with embedded copper layers in the PCB to effectively dissipate heat, reducing temperatures by up to 20°C (36°F).
- TurboV Tool: Allows real-time, precise voltage and frequency adjustments for optimized overclocking with micro-interval (0.02v) tuning.
- Express Gate SSD: Provides a quick-booting operating system for instant internet access and basic tasks.
3. תכולת החבילה
Verify that all items are present in your ASUS P6X58D-E motherboard package:
- ASUS P6X58D-E Motherboard
- מדריך למשתמש
- 4 x Serial ATA 3.0Gb/s Cables
- 2 x Serial ATA 6.0Gb/s Cables
- ASUS Q-Shield (I/O backplate)
- 2-in-1 Q-Connector (for front panel headers)
- 1 x ASUS 3-Way SLI Bridge Connector
- 1 x ASUS SLI Bridge Connector
- Support Disc (Drivers, Anti-virus software, ASUS Update, ASUS Utilities)
4. התקנה והתקנה
לפני תחילת ההתקנה, ודא שהמערכת כבויה ומנותקת משקע החשמל בקיר. ענד רצועת יד אנטי-סטטית כדי למנוע נזק לרכיבים כתוצאה מפריקה אלקטרוסטטית (ESD).
4.1. הכנת לוח האם
- התקנת מעבד: Carefully open the CPU socket lever. Align the triangular mark on the Intel LGA 1366 processor with the mark on the socket. Gently place the CPU into the socket without forcing it. Close the lever to secure the CPU.
- התקנת מקרר מעבד: Apply thermal paste to the CPU if not pre-applied on the cooler. Mount the CPU cooler according to its manufacturer's instructions, ensuring it is securely fastened and makes proper contact with the CPU.
- התקנת זיכרון (RAM): Open the clips on the DDR3 DIMM slots. Align the memory module's notch with the key in the slot. Press down firmly on both ends of the module until the clips snap into place. For triple-channel operation, refer to your manual for recommended slot population (typically slots A1, B1, C1 or similar).
- התקנת מגן קלט/פלט: Install the ASUS Q-Shield into the rear opening of your computer case.

איור 4.1: בזווית view of the motherboard, showing the CPU socket (LGA 1366) and six DDR3 memory slots.
4.2. Motherboard Installation into Case
- הרכבת לוח אם: Carefully place the motherboard into the computer case, aligning the screw holes with the standoffs. Secure the motherboard with screws.
- חבר ספק כוח: Connect the 24-pin ATX main power connector and the 8-pin CPU power connector from your power supply to the corresponding ports on the motherboard.
- התקנת כרטיסי הרחבה: Insert graphics cards into the PCIe 2.0 x16 slots. Ensure they are seated firmly and secured with the case's retention mechanism. Install any other expansion cards (e.g., sound cards, network cards) into available PCIe x1 or PCI slots.
- חיבור התקני אחסון: Connect SATA data cables from your hard drives, solid-state drives, and optical drives to the SATA 6 Gb/s (Marvell) or SATA 3 Gb/s (Intel ICH10R) ports on the motherboard. Connect SATA power cables from your power supply to these devices.
- חיבור כבלי הפאנל הקדמי: Use the 2-in-1 Q-Connector to simplify connecting the front panel headers (power button, reset button, HDD LED, power LED) to the motherboard. Connect front panel USB and audio cables.
- חיבור מאווררי מארז: חברו את מאווררי המארז לראשי המאווררים הזמינים בלוח האם.
4.3. Rear I/O Panel Overview

איור 4.2: Rear I/O panel connections. From left to right: PS/2 keyboard/mouse, USB 2.0, USB 3.0, Coaxial S/PDIF Out, Optical S/PDIF Out, LAN (RJ45), and 8-channel audio jacks.
- יציאות PS/2: לחיבור מקלדת ועכבר מדור קודם.
- יציאות USB 2.0: לחיבור התקני USB 2.0.
- יציאות USB 3.0: לחיבור התקני USB 3.0 במהירות גבוהה.
- יציאת LAN (RJ45): לחיבור רשת.
- שקעי אודיו: 8-channel audio output and input.
- S/PDIF Out (Coaxial & Optical): עבור פלט שמע דיגיטלי.
5. הוראות הפעלה
5.1. אתחול ראשון והגדרת BIOS
- לאחר הרכבת המערכת, חברו צג, מקלדת ועכבר.
- Power on your system. During the Power-On Self-Test (POST), press the DEL שוב ושוב כדי להיכנס לתוכנית השירות להגדרת BIOS.
- ב-BIOS, ודא שכל הרכיבים המותקנים (מעבד, זיכרון RAM, כונני אחסון) מזוהים כהלכה.
- Configure boot order to install your operating system from a USB drive or optical disc.
- שמור את השינויים וצא מה-BIOS. המערכת תופעל מחדש.
5.2. התקנת דרייבר
After installing your operating system, install the necessary drivers from the provided support disc or download the latest versions from the ASUS official webאתר. גורמים מרכזיים כוללים:
- מנהלי התקנים של ערכת השבבים
- מנהלי התקנים לאודיו
- מנהלי התקנים של LAN
- דרייברים של USB 3.0
- SATA 6 Gb/s Drivers
- דרייברים של כרטיסי מסך (מיצרן ה-GPU)
5.3. Overclocking with TurboV
The ASUS P6X58D-E features the TurboV tool for real-time system performance tuning. This utility allows for precise adjustments of CPU PPL, NB, NB-PCIe, and DRAM voltages in 0.02v intervals. Refer to the software manual on the support disc or ASUS website for detailed instructions on using TurboV for overclocking.
6. תחזוקה
- שמור על ניקיון: נקו באופן קבוע אבק מתוך מארז המחשב באמצעות אוויר דחוס. הצטברות אבק עלולה לגרום להתחממות יתר ולכשל רכיבים.
- ודא זרימת אוויר: Ensure proper airflow within your case by managing cables and ensuring fans are unobstructed.
- עדכוני BIOS: בדוק מעת לעת את התמיכה של ASUS website for BIOS updates. BIOS updates can improve stability, compatibility, and performance. Follow update instructions carefully.
- עדכוני דרייבר: עדכן את מנהלי ההתקנים שלך כדי להבטיח ביצועים אופטימליים ותאימות עם תוכנות וחומרה חדשות.
7. פתרון תקלות
סעיף זה מספק פתרונות לבעיות נפוצות שאתה עשוי להיתקל בהן.
- המערכת לא נדלקת:
- Check all power connections: 24-pin ATX, 8-pin CPU, and power cables to components.
- ודא שמתג ספק הכוח נמצא במצב פתוח.
- ודא את חיבור כפתור ההפעלה של הלוח הקדמי ללוח האם.
- אין פלט תצוגה:
- Ensure the monitor is connected to the graphics card (not the motherboard I/O if a dedicated GPU is installed).
- התקן מחדש את כרטיס המסך ואת מודולי הזיכרון.
- Test with a different monitor or graphics card if available.
- מערכת קופאת או קורסת:
- בדוק את טמפרטורות המעבד והכרטיס הגרפי. התחממות יתר עלולה לגרום לחוסר יציבות.
- הפעל כלי אבחון זיכרון כדי לבדוק אם יש שגיאות RAM.
- ודא שכל הדרייברים מותקנים כראוי ומעודכנים.
- בדוק אם יש חיבורים רופפים או רכיבים שאינם מחוברים כראוי.
- Storage Devices Not Detected:
- Verify SATA data and power cable connections.
- Check BIOS settings to ensure SATA ports are enabled and configured correctly (e.g., AHCI mode).
- Ensure drivers for SATA 6Gb/s controller are installed.
8. מפרטים
| רְכִיב | מִפרָט |
|---|---|
| שקע מעבד | LGA 1366 for Intel Core i7 Processor Extreme Edition/Core i7 Processor |
| ערכת שבבים | Intel X58 / ICH10R |
| זֵכֶר | 6 x DIMM, Max. 24GB, DDR3 2000 (O.C.)/1600/1333/1066 MHz Non-ECC, Un-buffered Memory, Triple channel memory architecture |
| Power Phase | 16+2 Xtreme Phase |
| PCIe 2.0 x16 Slots | 3 (at x16/x8/x8 or x16/x16/x1 mode) |
| תמיכה בריבוי GPU | ATI Quad-GPU CrossFireX / NVIDIA 3-Way SLI |
| LAN | Marvell 88E8056 Gigabit LAN controller featuring AI NET2 |
| שֶׁמַע | Realtek ALC889 8-Channel High Definition Audio CODEC, DTS support |
| אִחסוּן | 2x SATA 6 Gb/s (Marvell), 6x SATA 3Gb/s (Intel ICH10R, RAID 0,1,5,10 Support), 1x eSATA |
| יציאות USB | 8x USB 2.0 (4 rear, 4 by headers), 2x USB 3.0 (rear) |
| Firewire (1394a) | 2 ports (1 rear, 1 at mid-board) |
| גורם צורה | ATX (12 inch x 9.6 inch / 30.5 cm x 24.4 cm) |
| מידות | 13.5 x 11 x 3.1 אינץ' |
| משקל פריט | 3.8 פאונד |
9. מידע על אחריות
The ASUS P6X58D-E motherboard carries a אחריות מוצר מוגבלת לשנה. The warranty is based on the serial number printed on the product box. For detailed terms and conditions, please refer to the warranty card included in your package or visit the official ASUS support webאֲתַר.
10. תמיכה
For further assistance, technical support, driver downloads, or BIOS updates, please visit the official ASUS support webאֲתַר:
You can also refer to the comprehensive user manual provided on the support disc for more in-depth information.