
1. הקדמה
This manual provides instructions for the installation, configuration, and operation of your ASUS RT-N13U Wireless-N Router. The RT-N13U is a versatile networking device capable of functioning as a wireless router, an access point, or a wireless repeater. It also features a USB 2.0 port for enhanced functionalities such as printer sharing, FTP hosting, network storage, and direct BitTorrent downloading.
אנא קרא מדריך זה בעיון לפני השימוש במכשיר כדי להבטיח התקנה נכונה וביצועים אופטימליים.
2. המוצר נגמרview
2.1 תכונות עיקריות
- EZ All-in-One Printer Sharing: Utilize the USB port to share a printer across your network.
- EZ Switch: Easily switch between Router, Repeater, and Access Point modes with a single touch.
- Enhanced Download Master: הורד files directly to a connected USB hard drive even when your computer is off.
- קישוריות אלחוטית-N: Supports 802.11b/g/n standards for high-speed wireless networking.
- 4 LAN Ports: Provides four 10/100 Mbps Ethernet ports for wired connections.
- Diagnostic and Bandwidth Management Tools: Includes Dr. Surf and EZQoS for network monitoring and quality of service management.
2.2 תכולת החבילה
- ASUS RT-N13U Wireless-N Router
- מתאם מתח
- כבל Ethernet
- מדריך להתחלה מהירה
- Support CD (containing user manual and utilities)
2.3 ממשק חומרה
Familiarize yourself with the ports, buttons, and LED indicators on your RT-N13U router.
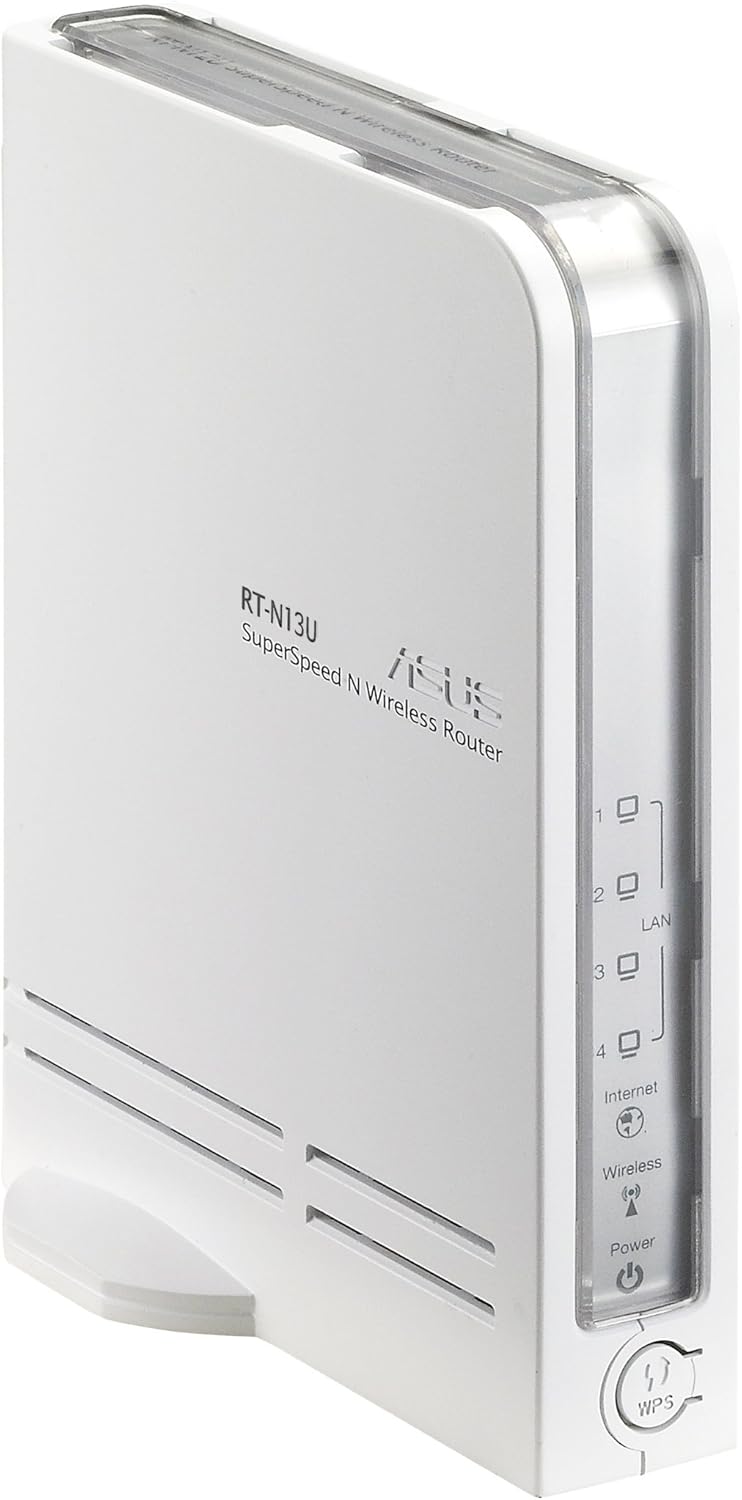
איור 1: חזית וצד View of the ASUS RT-N13U Router. This image shows the front panel with LED indicators for Power, Wireless, Internet, and LAN ports (1-4), along with the WPS button.

איור 2: אֲחוֹרִי View of the ASUS RT-N13U Router. This image displays the rear panel, including the USB 2.0 port, four LAN ports (yellow), one Internet (WAN) port (blue), and the power input port.
מחווני LED:
- LED מתח: מציין את מצב החשמל. ירוק קבוע להפעלה רגילה.
- LED אלחוטי: Indicates wireless activity. Blinks when data is being transmitted wirelessly.
- LED אינטרנט: Indicates internet connection status. Solid green for connected, blinking for activity.
- LAN 1-4 LEDs: Indicate activity on the respective LAN ports. Solid green for connected, blinking for activity.
- LED WPS: מציין את מצב ההגדרה המוגנת של Wi-Fi.
יציאות וכפתורים:
- יציאת USB 2.0: For connecting USB devices such as printers or external storage.
- יציאות LAN (1-4): Connect wired devices like computers or gaming consoles.
- יציאת אינטרנט (WAN): מתחבר למודם שלך לגישה לאינטרנט.
- יציאת חשמל: מתחבר למתאם החשמל המצורף.
- לחצן WPS: מפעיל את הגדרת Wi-Fi Protected Setup לחיבור אלחוטי קל.
- לחצן איפוס: (Typically a small pinhole button) Used to restore factory default settings.
- EZ Switch: A physical switch to change the device's operating mode (Router, AP, Repeater).
3. התקנה
3.1 חיבור חומרה ראשוני
- Connect the power adapter to the router's Power port and plug it into a power outlet.
- Connect one end of the Ethernet cable to the Internet (WAN) port of the RT-N13U and the other end to your modem's Ethernet port.
- (Optional) For initial configuration, connect your computer directly to one of the LAN ports (1-4) on the router using an Ethernet cable.
- Power on your modem, then power on the RT-N13U router. Wait for the Power, Internet, and Wireless LEDs to stabilize.
3.2 Configuration Modes
The RT-N13U supports three operating modes, selectable via the EZ Switch:
- מצב נתב: The default mode, where the device acts as a gateway for your network, providing internet access and managing local network traffic.
- מצב נקודת גישה (AP): Extends an existing wired network by adding wireless connectivity. In this mode, internet features are typically disabled, and the device acts as a wireless hub.
- מצב חוזר: Extends the range of an existing wireless network by receiving and re-transmitting the wireless signal.
Select the desired mode using the physical EZ Switch on the router before proceeding with software configuration.
3.3 Web גישה לממשק
- פתח א web browser (e.g., Chrome, Firefox, or IE8/Edge; IE9 beta may have compatibility issues).
- בשורת הכתובת, הקלד את כתובת ה-IP המוגדרת כברירת מחדל של הנתב (בדרך כלל
192.168.1.1orrouter.asus.com) והקש Enter. - הזן את שם המשתמש והסיסמה המוגדרים כברירת מחדל (בדרך כלל
adminfor both). Refer to the label on the bottom of your router if these defaults do not work. - Follow the on-screen setup wizard.
3.4 Internet Connection Setup (Router Mode)
If the EZ UI setup feature does not automatically configure your internet connection, manual steps may be required, especially for certain Internet Service Providers (ISPs).
- Gather Information:
- Your computer's MAC address (Physical Address). On Windows, open Command Prompt and type
ipconfig /all. - Your ISP's DNS server addresses. If connected via Ethernet, use
ipconfig /allto find "DNS Servers".
- Your computer's MAC address (Physical Address). On Windows, open Command Prompt and type
- Access Network Map: בנתב web interface, navigate to the "Network Map" or "EZ-UI" section.
- תצורה ידנית: If the connection fails, the system may prompt for manual configuration.
- נצל את שיבוט MAC feature. Some ISPs tie your internet service to a specific MAC address. Cloning your computer's MAC address to the router can resolve connectivity issues.
- Manually enter your ISP's DNS server addresses if required.
- Apply Settings and Restart: Apply the new settings. The router will restart. Your computer may temporarily lose connection. Reconnect to the router.
- Power Cycle (If Needed): If the internet connection is still not established:
- Power off the wireless router.
- Power off your modem/ISP's box.
- המתן 5 דקות.
- First, power on the modem/ISP's box and wait for it to fully boot.
- Then, power on the ASUS RT-N13U router.
- Check for internet connectivity.
Note: For optimal wireless performance, ensure the wireless radio is set to "N only" mode in the router's settings if all your devices support 802.11n.
4. תפעול
4.1 חיבור התקנים
חיבורים קוויים:
Connect Ethernet-enabled devices (e.g., desktop computers, smart TVs, gaming consoles) to the yellow LAN ports (1-4) on the back of the router using Ethernet cables.
חיבורים אלחוטיים:
- במכשיר האלחוטי שלך (מחשב נייד, סמארטפון, טאבלט), חפש רשתות Wi-Fi זמינות.
- Select the network name (SSID) of your ASUS RT-N13U (default SSID is usually "ASUS" or "ASUS_RT-N13U").
- Enter the network security key (password). This can be found on a label on the router or in the router's web מִמְשָׁק.
- Alternatively, press the WPS button on the router and then activate WPS on your wireless device within two minutes for a quick connection.
4.2 תכונות USB
The USB 2.0 port on the RT-N13U provides additional functionalities:
שיתוף מדפסות:
Connect a compatible USB printer to the USB 2.0 port. Configure printer sharing through the router's web interface to allow multiple computers on your network to print to it.
הורדת מאסטר:
Connect a USB storage device (e.g., external hard drive, flash drive) to the USB 2.0 port. The Download Master feature allows you to initiate downloads (including BitTorrent) directly to the connected storage device, even when your computer is turned off. This feature typically works only when the router is in Router Mode.
Note: Ensure the USB storage device is formatted correctly and recognized by the router. For BitTorrent downloads, you may need to provide the exact URL location for the downloader to function properly.
5. תחזוקה
5.1 עדכוני קושחה
Regularly updating the router's firmware is crucial for performance improvements, security enhancements, and bug fixes. Visit the official ASUS support website for the RT-N13U model to download the latest firmware. Follow the instructions provided with the firmware update package carefully to avoid damaging the device.
Note: Firmware updates can resolve many common issues and improve compatibility with various devices and services.
5.2 שחזור ברירות מחדל של היצרן
If you encounter persistent issues or forget your login credentials, you can restore the router to its factory default settings. This will erase all custom configurations.
- With the router powered on, locate the Reset button (often a small pinhole) on the device.
- השתמשו באטב נייר או בחפץ מחודד דומה כדי ללחוץ והחזיקו את כפתור האיפוס למשך כ-5-10 שניות.
- Release the button when the Power LED starts blinking rapidly or all LEDs briefly flash.
- The router will restart with factory default settings. You will need to reconfigure it from scratch.
6. פתרון תקלות
6.1 בעיות ופתרונות נפוצים
- אין חיבור אינטרנט:
- בדוק את כל חיבורי הכבלים (מהמודם ליציאת WAN של הנתב, מהנתב ליציאת LAN של המחשב).
- Perform a power cycle on both your modem and router (unplug, wait 5 minutes, plug modem first, then router).
- Verify your ISP settings in the router's web interface, especially if MAC cloning or specific DNS servers are required.
- Ensure the router is in the correct operating mode (Router Mode for internet access).
- לא ניתן לגשת לנתב Web מִמְשָׁק:
- ודא שהמחשב שלך מחובר לנתב (חוטי או אלחוטי).
- Verify the IP address (e.g.,
192.168.1.1) is correct. - נסה אחרת web דפדפן.
- השבת זמנית כל תוכנת חומת אש או אנטי-וירוס במחשב שלך.
- אם שכחת את הסיסמה, בצע איפוס להגדרות היצרן (ראה סעיף 5.2).
- מהירות אלחוטית איטית או ניתוק חיבורים:
- ודא שהקושחה של הנתב מעודכנת.
- בדוק אם יש הפרעות אלחוטיות ממכשירים אחרים (טלפונים אלחוטיים, מיקרוגלים).
- Adjust the wireless channel in the router settings.
- Position the router in a central location, away from obstructions.
- If all devices support 802.11n, set the wireless mode to "N only" for higher speeds.
- התקן USB לא מזוהה:
- Ensure the USB device is properly connected and powered (if external power is required).
- בדוק את הנתב web interface for USB device status and configuration.
- Verify compatibility of the USB device with the router.
- Ensure the router is in Router Mode for USB features like Download Master.
6.2 משמעויות מחוון ה-LED
| מחוון LED | סטָטוּס | תֵאוּר |
|---|---|---|
| כּוֹחַ | ירוק מלא | המכשיר מופעל ופועל כרגיל. |
| כבוי | המכשיר כבוי. | |
| אַלחוּט | ירוק מלא | פונקציה אלחוטית מופעלת. |
| ירוק מהבהב | Wireless data transmission is active. | |
| לַאִינטֶרנֶט | ירוק מלא | מחובר לאינטרנט. |
| ירוק מהבהב | Internet data transmission is active. | |
| כבוי | אין חיבור לאינטרנט. | |
| LAN 1-4 | ירוק מלא | התקן מחובר ליציאת LAN המתאימה. |
| ירוק מהבהב | Data transmission is active on the corresponding LAN port. | |
| WPS | מהבהב | WPS connection process is active. |
7. מפרטים
| תכונה | פְּרָט |
|---|---|
| שם הדגם | RT-N13U |
| תקן אלחוטי | 802.11b/g/n |
| רצועת תדרים | פס יחיד (2.4 גיגה-הרץ) |
| טכנולוגיית קישוריות | אלחוטי, אתרנט |
| יציאות Ethernet | 4 x רשתות LAN של 10/100 מגה-ביט לשנייה, רשת WAN של 10/100 מגה-ביט לשנייה אחת |
| יציאת USB | 1 x USB 2.0 |
| סוג אנטנה | פְּנִימִי |
| תכונות מיוחדות | Access Point Mode, Repeater Mode, WPS, Printer Sharing, Download Master |
| מידות המוצר | 10 x 8.88 x 3.75 אינץ' |
| משקל פריט | 5.3 אונקיות (כ-150 גרם) |
| יַצרָן | ASUS |
| תאריך זמין ראשון | 28 בספטמבר 2009 |
8. מידע בטיחות
- Use only the power adapter provided with the device. Using an incompatible adapter may damage the device and void your warranty.
- אין לחשוף את המכשיר למים, לחות או לטמפרטורות קיצוניות.
- הנח את המכשיר באזור מאוורר היטב כדי למנוע התחממות יתר.
- אל תפתח את המכשיר גasinז. יש לבצע את הטיפולים אך ורק על ידי אנשי צוות מורשים.
- הרחק את המכשיר משדות אלקטרומגנטיים חזקים.
9. אחריות ותמיכה
For warranty information, technical support, and further assistance, please visit the official ASUS support website or contact ASUS customer service. Details can typically be found on the ASUS webבאתר או בתיעוד המצורף למוצר שלך.
תמיכה של ASUS Webאֲתַר: www.asus.com/support/