
1. הקדמה
תודה על הרכישהasing the Karcher KA 350 Compact Stereo System. This versatile audio system combines modern design with a wide range of playback options, including a 3-disc CD changer, dual cassette deck, turntable, USB port, SD card reader, and an integrated radio. This manual provides essential information for safe operation, setup, and maintenance of your device. Please read it thoroughly before use and retain it for future reference.
2. הוראות בטיחות חשובות
- מקור כוח: ודא את אספקת החשמל כרךtage תואם לתווית הדירוג שעל היחידה.
- אוורור: אין לחסום פתחי אוורור. יש להשאיר מרווח מספיק סביב היחידה לזרימת אוויר תקינה.
- מים ולחות: אין לחשוף את המכשיר לגשם, לחות, טפטופים או התזות. אין להניח חפצים מלאים בנוזלים, כגון אגרטלים, על המכשיר.
- חוֹם: הרחק את היחידה ממקורות חום כגון רדיאטורים, אוגרי חום, תנורים או מכשירים אחרים (כולל ampמחצבים) המייצרים חום.
- ניקוי: נתקו את המכשיר משקע החשמל לפני הניקוי. השתמשו במטלית רכה ויבשה בלבד.
- שֵׁרוּת: אל תנסה לתת שירות למוצר זה בעצמך. הפנה את כל השירות לאנשי שירות מוסמכים.
- יְלָדִים: יש להרחיק את המכשיר והאביזרים שלו מהישג ידם של ילדים.
- בטיחות לייזר: This product uses a laser. Use of controls or adjustments or performance of procedures other than those specified herein may result in hazardous radiation exposure.
3. תכולת החבילה
אנא בדקו שכל הפריטים נמצאים ובמצב תקין:
- Karcher KA 350 Compact Stereo System (Main Unit)
- שְׁלַט רָחוֹק
- מדריך הוראות
- רמקולים סטריאו (2 יחידות)
- כבל חשמל
- אנטנת FM (סוג חוט)
4. המוצר נגמרview
4.1 בקרות בלוח הקדמי
The front panel provides access to all primary functions and controls for the KA 350 system.

איור 4.1: פקדים בלוח הקדמי
- כפתור הפעלה/המתנה: מפעיל או מכבה את היחידה.
- לחצן FUNCTION: Selects between CD, Tuner (Radio), Phono (Turntable), Tape (Cassette), and USB/SD modes.
- ידית VOLUME: כוונון עוצמת הקול הראשית.
- בקרות תקליטור: Play/Pause, Stop, Skip/Search (Forward/Backward), Open/Close CD tray.
- בקרות קלטת: Play, Record, Fast Forward, Rewind, Stop/Eject for Deck 1 and Deck 2.
- USB/SD Controls: Play/Pause, Stop, Skip/Search (Forward/Backward).
- בקרות טיונר: Band selection (AM/FM), Tuning Up/Down, Memory presets.
- לְהַצִיג: מציג את המצב הנוכחי, פרטי הרצועה, תדר רדיו ושעה.
4.2 חיבורי לוח אחורי
The rear panel houses all necessary input and output connections for the system.
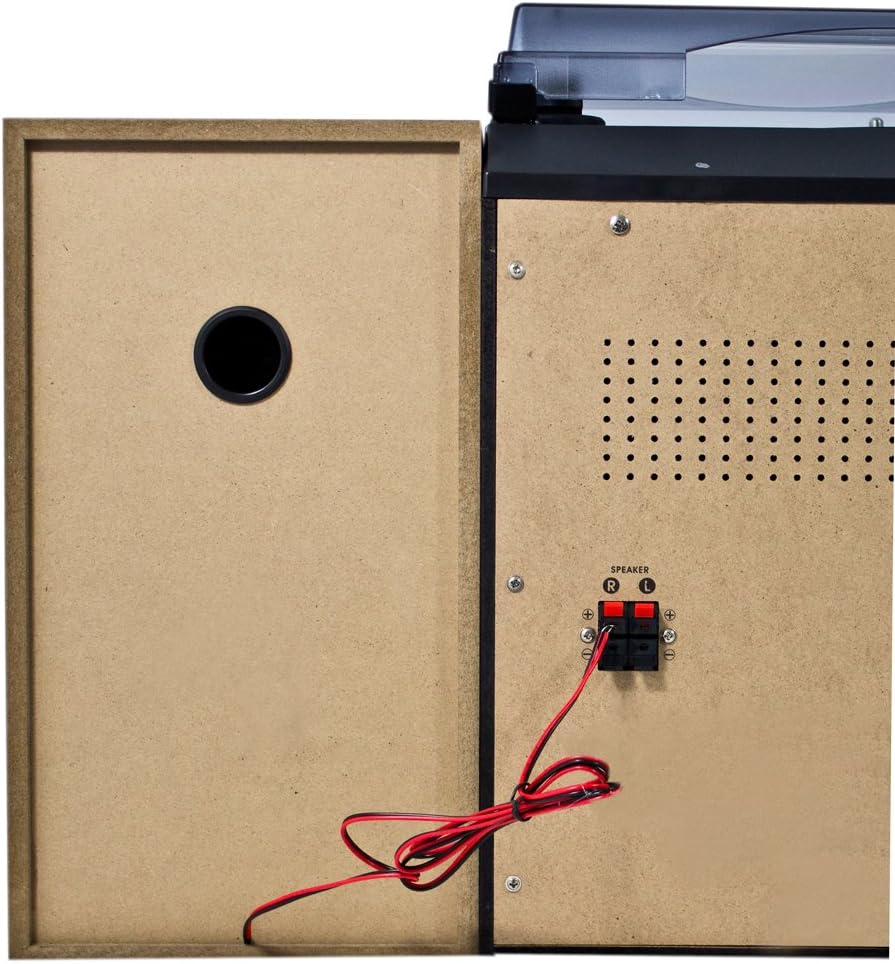
איור 4.2: חיבורי הפאנל האחורי
- חיבורי רמקולים (ימין/שמאל): Connect the included stereo speakers. Ensure correct polarity (+ to + and - to -).
- כניסת מתח AC: חבר את כבל החשמל כאן.
- מסוף אנטנת FM: Connect the supplied FM wire antenna for radio reception.
4.3 רכיבים עיקריים

Figure 4.3: Karcher KA 350 Main Components
- פָּטֵיפוֹן: Located on top, for playing vinyl records.
- 3-Disc CD Changer: Front-loading tray for multiple CDs.
- Dual Cassette Deck: Two cassette compartments for playback and recording.
- יציאת USB: לחיבור כונני הבזק מסוג USB.
- חריץ לכרטיס SD: להכנסת כרטיסי זיכרון SD.
- רמקולים סטריאו: Two external speakers for audio output.
5. התקנה
5.1 פריקה ומיקום
- הסר בזהירות את כל הרכיבים מהאריזה.
- הנח את היחידה הראשית על משטח יציב ושטוח.
- Position the speakers on either side of the main unit, ensuring they are at an equal distance for optimal stereo sound.
- ודא שיש אוורור נאות סביב היחידה.
5.2 חיבור הרמקולים
Connect the supplied speakers to the speaker terminals on the rear of the main unit.

Figure 5.1: Speaker Unit
- Identify the speaker wires. Each wire typically has two strands, one marked for positive (+) and one for negative (-).
- Connect the positive (+) terminal of the left speaker to the 'L+' terminal on the main unit's rear panel.
- Connect the negative (-) terminal of the left speaker to the 'L-' terminal on the main unit's rear panel.
- Repeat the process for the right speaker, connecting it to the 'R+' and 'R-' terminals.
- Ensure all connections are secure to prevent sound distortion or damage.
5.3 חיבור אנטנת ה-FM
For optimal radio reception, connect the supplied FM wire antenna.
- Insert the FM antenna plug into the FM antenna jack on the rear panel.
- Extend the wire antenna fully and position it for the best possible reception. You may need to experiment with its placement.
5.4 חיבור מתח
- Plug the AC power cable into the AC power input on the rear of the main unit.
- חבר את הקצה השני של כבל החשמל לשקע חשמל סטנדרטי בקיר.
6. הוראות הפעלה
6.1 הפעלה/כיבוי
הקש על בסטנד ביי בלוח הקדמי או בשלט רחוק כדי להפעיל או לכבות את היחידה.
6.2 בחירת מצבים
הקש על פוּנקצִיָה button repeatedly to cycle through the available modes: CD, Tuner (Radio), Phono (Turntable), Tape (Cassette), and USB/SD.
6.3 הפעלת נגן התקליטורים

Figure 6.1: CD Changer Tray
- הקש על פוּנקצִיָה כפתור לבחירת מצב CD.
- הקש על פתח/סגור לחצן כדי לפתוח את מגש התקליטורים.
- Place up to three CDs onto the disc trays, label side up.
- הקש על פתח/סגור כפתור שוב כדי לסגור את המגש.
- הקש על PLAY/PAUSE כפתור להפעלת השמעה.
- השתמש ב- דילוג / חיפוש buttons to navigate between tracks or fast forward/rewind.
6.4 הפעלת נגן/מקליט קלטות
- הקש על פוּנקצִיָה button to select TAPE mode.
- הקש על עצור/הוצאה button on either Deck 1 or Deck 2 to open the cassette compartment.
- הכנס סרט קלטת וסגור את התא.
- הקש על לְשַׂחֵק כפתור להפעלת השמעה.
- To record, insert a blank tape into Deck 2 (for recording from Deck 1 or other sources) or Deck 1 (for recording from external sources if applicable). Press the רְשׁוּמָה לַחְצָן.
6.5 הפעלת הפטיפון
- הקש על פוּנקצִיָה button to select PHONO mode.
- פתח את מכסה האבק.
- הניחו תקליט ויניל על מגש התקליטים.
- בחר את המהירות המתאימה (33, 45 או 78 סל"ד) באמצעות מתג בורר המהירות.
- Carefully lift the tone arm and place the stylus onto the desired groove of the record.
- At the end of the record, manually return the tone arm to its rest.
6.6 השמעת USB/SD
- הקש על פוּנקצִיָה button to select USB/SD mode.
- הכנס כונן הבזק מסוג USB ליציאת ה-USB או כרטיס SD לחריץ כרטיס ה-SD.
- היחידה תזהה באופן אוטומטי ותתחיל להשמיע אודיו תואם file(MP3, WMA, AAC).
- השתמש ב- PLAY/PAUSE ו דילוג / חיפוש לחצנים לשליטה בהפעלה.
6.7 תפעול רדיו
- הקש על פוּנקצִיָה button to select TUNER mode.
- הקש על לְהִתְאַגֵד button to select between FM and AM bands.
- השתמש ב- כִּונוּן buttons to manually tune to a station or press and hold for automatic scanning.
- כדי לשמור תחנה, לחצו על הלחצן זֵכֶר כפתור ולאחר מכן השתמש ב דילוג / חיפוש כדי לבחור מספר מוגדר מראש, ולחצו על הכפתורים זֵכֶר שוב כדי לאשר.
שלט רחוק 6.8
The included remote control allows convenient operation of all functions from a distance. Ensure batteries are correctly inserted.
7. תחזוקה
7.1 ניקוי היחידה
- נתק תמיד את המכשיר משקע החשמל לפני הניקוי.
- השתמש במטלית רכה ויבשה כדי לנגב את המשטחים החיצוניים.
- אין להשתמש בחומרי ניקוי שוחקים, שעווה או ממיסים מכיוון שהם עלולים לפגוע בגימור.
7.2 טיפול בסטיילוס של פטיפון
- Handle the stylus with extreme care. Only touch the tone arm, not the stylus itself.
- נקו את העט מעת לעת בעזרת מברשת רכה, תוך צחצוח מאחורה קדימה.
- Replace the stylus when it shows signs of wear (e.g., distorted sound, skipping).
7.3 טיפול בסיפון קסטות
- Regularly clean the tape heads, capstan, and pinch roller with a cotton swab lightly dampהסתיים עם איזופרופיל אלכוהול.
- Demagnetize the tape heads periodically to maintain sound quality.
8. פתרון תקלות
| בְּעָיָה | סיבה אפשרית | פִּתָרוֹן |
|---|---|---|
| אין כוח | כבל חשמל לא מחובר; שקע החשמל אינו פעיל | בדוק את חיבור כבל החשמל; נסה שקע אחר |
| אין קול | Volume too low; Speakers not connected correctly; Incorrect function mode selected | Increase volume; Check speaker connections and polarity; Select correct function mode |
| דילוג על תקליטור או אי הפעלה | CD is dirty or scratched; CD inserted incorrectly | Clean or replace CD; Insert CD label side up |
| קליטת רדיו גרועה | Antenna not connected or poorly positioned; Weak signal | Connect and adjust FM antenna; Try repositioning the unit |
| Turntable speed incorrect | נבחרה מהירות שגויה | Adjust the speed selector switch (33/45/78 RPM) |
| בעיות נגינה ב-USB/SD | מְנוּגָד file format; USB/SD card not inserted correctly; Corrupted files | לְהַבטִיחַ files are MP3, WMA, or AAC; Reinsert USB/SD card; Try a different USB/SD card |
9. מפרטים
| תכונה | מִפרָט |
|---|---|
| מותג | קרצ'ר |
| מספר דגם | ק"א 350 |
| טכנולוגיית קישוריות | FM/MW Tuner, USB, SD |
| צֶבַע | שָׁחוֹר |
| סוג רמקול | Stereo (2 speakers included) |
| מידות פריט (L x W x H) | 70.5 x 41 x 37.3 ס"מ |
| מקור כוח | חשמלי עם כבלים |
| מכשירים תואמים | Smartphone, Tablet, MP3 Player, Personal Computer |
| משקל פריט | 10.8 קילוגרם |
| יציאת חשמל (RMS) | 2 x 5 W (Total 50 W) |
| Supported Media Standards | MP3, CD, Cassette, USB, SD |
| פורמטי שמע נתמכים | CD-DA, MP3, WMA, AAC |
| תמיכה בלוטות' | לֹא |
| מספר הרמקולים | 2 |
| מצב פלט שמע | סטריאו |
| תצורת סאונד סראונד | 2.0 |
| רכיבים כלולים | Compact system, Remote control, Instruction manual |
10. אחריות ותמיכה
For warranty information and technical support, please refer to the warranty card included with your product or visit the official Karcher webאתר. שמור את הוכחת הרכישה שלך עבור כל תביעת אחריות.
יַצרָן: קרצ'ר


